The King Holds Court
The Antler King is ready to hold court. I added a bit of dark stain after I did some finer detail on the eyes, hair and beard to pick up the highlights.
A fun project.


The Antler King is ready to hold court. I added a bit of dark stain after I did some finer detail on the eyes, hair and beard to pick up the highlights.
A fun project.
Our little antler man got crowned this weekend. We’re both pretty pleased with the coronation.
This power carving of the elk antler with the Foredom tool has been a lot of fun so far. If this catches your interest like it caught mine, give it a try. A word of caution…I really work hard at keeping the dust levels down by doing the carving over a dust collector. I also use a very good dust mask, and you should too.

I thought that I had mentioned the story about the elk antlers in one of my blog posts, but I guess that I hadn’t.
Well…I came across the artwork of a phenomenally good artist who happens to live in Minsk, Belarus and carves faces and busts out of elk antlers. His name is Андрей Сагалов and if you were to copy and paste his name into Facebook, you’ll come across his many carvings.
I admired his carvings for so long that I finally put the word out that I needed a small piece of elk antler. In no time at all, my sister-in-law, Bonnie and her husband, Steve, came up with a huge…I mean, huge…set of antlers that had been shed. On my last trip down to Niagara, I picked them up. After visiting my daughter along the way and losing one half of the antlers to her sense of family room decorating, I finally got them home and on the bandsaw.
So, this is the result so far of my rendition of my Facebook friend’s style of carving. Of course this is all done with a Foredom tool and cutting bits that you’d expect to see at a dentist’s office. That top piece will be a crown of sorts by the end of the weekend.
Click on the picture to make it bigger.


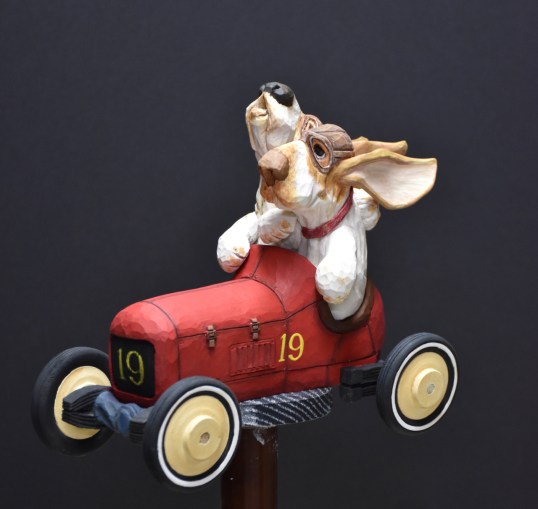
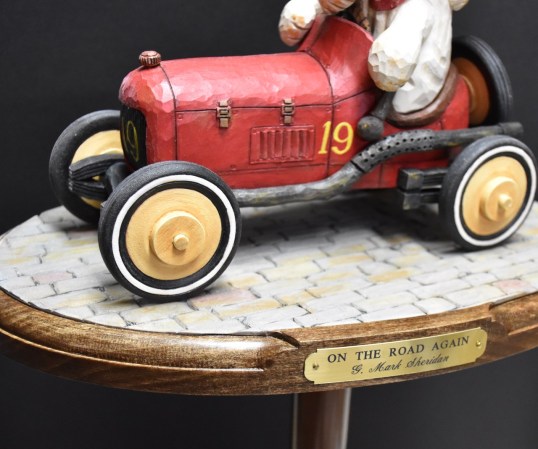
Here are some final photos of the carving. That was a really enjoyable carving to do and the first time that I’ve carved a vehicle. I enjoyed that so much that the next caricature that I do is going to include a scooter and sidecar!


I picked up a nice piece of hardwood and cut out an oval shape for the base. After routing in a nice edge and leaving about an 1/8″to play with, I carved in an alternating pattern of cobblestone.
The first thing that I did was use a gouge to create troughs in the roadway where car and wagon wheels would have depressed the roadway from constant use. Once that was done, the cobblestone was first laid out using a v-tool chisel and then with a gouge I made the surface of each cobblestone irregular with little bumps and dips in it…because no one has ever seen perfectly flat cobblestone. That perfectly flat stone in the walkway to your house ain’t cobblestone.
Once that was done, I clipped a few corners of the stones and created a few cracks in others to give it a real worn look and followed up with a wood burner to make the cracks and lines really crisp.
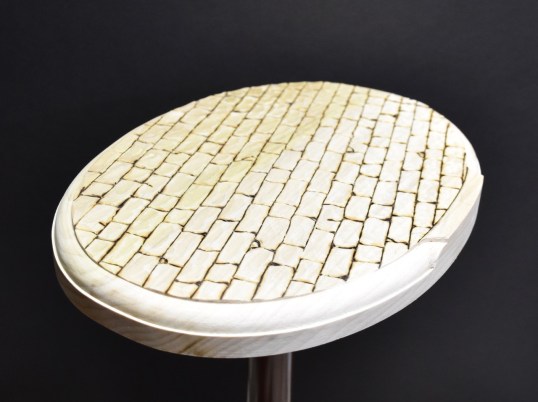
The painting was done with a base coat of grey. Some of the stones were then given a wash of barnyard red, whereas others got a wash of yellow ochre. To add a little dirt and mud, some smudging with yellow ochre and raw sienna did the trick. Finally, to take some of the brightness away and leave the cracks between the stones a bit darker, several washes of payne’s grey were applied.
The routered edge got a dark stain followed by a few coats of satin urethane. The cobblestone had satin urethane applied and then wiped away almost immediately with a paper cloth to ensure that there would be no shine left on the coloured stones.
Finally, a nice brass nameplate was added…and I think it all looks pretty good. A couple more touches and we’re done.
I attended this year’s show in Kars this weekend put on by the Outaouais Wood Carvers and had a great time. A big part of making it a great weekend was meeting up with my cousin, Humphrey, in Ottawa and spending a good portion of the day with him visiting the Canadian War Museum and later attending the carving show. Humphrey and I have a shared interest in remembering the Sheridan history and although his research exceeds mine, I always enjoy the tidbits of information that we share to puzzle the picture together.
Later at the carving show, we were treated to some great carvings. Although I would have liked to have brought my latest carving along, it would have been too rushed to be ready so “A Moving Experience” took the trip with me. Mervin the Mover received Best in Class, Best in Division and Judges’ Sentimental Favourite ribbons.

Some terrific carvings and pyrography works were displayed as well. You can click on the photos below to enlarge them.


The highlight for me in the carving show was presented by my friend, Tony Endhoven, who created a tremendous carving accented by his pyrography skills and entitled “A Death of Innocence.” As I stood around chatting with Tony, I was stunned with how many people were approaching him to thank him for doing the carving. Very well done.

Happy Mother’s Day to all of you carvers and art lovers who have a day job being a mom!
My Mom’s in Niagara Falls. She’s a great mom…how many moms would have let their young son play with sharp knives!
Paul started the day off right with a hand-crafted card and a nice gift. It’s sunny and warm today and we’ll do our best to pamper Peggy…she more than deserves it.

On a less celebratory note, I picked up a nice piece of hard wood and cut out the base for the carving. I think that I’m going to carve some cobblestone into the base as the roadway to match the era of the car. The little flat section in the middle is where the nameplate will be fastened.

From this and the previous photo, you can see the difference in the colour of the carving after the urethane has been applied. The sealing coat really brings out the colours that were fairly subtle when they were just the flat acrylic. You can also see the addition of the “leather-wrapped” steering wheel, the hand lever and the radiator cap. Still need to add a small hub cap on the wheels. Lots of fun.

You can look back a few posts earlier where I cut the two mufflers and tail pipes out of basswood and them shaped them with a carving knife. Today, I did a little extra detailing and painted them up. I also carved a little gear shift lever that’s at the driver’s right paw.
I actually carved a couple of heat shields into the tailpipe. These were simply there so that the passengers in the open cockpit didn’t inadvertently touch an elbow on a hot pipe. They were typically perforated for better cooling, so I used the rounded tip of a Foredom tool to quickly put some dimples into the shields.
I also added a couple of small dowels to each pipe to locate it properly along and under the car. Once I’ve applied the final sealing coat of urethane, I’ll epoxy these dowels and the general area around the dowel to the car.
The mufflers got several washes of mixtures of asphaltum brown and carbon black. This was followed with some blotches of asphaltum, raw sienna and yellow ochre. When this was all done, it started to look like a pipe that had gone through a few heating cycles and a few mud puddles! I topped it off with a dry brushing of silver…a little heavier on the heat shield sections and a bit lighter on the rest of the pipe.
I still need to add a steering wheel, radiator cap, starter crank and some wheel hub nuts and then I think it’ll be ready for it’s seal coat of urethane.
Just click on the photos to make them bigger.


Our little racer isn’t a show piece that stays in the garage, so we want it to look like it’s enjoyed.
To do that, I first used yellow ochre and raw sienna to highlight a few spots that have picked up some dirt along the roads. I don’t actually paint this on in the usual sense. I just put a small dab on the end of a brush and, after wiping a lot of it away on a paper towel, I rub the brush into a small area of the carving. This ends up giving it a nice blended look rather than just a spot of paint.
Following that, I dry brush on a light beige by just lightly using the tips of the brush to catch the high points of the carving. Again, very little paint is used on the brush and most is wiped off on a paper towel before touching the carving. The brush is similar to the brush a woman would use to apply blush…be sure to use your wife’s if you’re brave. This method gave the car a dusty and scuffed appearance…similar to how you’re going to look if you use your wife’s cosmetic brush.
What do you think? Once I get the urethane final finish on the paint, the colours and highlights will get really enhanced.


It’s starting to look like a racer now.
I highlighted all of the panel lines on the car with a mixture of cherry red and asphaltum brown. I also added a number of rivets/fasteners and highlighted them with a very thin wash of the same colour mixture. The rivets were made with the end of a centre punch that I have that happens to have a nice round hollowed out end that leaves a great rivet impression when pressed into the wood.
I also painted the combing around the cockpit to look like cushioned leather. The leather is painted with milk chocolate and a wash shadow of asphaltum on the lower edges.
The radiator got some vertical veins in it by making finely spaced burned lines with a wood burning tool. Then it was painted a combination of asphaltum and carbon black before the yellow number 19 was applied.
Now it needs some dirt thrown here and there for highlights.