tributesinwood

Wood Carvings by Mark Sheridan

Archive for the tag “Basset Hound Carving”

The Completed Basset

A few Christmas carvings along with eating all kinds of Christmas goodies got in the way of completing my latest Basset in a Basket! But here it is all finished.

Finishing included a variety of washes of different tones of brown on the darker sections of the little hound along with a slightly off-white for the remainder. The basket also has a number of tones but predominantly yellow-ochre and shades of almost a butterscotch colour.

Everything was topped off with a light coat of satin urethane that was mostly wiped away before it set.

Advertisement

A Little Unhinged?

Actually, a bit hinged as I wanted to include a couple of handles on the front and back of the basket.

A pretty simple addition, really…just some household copper wire strung through a hardwood carved handle and then bent to fit in some holes that I drilled into the basket. After painting, I’ll glue the copper wire in place.

A Bit More Basset Detail

I’ve been shovelling snow more than I’ve been carving the little Basset Hound, lately.

But I have put a little bit of time into carving. I’ve actually been joining a group of fellows at our local Seniors’ Centre for some carving once a week and have been enjoying that…and managed to finish a bark carving and a Santa figure ( which my Mom now has ). Next week, I’m providing an afternoon seminar on caricature carving at the centre and I’m looking forward to that as well. Hopefully, I’ll get some more people involved in caricature carving.

The Basset in a Basket is coming along nicely. I like to trim down the ears quite a bit so that they’re thin and, with a bit of sanding, take on a velvety appearance. The facial features are coming along nicely as well and I’ll make sure that he has droopy eyes to go along with his howling pout.

Basset Hound in a Basket

You’ve seen my original Basset Hound in a Box post, so I won’t go into great detail on what got me to this point…just look back on the previous post if you’d like to see those steps.

It was suggested to me, though, that the same carving would look nice with a woven basket rather than a bag. That turned out to be a good suggestion as the carving of a basket weave is something that I hadn’t tried before and it turned out to be fun.

The thing that you have to keep in mind is that the weave has a horizontal band and two vertical bands, or in my rendition, more of a rounded cane. The horizontal bands weave over one vertical cane and under the adjacent cane. Once you get your head around that, it’s just repetitive carving. I finished up with a wood burning tool to keep everything nice and neat and “split” the horizontal band just to make it look more complicated!

A Change of Plans

From an earlier post, you’ll remember the little Basset-in-a-Box.  This little guy is intended as a “Learning by Doing” project at the upcoming Magic in Wood Competition and Show held in Pickering, Ontario this October.  The basic idea is to have several carvers come up with a carving that can be accomplished in about two hours and invite small groups to join them in completing a project of their own.  Registration will be on the Ontariowoodcarvers.ca site shortly for all of the different projects.  I was asked to lead a carving session for a Basset carving and this is what I’m planning to bring.

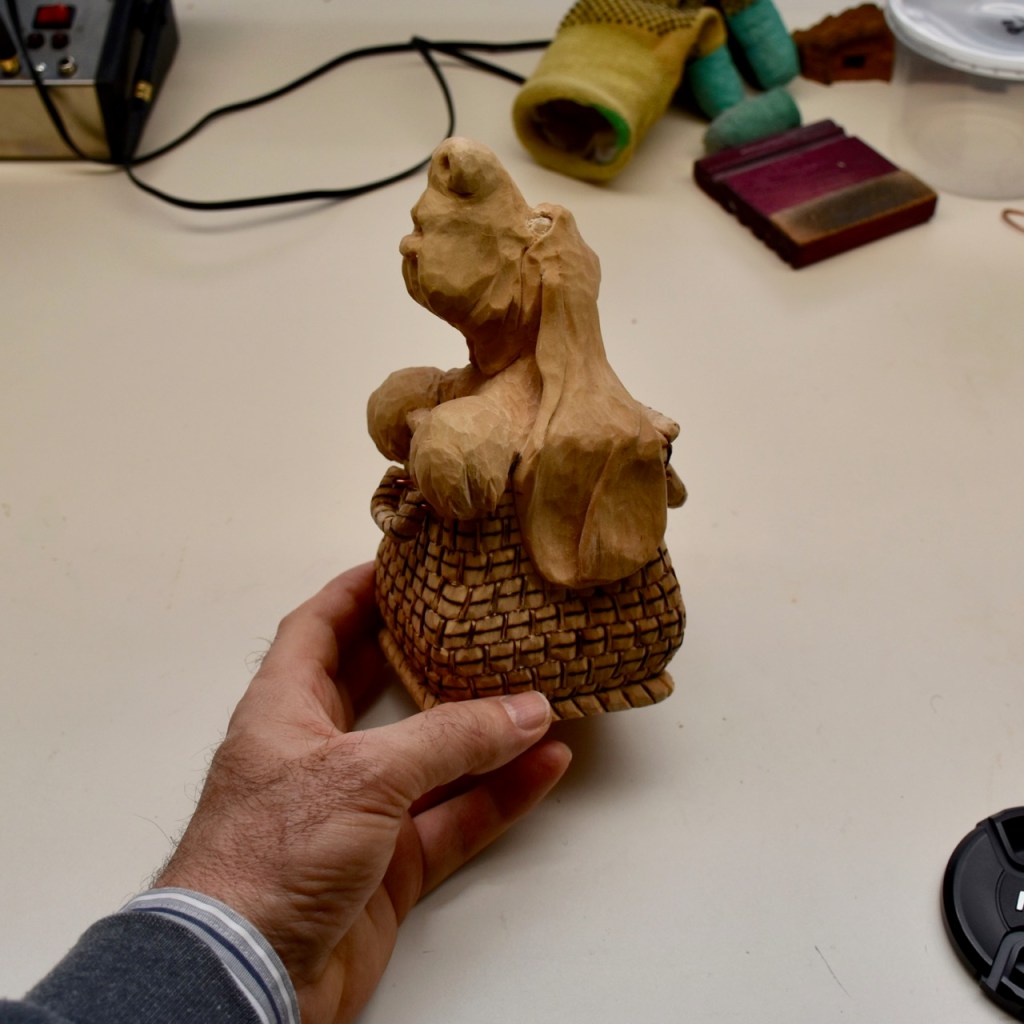
Actually, because we only have a couple of hours in the carving session, I’m bringing a “rough-out” of the carving for each participant that will look something like this…

DSC_0570

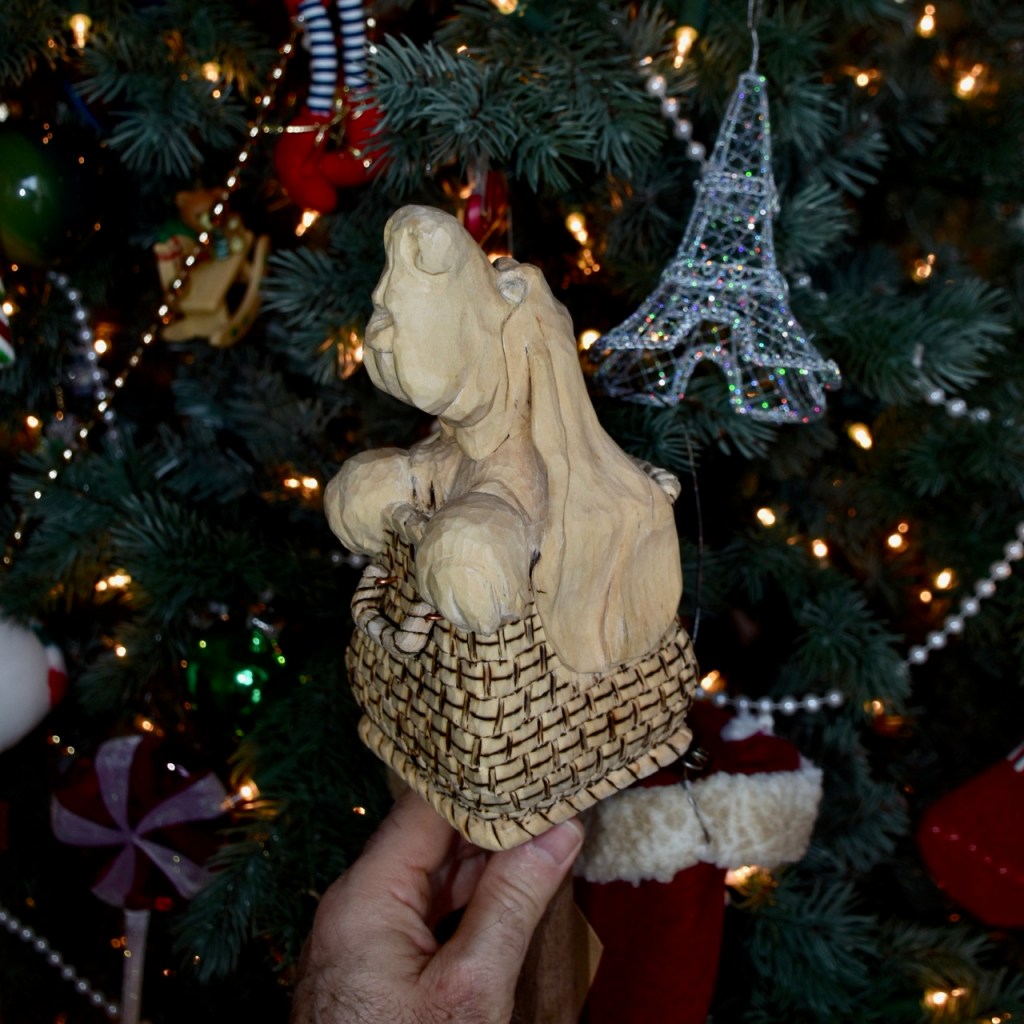
From that roughed in version, the hope is to get everyone within a couple of hours to this stage…

DSC_0669

Beyond that, I’m planning to leave some instructions and photos with the participants so, if they choose, they can go home and paint the figure along the lines that I’ve painted mine.

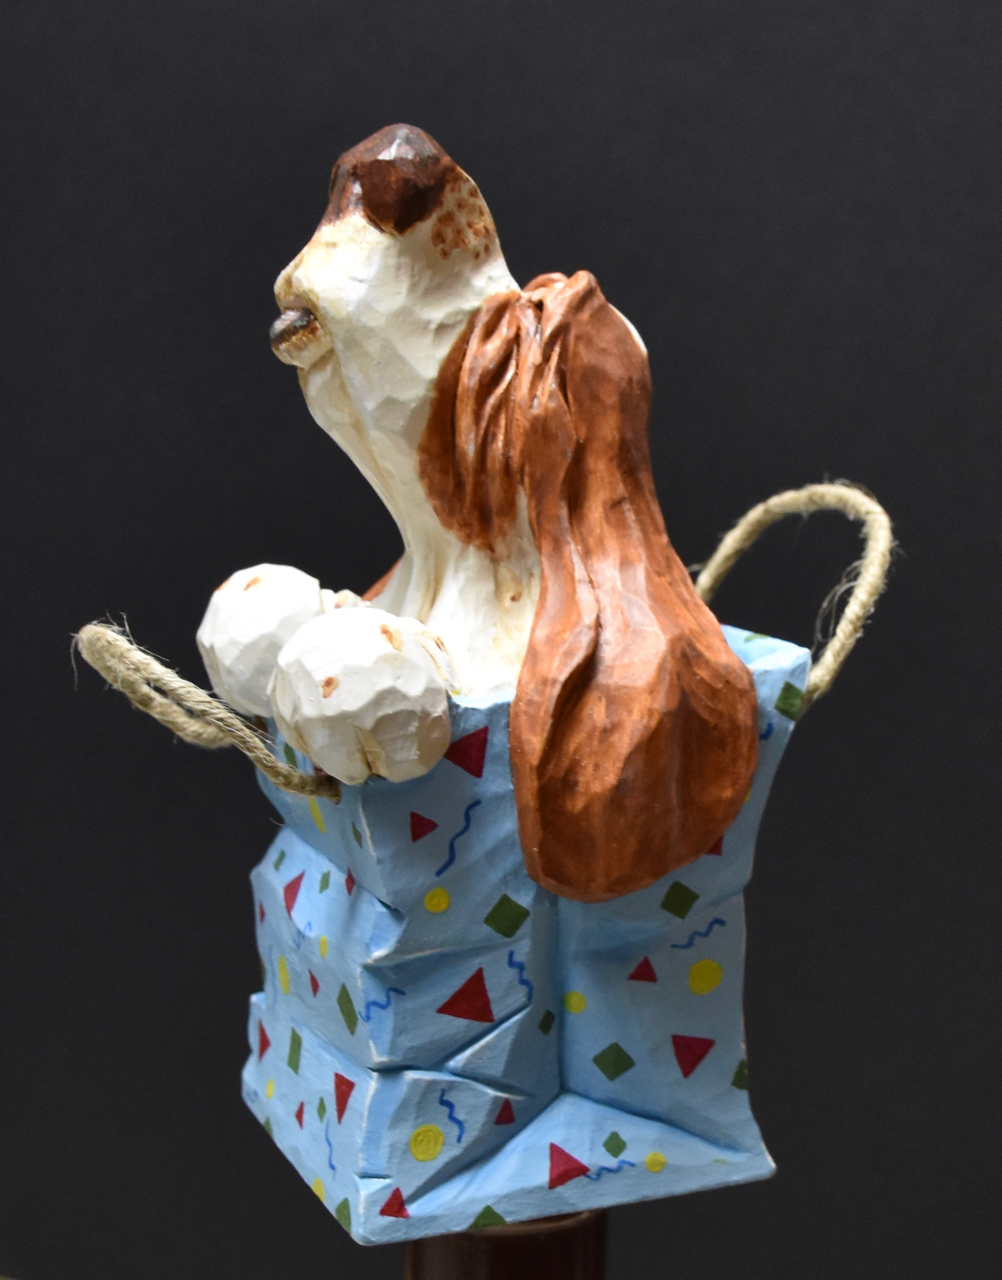
Now, about the change in plans.  Well, although I started out with the idea that the pup would be in a box, it struck me along the way that it would either be a pretty big pup or a pretty small box.  So, I decided that the box needed to become a bag…a gift bag.

So, come on, who wouldn’t want to receive a howling hound in a surprise gift bag?  Really.

DSC_0677DSC_0680DSC_0683

Finished and “On The Road Again”

Here are some final photos of the carving.  That was a really enjoyable carving to do and the first time that I’ve carved a vehicle.  I enjoyed that so much that the next caricature that I do is going to include a scooter and sidecar!


Some Cobblestone to Ride On

I picked up a nice piece of hardwood and cut out an oval shape for the base.  After routing in a nice edge and leaving about an 1/8″to play with, I carved in an alternating pattern of cobblestone.

The first thing that I did was use a gouge to create troughs in the roadway where car and wagon wheels would have depressed the roadway from constant use.  Once that was done, the cobblestone was first laid out using a v-tool chisel and then with a gouge I made the surface of each cobblestone irregular with little bumps and dips in it…because no one has ever seen perfectly flat cobblestone.  That perfectly flat stone in the walkway to your house ain’t cobblestone.

Once that was done, I clipped a few corners of the stones and created a few cracks in others to give it a real worn look and followed up with a wood burner to make the cracks and lines really crisp.

DSC_0381

The painting was done with a base coat of grey.  Some of the stones were then given a wash of barnyard red, whereas others got a wash of yellow ochre. To add a little dirt and mud, some smudging with yellow ochre and raw sienna did the trick.  Finally, to take some of the brightness away and leave the cracks between the stones a bit darker, several washes of payne’s grey were applied.

The routered edge got a dark stain followed by a few coats of satin urethane.  The cobblestone had satin urethane applied and then wiped away almost immediately with a paper cloth to ensure that there would be no shine left on the coloured stones.

Finally, a nice brass nameplate was added…and I think it all looks pretty good.  A couple more touches and we’re done.

DSC_0419

Happy Mother’s Day

Happy Mother’s Day to all of you carvers and art lovers who have a day job being a mom!

My Mom’s in Niagara Falls.  She’s a great mom…how many moms would have let their young son play with sharp knives!

Paul started the day off right with a hand-crafted  card and a nice gift.  It’s sunny and warm today and we’ll do our best to pamper Peggy…she more than deserves it.

DSC_0375

On a less celebratory note, I picked up a nice piece of hard wood and cut out the base for the carving.  I think that I’m going to carve some cobblestone into the base as the roadway to match the era of the car.  The little flat section in the middle is where the nameplate will be fastened.

DSC_0369

From this and the previous photo, you can see the difference in the colour of the carving after the urethane has been applied.  The sealing coat really brings out the colours that were fairly subtle when they were just the flat acrylic.  You can also see the addition of the “leather-wrapped” steering wheel, the hand lever and the radiator cap.  Still need to add a small hub cap on the wheels.  Lots of fun.

DSC_0371


A Quieter Ride

You can look back a few posts earlier where I cut the two mufflers and tail pipes out of basswood and them shaped them with a carving knife.  Today, I did a little extra detailing and painted them up.  I also carved a little gear shift lever that’s at the driver’s right paw.

I actually carved a couple of heat shields into the tailpipe.  These were simply there so that the passengers in the open cockpit didn’t inadvertently touch an elbow on a hot pipe.  They were typically perforated for better cooling, so I used the rounded tip of a Foredom tool to quickly put some dimples into the shields.

I also added a couple of small dowels to each pipe to locate it properly along and under the car.  Once I’ve applied the final sealing coat of urethane, I’ll epoxy these dowels and the general area around the dowel to the car.

The mufflers got several washes of mixtures of asphaltum brown and carbon black.  This was followed with some blotches of asphaltum, raw sienna and yellow ochre.  When this was all done, it started to look like a pipe that had gone through a few heating cycles and a few mud puddles!  I topped it off with a dry brushing of silver…a little heavier on the heat shield sections and a bit lighter on the rest of the pipe.

I still need to add a steering wheel, radiator cap, starter crank and some wheel hub nuts and then I think it’ll be ready for it’s seal coat of urethane.

Just click on the photos to make them bigger.

Some Dirt, Wear and Tear

Our little racer isn’t a show piece that stays in the garage, so we want it to look like it’s enjoyed.

To do that, I first used yellow ochre and raw sienna to highlight a few spots that have picked up some dirt along the roads.  I don’t actually paint this on in the usual sense.  I just put a small dab on the end of a brush and, after wiping a lot of it away on a paper towel, I rub the brush into a small area of the carving.  This ends up giving it a nice blended look rather than just a spot of paint.

Following that, I dry brush on a light beige by just lightly using the tips of the brush to catch the high points of the carving.  Again, very little paint is used on the brush and most is wiped off on a paper towel before touching the carving.  The brush is similar to the brush a woman would use to apply blush…be sure to use your wife’s if you’re brave.  This method gave the car a dusty and scuffed appearance…similar to how you’re going to look if you use your wife’s cosmetic brush.

What do you think?  Once I get the urethane final finish on the paint, the colours and highlights will get really enhanced.


Post Navigation

%d bloggers like this: