tributesinwood

Wood Carvings by Mark Sheridan

Archive for the category “On The Road Again”

Finished and “On The Road Again”

Here are some final photos of the carving.  That was a really enjoyable carving to do and the first time that I’ve carved a vehicle.  I enjoyed that so much that the next caricature that I do is going to include a scooter and sidecar!


Advertisement

Some Cobblestone to Ride On

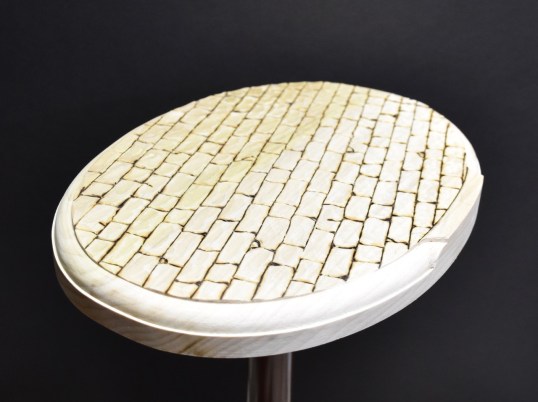
I picked up a nice piece of hardwood and cut out an oval shape for the base.  After routing in a nice edge and leaving about an 1/8″to play with, I carved in an alternating pattern of cobblestone.

The first thing that I did was use a gouge to create troughs in the roadway where car and wagon wheels would have depressed the roadway from constant use.  Once that was done, the cobblestone was first laid out using a v-tool chisel and then with a gouge I made the surface of each cobblestone irregular with little bumps and dips in it…because no one has ever seen perfectly flat cobblestone.  That perfectly flat stone in the walkway to your house ain’t cobblestone.

Once that was done, I clipped a few corners of the stones and created a few cracks in others to give it a real worn look and followed up with a wood burner to make the cracks and lines really crisp.

DSC_0381

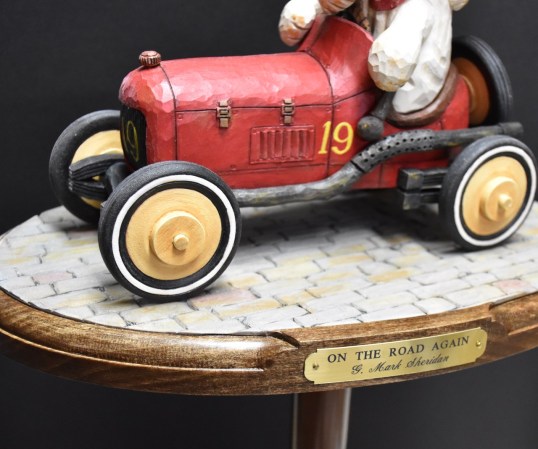
The painting was done with a base coat of grey.  Some of the stones were then given a wash of barnyard red, whereas others got a wash of yellow ochre. To add a little dirt and mud, some smudging with yellow ochre and raw sienna did the trick.  Finally, to take some of the brightness away and leave the cracks between the stones a bit darker, several washes of payne’s grey were applied.

The routered edge got a dark stain followed by a few coats of satin urethane.  The cobblestone had satin urethane applied and then wiped away almost immediately with a paper cloth to ensure that there would be no shine left on the coloured stones.

Finally, a nice brass nameplate was added…and I think it all looks pretty good.  A couple more touches and we’re done.

DSC_0419

Happy Mother’s Day

Happy Mother’s Day to all of you carvers and art lovers who have a day job being a mom!

My Mom’s in Niagara Falls.  She’s a great mom…how many moms would have let their young son play with sharp knives!

Paul started the day off right with a hand-crafted  card and a nice gift.  It’s sunny and warm today and we’ll do our best to pamper Peggy…she more than deserves it.

DSC_0375

On a less celebratory note, I picked up a nice piece of hard wood and cut out the base for the carving.  I think that I’m going to carve some cobblestone into the base as the roadway to match the era of the car.  The little flat section in the middle is where the nameplate will be fastened.

DSC_0369

From this and the previous photo, you can see the difference in the colour of the carving after the urethane has been applied.  The sealing coat really brings out the colours that were fairly subtle when they were just the flat acrylic.  You can also see the addition of the “leather-wrapped” steering wheel, the hand lever and the radiator cap.  Still need to add a small hub cap on the wheels.  Lots of fun.

DSC_0371


A Quieter Ride

You can look back a few posts earlier where I cut the two mufflers and tail pipes out of basswood and them shaped them with a carving knife.  Today, I did a little extra detailing and painted them up.  I also carved a little gear shift lever that’s at the driver’s right paw.

I actually carved a couple of heat shields into the tailpipe.  These were simply there so that the passengers in the open cockpit didn’t inadvertently touch an elbow on a hot pipe.  They were typically perforated for better cooling, so I used the rounded tip of a Foredom tool to quickly put some dimples into the shields.

I also added a couple of small dowels to each pipe to locate it properly along and under the car.  Once I’ve applied the final sealing coat of urethane, I’ll epoxy these dowels and the general area around the dowel to the car.

The mufflers got several washes of mixtures of asphaltum brown and carbon black.  This was followed with some blotches of asphaltum, raw sienna and yellow ochre.  When this was all done, it started to look like a pipe that had gone through a few heating cycles and a few mud puddles!  I topped it off with a dry brushing of silver…a little heavier on the heat shield sections and a bit lighter on the rest of the pipe.

I still need to add a steering wheel, radiator cap, starter crank and some wheel hub nuts and then I think it’ll be ready for it’s seal coat of urethane.

Just click on the photos to make them bigger.

Go Number 19!

It’s starting to look like a racer now.

I highlighted all of the panel lines on the car with a mixture of cherry red and asphaltum brown.  I also added a number of rivets/fasteners and highlighted them with a very thin wash of the same colour mixture.  The rivets were made with the end of a centre punch that I have that happens to have a nice round hollowed out end that leaves a great rivet impression when pressed into the wood.

I also painted the combing around the cockpit to look like cushioned leather.  The leather is painted with milk chocolate and a wash shadow of asphaltum on the lower edges.

The radiator got some vertical veins in it by making finely spaced burned lines with a wood burning tool.  Then it was painted a combination of asphaltum and carbon black before the yellow number 19 was applied.

Now it needs some dirt thrown here and there for highlights.

DSC_0349

Painting the Wheels

You’ll remember that I actually cut out the wheel parts initially with a hole saw and then glued the pieces together and detailed them a bit on a lathe.

Today I used a wood burner to create deeper ridges for the treads and the whitewalls on the tires.  These ridges allowed me to be a little less cautious with the painting, as the thinned paint would only flow as far as the ridge and no further…so, you didn’t get too much bleeding of one paint colour into the next.

I think it’s all looking pretty good for what I’d consider as the base coat.  Once I detail the wheels in a bit more with a variety of highlight colours, I think that they’re going to look pretty good.  At least the little hounds look happy.

DSC_0329

DSC_0330

Finishing Up The Base Coats

I think I’ve got the two hounds painted about where I want them.  I used a lot of different browns in their coats…milk chocolate, asphaltum, linen…and a bit of yellow ochre to soften the browns.  The little passenger has a mottled pattern on her back as well as a larger “spot” of asphaltum with a few washes of carbon black.  This weekend, I’ll seal the acrylic on the hounds with satin urethane.  This last step really brightens up the colours even further.

You can see from these photos that I’ve taken the first few steps at painting the car.  Right now, I have a cherry red base coat that’s starting to look really nice.

As usual, just click on the photo to make it bigger.

Painting the Hounds

I’ve started painting the hounds, beginning with their helmets and goggles and then moving on to the faces and ears.

Everything other than the driver’s collar is a combination of browns and yellow.  The helmets got a base coat of asphaltum with highlights of chocolate, burnt umber and yellow ochre.  The goggles got pretty much the same treatment but with a base of chocolate.  Once they were done, both got a dry brushing of linen and then later chocolate to highlight the high spots.   I think that it turned out pretty well and the leather looks well worn.

The base coat on both dogs is linen lightened with white.  Over that base coat, the darker sections are chocolate washes alternated with a very dilute yellow ochre wash.  Around the noses I “dabbed” these washes to give them a bit of a mottled effect.

There’s still lots of painting to do but I’ve got a start on it.  The painting has actually been a nice diversion from yardwork ( but I’m not complaining about the nice weather).

DSC_0311

Completing Arms and Goggles

I’ve added the arms in my usual way.  Aside from the arm that is wrapped around the back of the driver and is carved directly into the wood, the other three arms were added separately so that the direction of the wood grain runs along the arm giving it the greatest strength.

You might be able to see from the photo that each arm had been placed in its rough location and then drilled through the shoulder with a 1/4″ bit followed by a wood dowel.  This helped me ensure that while I was fitting the arm to the body the arm was ending up in the exact same spot every time I removed it for shaping.  The shaping was done by shading the body with lead pencil and then letting that lead transfer to the “unleaded” arm.  The resulting marks on the unleaded arm showed where the high spots were and they were simply cut away with a chisel or knife.  Doing this several times mates the two pieces together very closely.


DSC_0211

You can also see from the photo that the eyes within the goggles are starting to emerge.  The driver is fairly wide-eyed and his friend is squinting and howling.

Racing Attire

Actually, I really haven’t had much carving time in over the last few days.  But I did spend my time productively…we drove down to Ancaster and Niagara for some Easter visits and treats and had a terrific time.  Paul even got to do some Easter Egg hunting at Emily’s.

OLYMPUS DIGITAL CAMERA

Even though I didn’t make too much progress on the little Racing Hounds, I had to include this update photo of their goggles and leather helmets.  I think that they’re really going to look great once they’re painted up.  What’s going to be an interesting challenge is carving their eyes within the goggle opening!  I think that will be a lot more interesting than just painting the lenses on the goggles a dark colour.

Stay tuned!

OLYMPUS DIGITAL CAMERA


Post Navigation

%d bloggers like this: