Bricks and Mortar
You can look back at an earlier posting of when I created the brickwork and the stonework for this carving…just look under “Themes” for “Missed A Spot” and scroll back to see the original wood version of what follows.
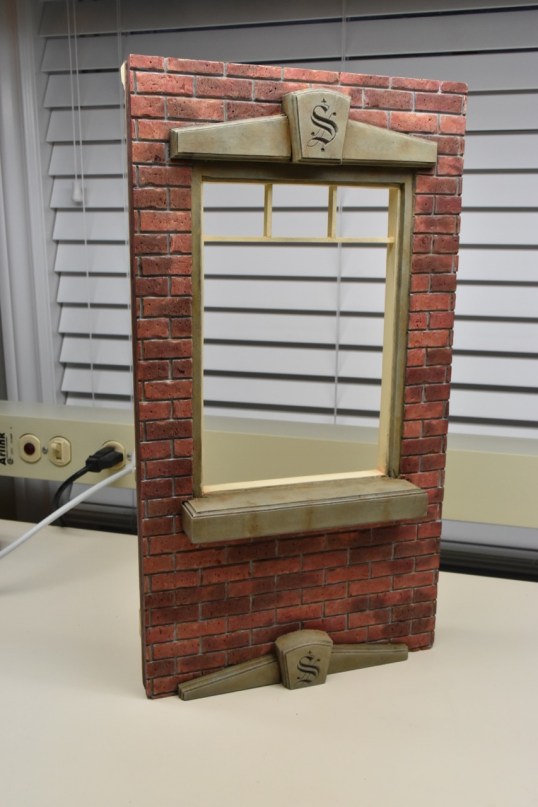
The painting was fun. I started with the stonework by initially carving in a stylized “S” onto the two keystones. I found a nice font on the web, flipped the image vertically and then printed it off on an ink-jet printer. With the letter now printed backwards, it was a simple matter to rub the back surface and leave a faint image directly on the wood. A sharp knife and a bit of wood burning then created the image into the wood. I suppose we could argue that the “S” is like the Sheraton chain, but I’m going with Sheridan.
The stone ledges and headers were initially painted a light grey and then were covered with multiple “washes” of a sand coloured beige, yellow ochre and light grey. I then finished them up with some age related “stains” of yellow ochre, burnt sienna and asphaltum in the corners and “dripping” down the edges.
The mortar between the bricks was painted first with a light grey. I then dabbed more than brushed on a brown/red combination followed by some grey and yellow ochre. The dabbing was effective in giving the bricks a mottled look…I was careful to dab the colours randomly.
Now the kicker: I remembered using an antiquing stain back ( way back ) when Peggy and I dabbled in ceramic painting. I’m not sure how to describe this but I’m sure that it still can be purchased at ceramic shops or hobby shops. It’s black, looks similar to a wood gel-type stain and has a slight solvent smell. With a bit on the end of an artists brush, I dabbed an area of several bricks with this black stain and then wiped it off with a paper towel. I used the same stain on the stonework, but in that case I painted the complete stone and then wiped off the stain.
Here are some pictures that show the “before” with just the acrylic paints and the “after” with the stain applied. I’m pretty pleased with how it turned out and I’m looking forward to seeing how it looks with the urethane finish coat.
Before…

After…

And here’s how the whole thing is looking so far…