tributesinwood

Wood Carvings by Mark Sheridan

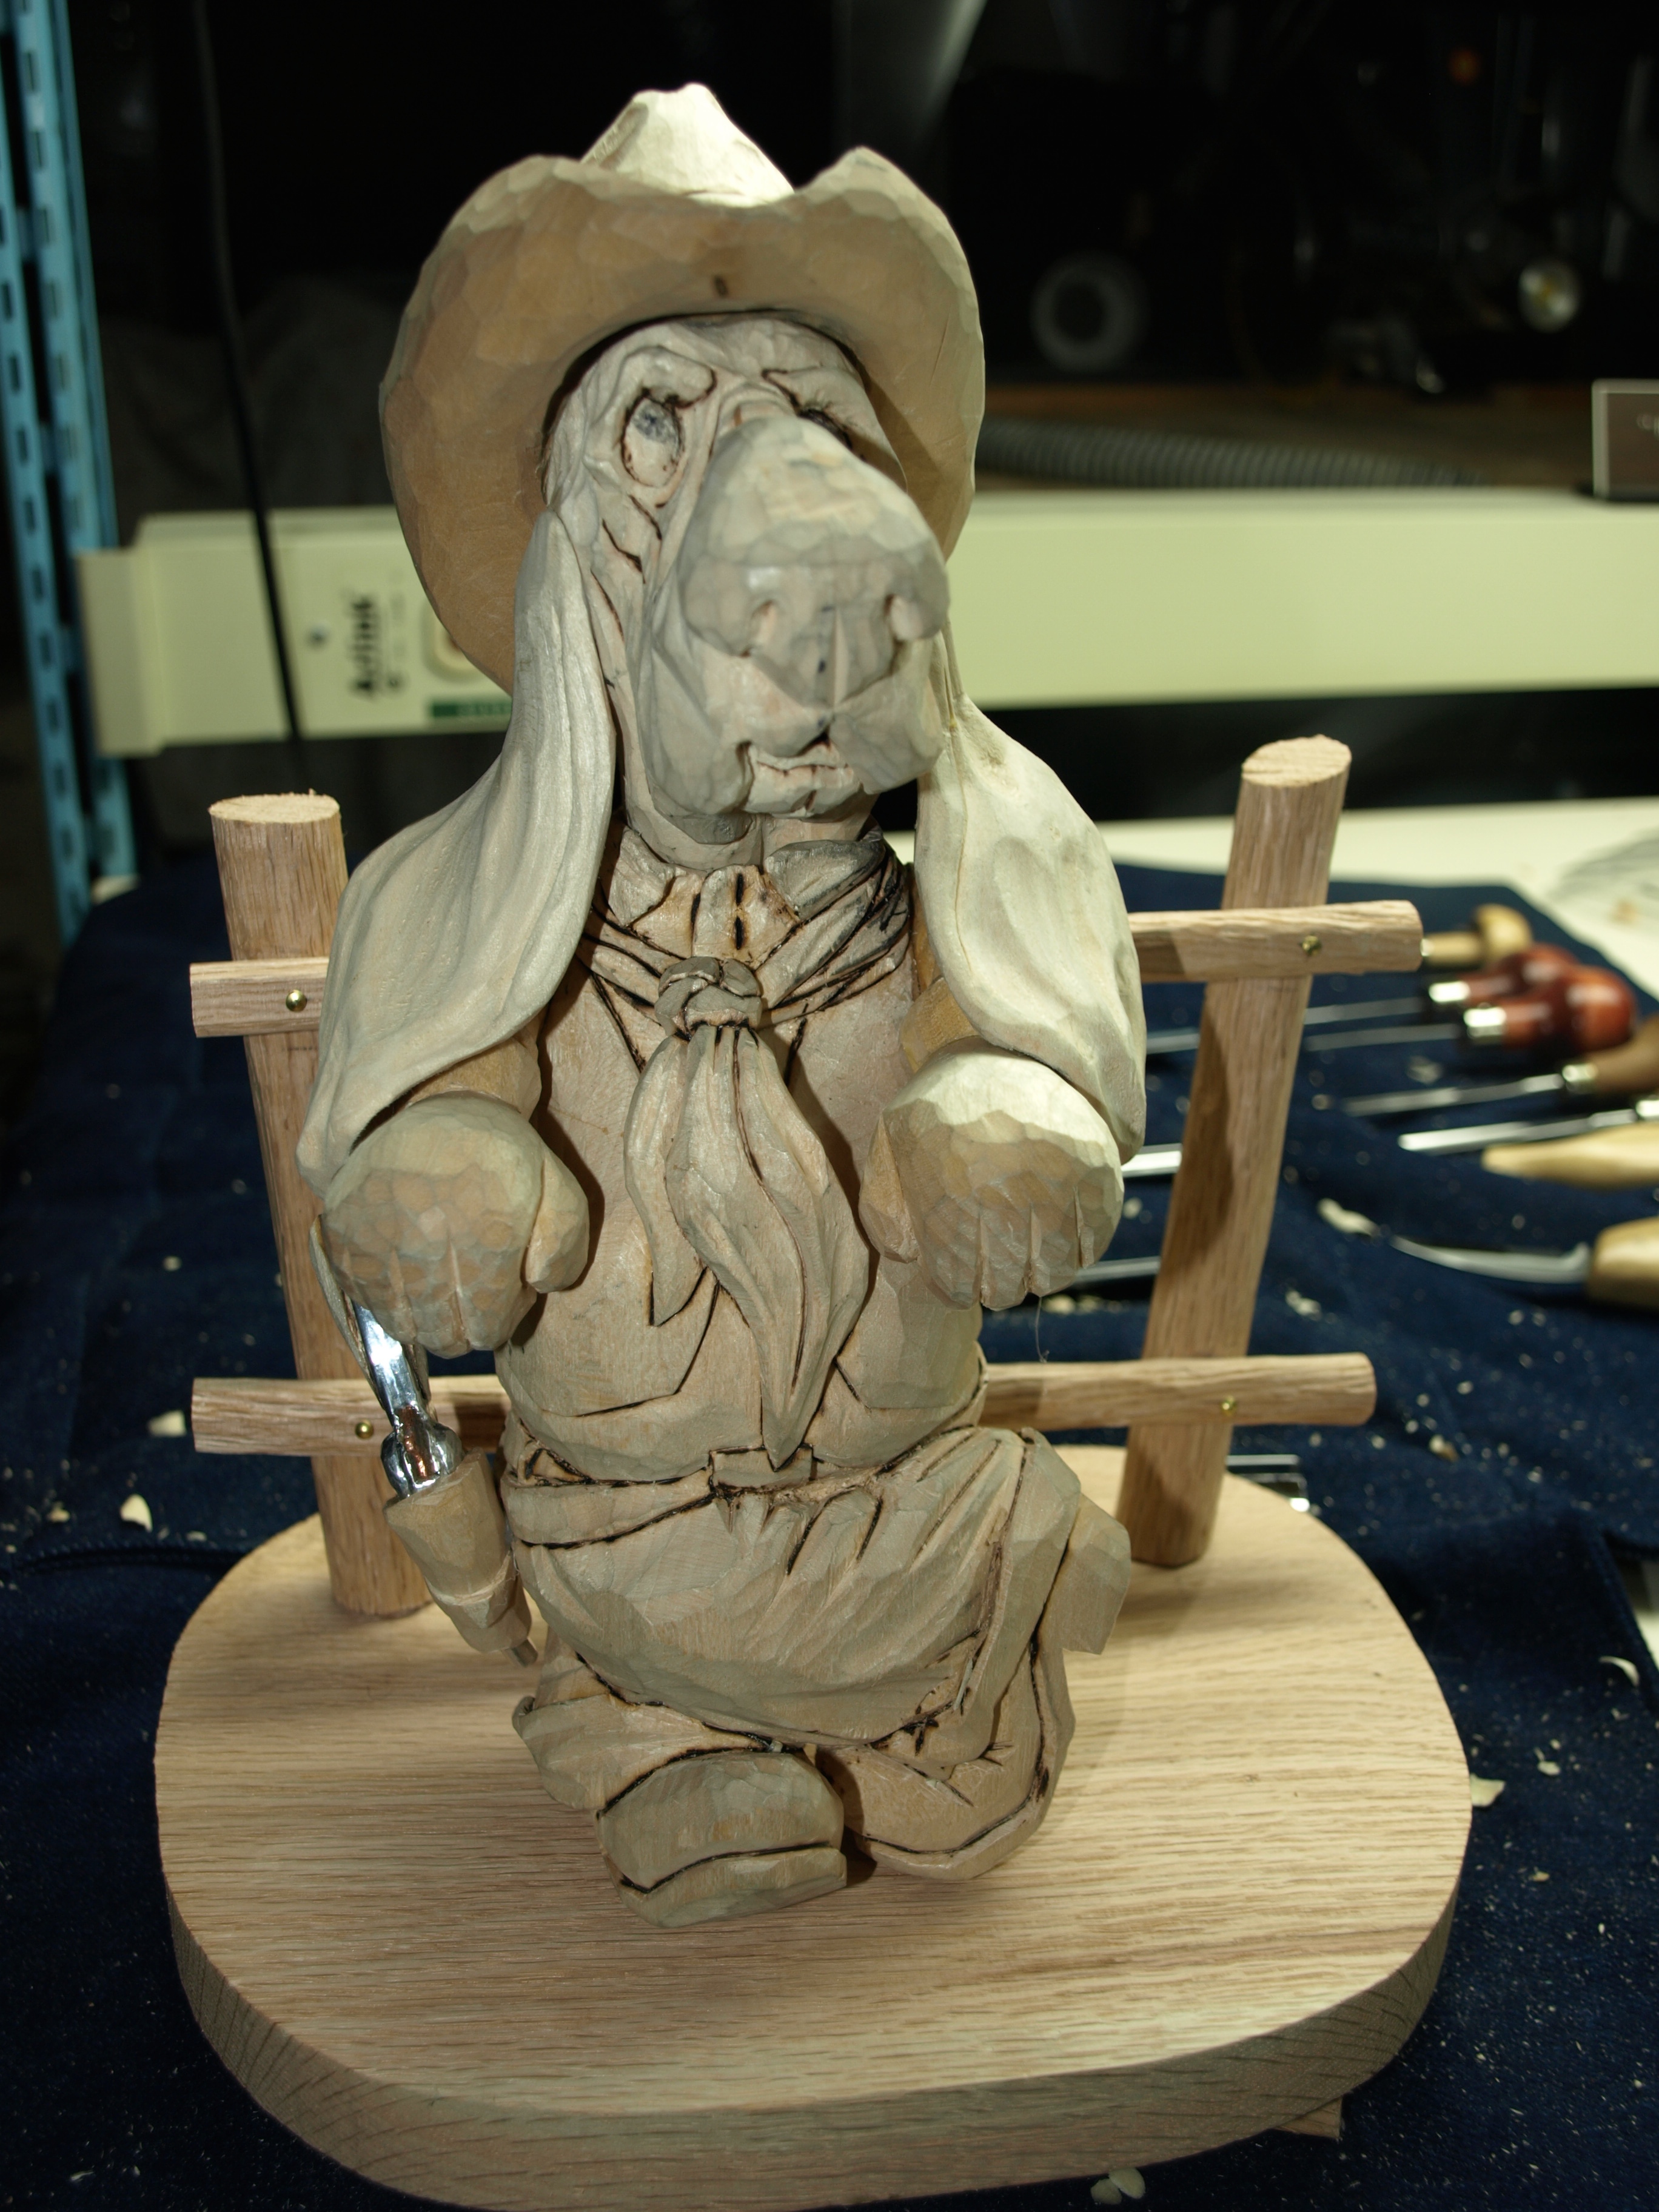
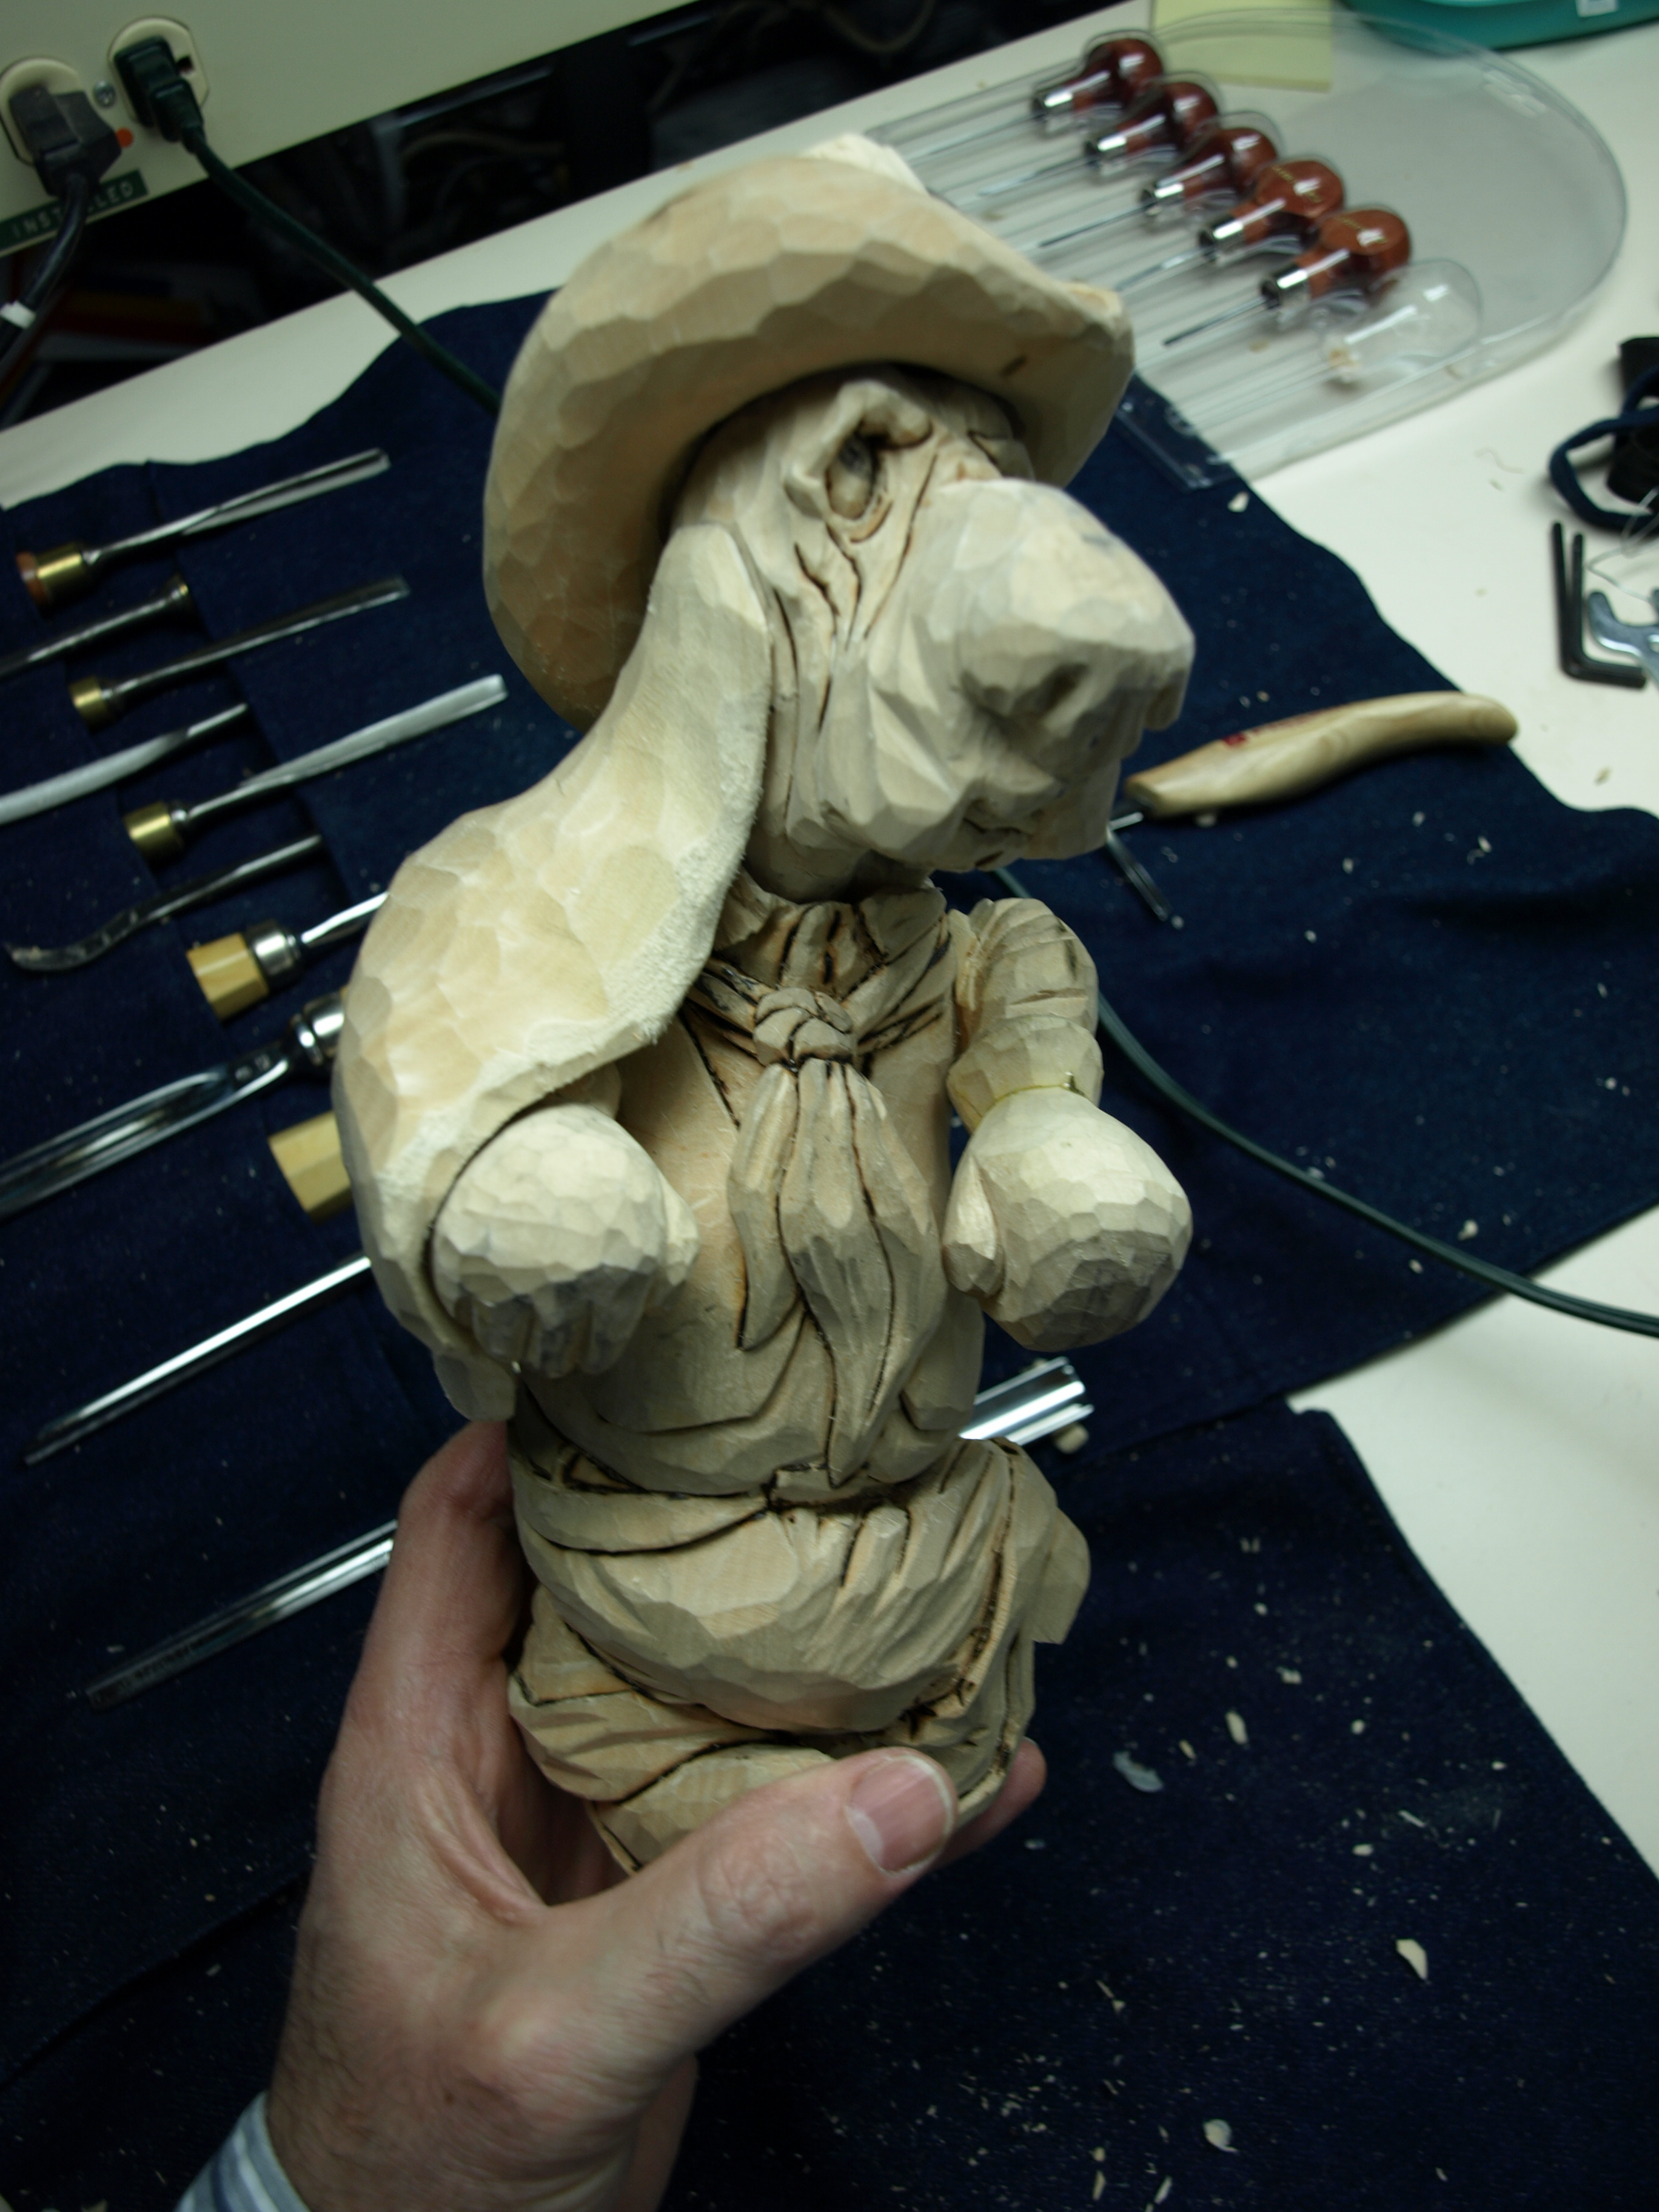
First Attempt at Rope

I spent a few minutes today making some rope that will become Buford’s laso that will hang on the cedar rail.  By the way, just try to type “laso” without auto-correct turning it into “also.”  That sentence took a while to complete.

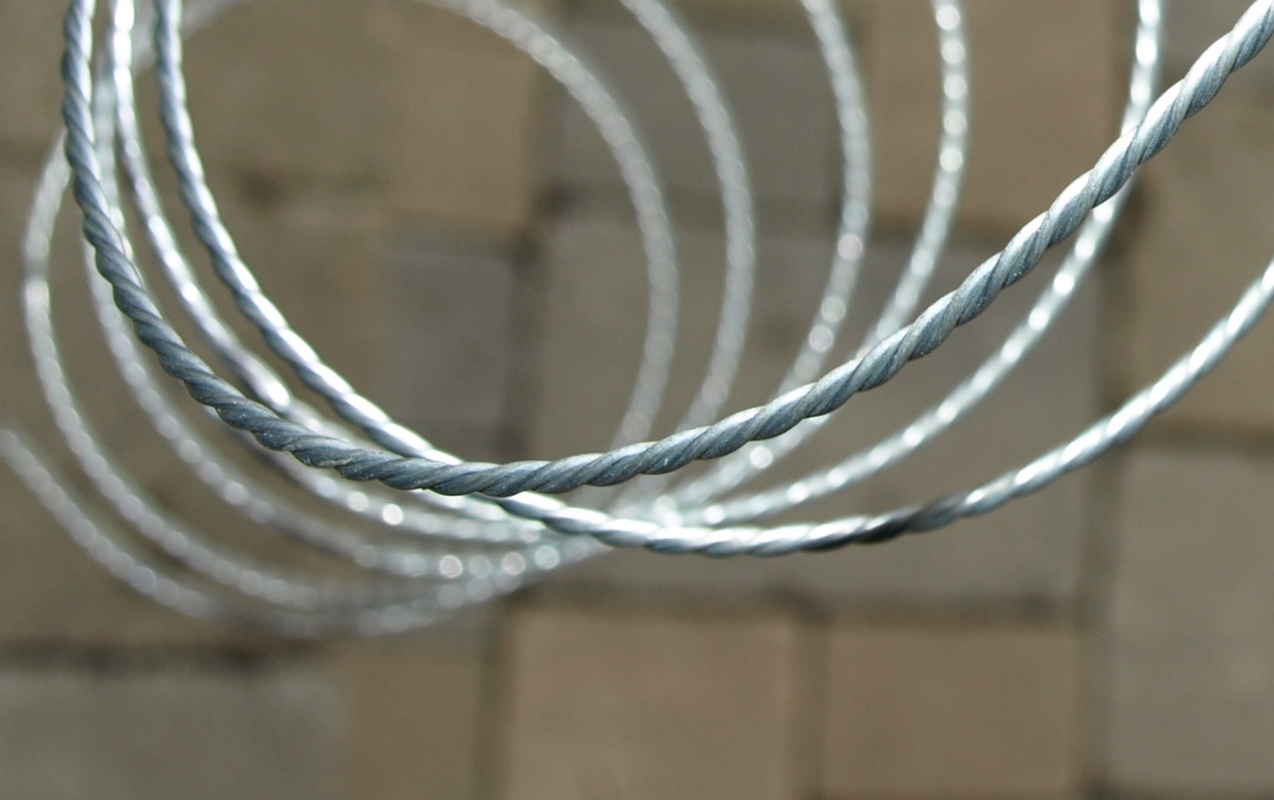
Anyways, I picked up some 18 gauge wire from the hardware store and twined three strands into rope.  I took about three six-foot lengths of wire and put one end of the three strands in my battery operated drill chuck.  I then took each of the strands and wrapped them individually around a nail held in a vice on my work bench.  By using this nail method, I was able to stretch tight each of the individual strands so that the end result was that all three strands ended up being equally tight.  Then I just slowly operated the battery to twine the strands into rope.  I saw this idea on Lynn Doughty’s site some time ago and have been itching to try it.

I can’t remember if Lynn used a nail to wrap the individual strands around, but it seemed to me the only way that you can ensure that you don’t end up with one of the strands being more slack then the others before you start winding.

I think it turned out pretty well.Then I grabbed a cream coloured enamel spray can that I had in the shop and wound the rope around it so that it coiled.  I thought that it would be easier to spray paint this way.

OLYMPUS DIGITAL CAMERA

OLYMPUS DIGITAL CAMERA

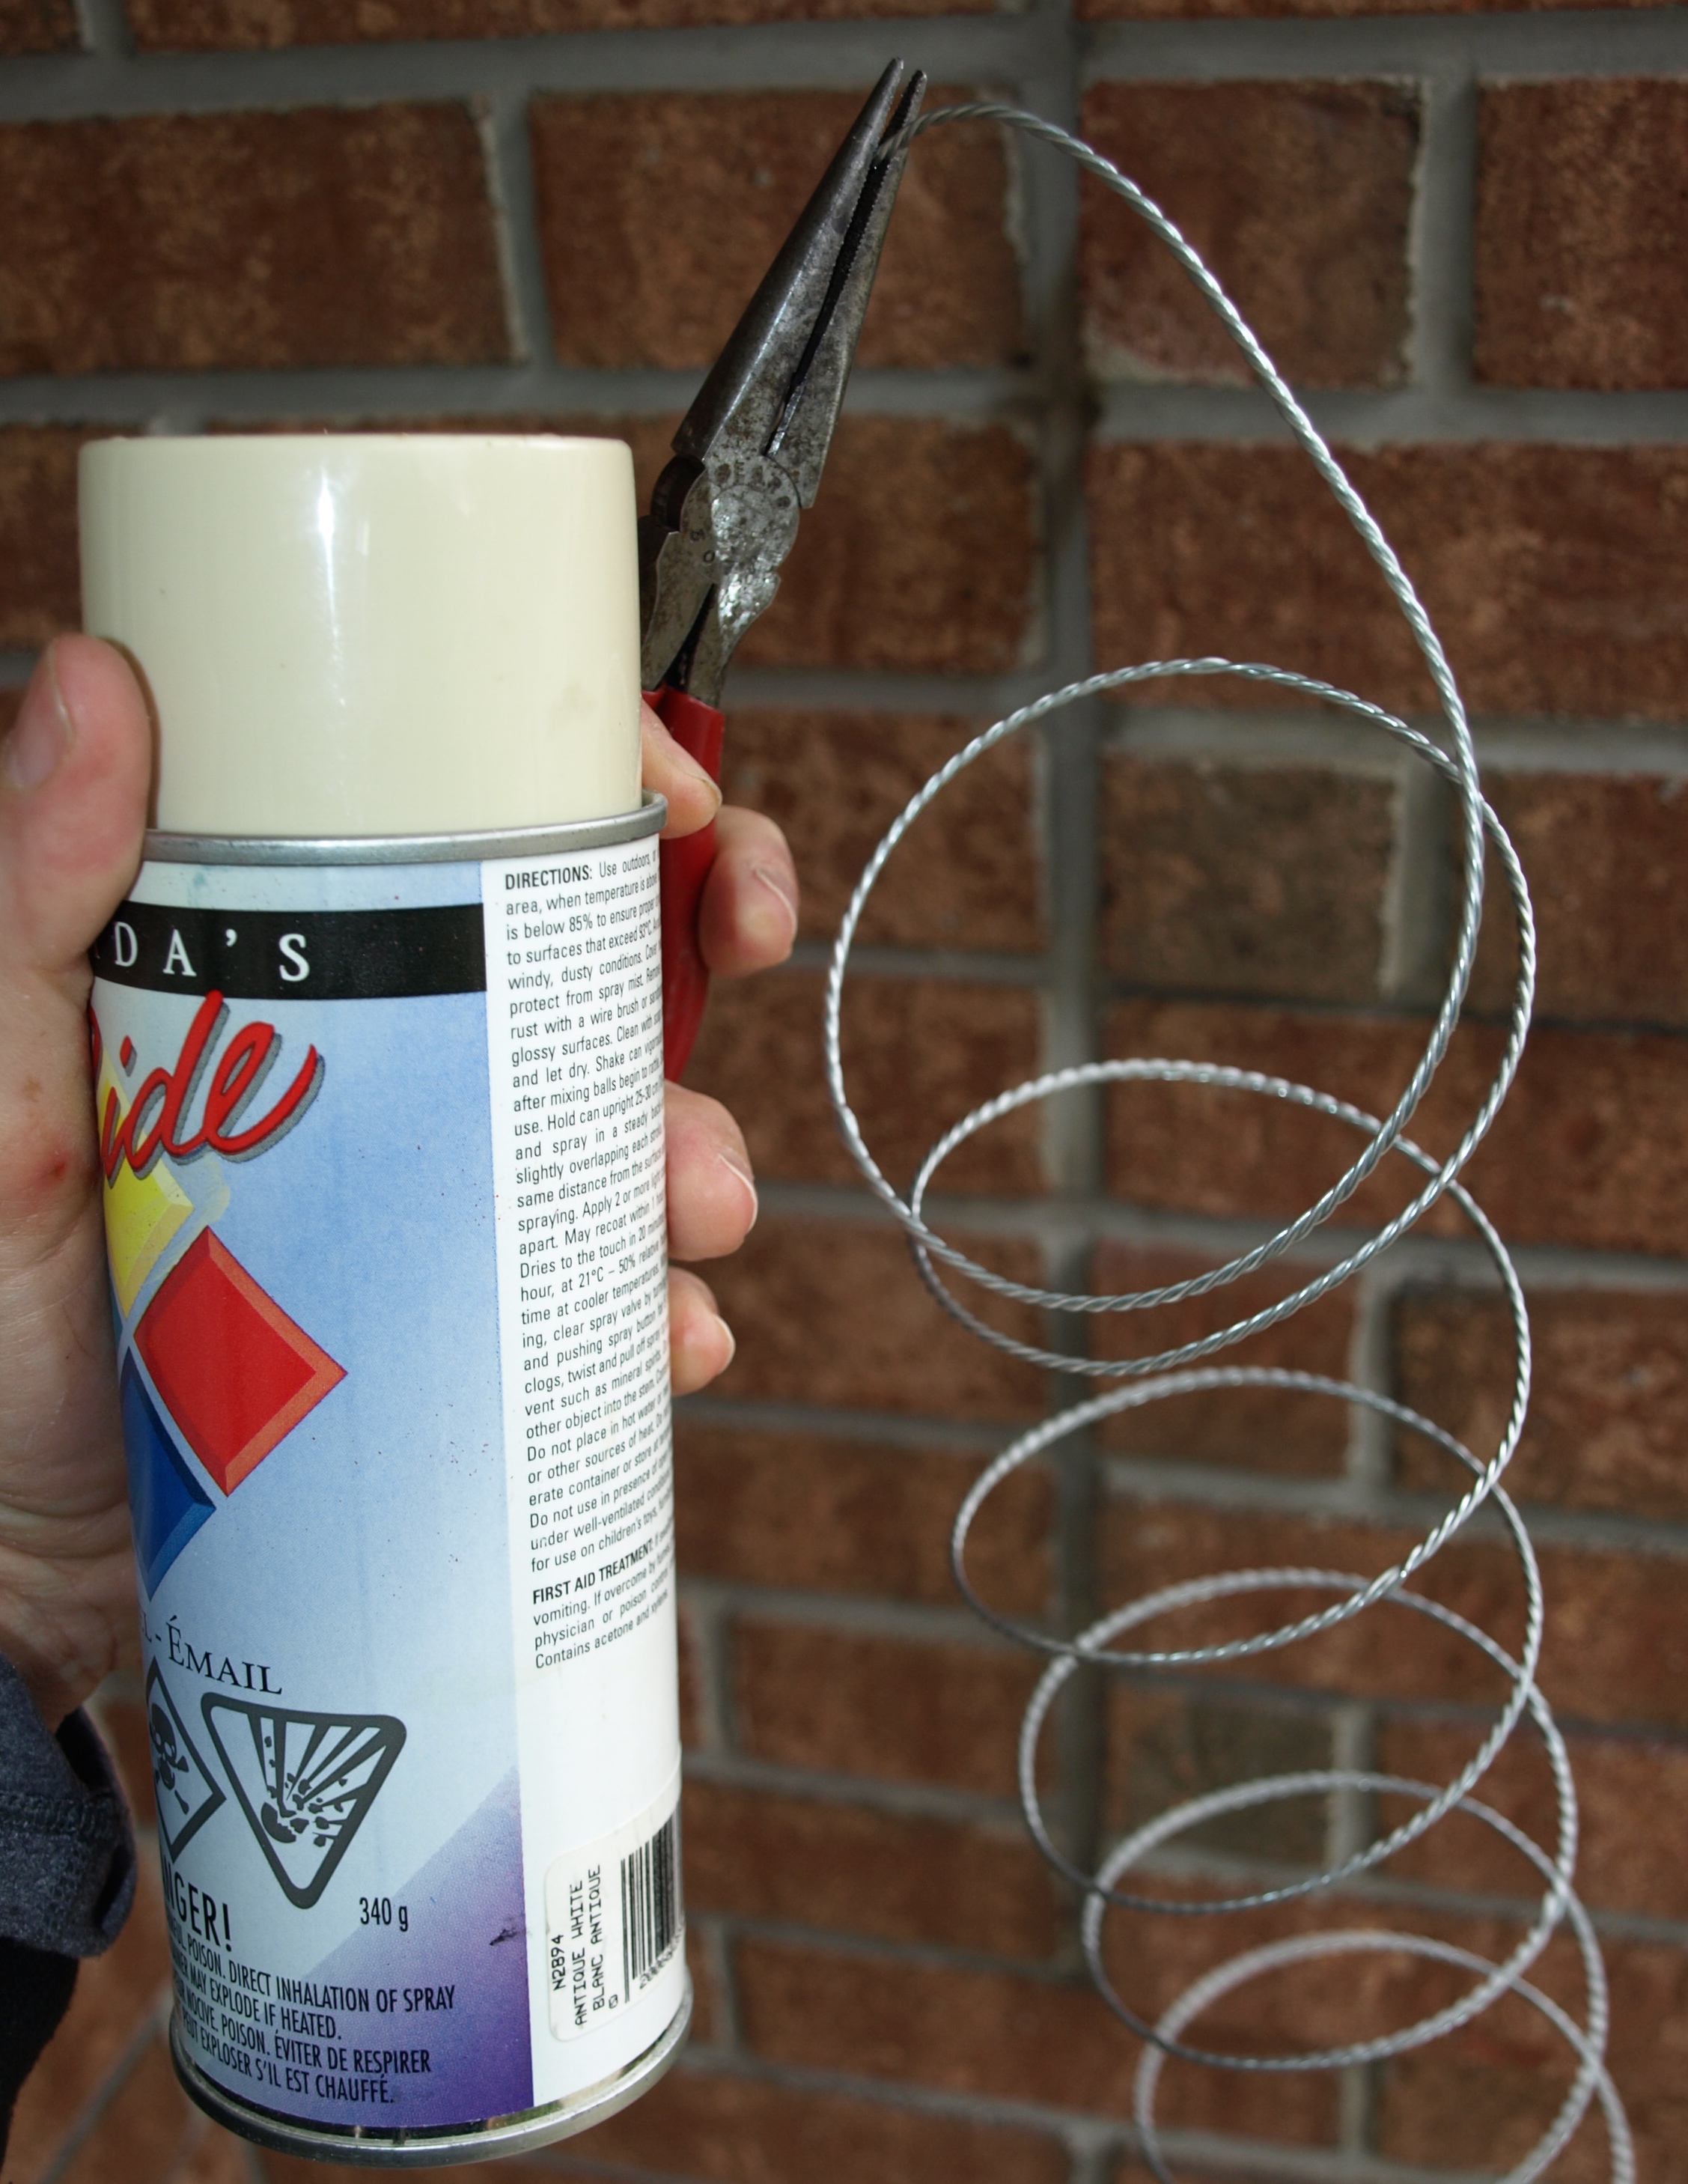
When the cream coloured enamel was dry, I brushed some dark brown paint ( surprisingly the same colour as my garage doors)   over the full length of the coil.  Then, before the paint dried, I wiped it off leaving the dark brown in the recesses of the wound rope.  Looks a bit like a rope doesn’t it?

OLYMPUS DIGITAL CAMERA

Painting Completed

Our little Cow-hand’s painting is now complete.  The pants are grey with a bit of burnt umber, yellow ochre and raw sienna.  The boots are asphaltum with black heels and soles and then some yellow ochre and raw sienna added in as mud and dirt.  Finally, the whole thing was dry-brushed with a mixture of ivory and raw sienna to give everything a dusty look.

I made a top button out of a piece of lead and used aluminum adhesive backed tape over the belt buckle to finish that off.  The only item left for me is to fashion a couple of spurs for those big boots and then we’ll be ready to finish the fence rails and base.

Plus, I got some more gardening done today before the rain came down in buckets!

OLYMPUS DIGITAL CAMERA

Weather-Worn Cowhand

Buford’s colouring is coming along and he’s looking pretty weather-worn from all of his ranch-hand duties.

I’m still not certain on the glove colour and it might change a bit, but I’m generally happy with the way he’s looking.  The blue vest has a red wash added in several coats to give it some depth and the camel coloured shirt has some burnt umber and asphaltum added in the crevices for depth.  Similarly, I added some purple in the crevices of the red neckerchief for highlights.  Some raw sienna and yellow ochre is added here and there for some added dirt.

I’m picturing grey pants and dark brown cowboy boots as the next steps.

It’s really nice that yard-work is crowding my carving and painting time…it’s been nice to get outside again after a long winter.

OLYMPUS DIGITAL CAMERA OLYMPUS DIGITAL CAMERA

Painting Progress

It’s a sunny day, I had bacon and eggs for breakfast, and spent the morning doing a bit of painting on Buford.  What a day!

Although I’m just holding the ears in place, you can see that this little guy is going to make a nice little carving.

The head and ears have a cream coloured background and alternating washes of Chocolate Brown and Asphaltum Brown.  A very, very light wash of Asphaltum covers the cream coloured snout and I was sure to leave a few darker “blemishes” for interest.  The nose and lower lip are Carbon Black with a bit of Chocolate Brown mixed in.  The inside of the ears have Chocolate Brown mixed with a Flesh tone.

His “smoke” is a nail bent up and painted with white, and a black-and-white “ashes” tip.

The eyes got a bit of a Flesh tone treatment at the base and then were covered in clear 5 minute epoxy…which gives it a nice gloss.  If you use this method, I’d suggest you first try it with a bit slower drying epoxy as you have to work pretty quickly with the 5 minute epoxy.  You don’t want the epoxy setting up too quickly and spoiling the clear and smooth effect for the eyes.

Plus…it’s my Birthday today, Paul and Emily gave me two great books to read, and, courtesy of my Mom, we’re having a big dinner to top things off!  What a day!

OLYMPUS DIGITAL CAMERA OLYMPUS DIGITAL CAMERA

The Painting Begins

Buford’s hat got a bit of paint last night.

I used Asphaltum brown in several washes ( light, watered-down coats ) to build up the colour in the hat.  I followed that up with a black head-band and then some dry brushing with a colour of Butterscotch.  Remember that the dry-brushing is basically loading up your paint brush with the desired colour and then removing most of the paint onto paper towels before lightly brushing the carving with a light back and forth motion…think of it as a feather soft brushing of the carving.  If you use a fat enough brush and a light touch, this leaves only a hint of colour on the highest points of the carving and leaves a sense of dust or wear.

As a final touch, the acrylic paints were covered with an acrylic satin finish and wiped dry with a paper towel.  Lynn Doughty gives several good examples of this process on his Outwestwoodcarving site.  I tend to start first with a light coat of white gesso as a primer directly on the wood but will try Lynn’s method of painting with acrylics directly on the wood at some point.

I think that the hat is looking pretty good and will suit this little hound cowboy…not quite a villain type but, out on the range, he ain’t no push-over either.

OLYMPUS DIGITAL CAMERA

Cedar Posts & Rails

The base for Buford the Cattle Wrangler is going to feature a cedar post and rail fence for him to rest against.  I remembered seeing a nice carving by Lynn Doughty of a cowboy leaning against a fence and kept that backdrop in mind as I pulled this base together.

The entire thing is made out of oak and I intend to stain the base and paint the posts and rails with acrylics.  In the centre of the base will be some gravel or sand…I still need to sort that out.

The posts and rails were simply cut out of the same material used for the base and then rounded into shape with a carving knife.  I drilled two holes in the base at an angle both to the side and to the back.  The ends of the posts were then trimmed back to fit snugly in the drilled holes of the base.  Once glued, these posts won’t be moving far.

I also dished the rails and the posts a bit where they meet so that there will be a bit of a saddle where the final glue will adhere the two pieces together.  The nail won’t add any strength and is just decorative.  I’ll paint the nail head to resemble an old iron nail.

That’s about it for now.  I hope everyone has a nice Easter weekend.

OLYMPUS DIGITAL CAMERA

OLYMPUS DIGITAL CAMERA

Two Ears and a Relaxed Pose

Both ears are now carved and tacked in place with a dab of glue along with his six-shooter.  Some minor detailing yet to do and some final gluing before I can start painting.

The second ear was done in the same way as the first…a blank cut out on the bandsaw, some initial rough fitting with the Typhoon bit and Foredom tool, and then some slow fitting using pencil lead and carving knives / chisels.  After taking a good look at the final pose, I shortened up both ears just slightly to cover the arms but not drape too much beyond the arms.  That was Peggy’s suggestion and, I think, a good one.  I like the way he’s looking.

OLYMPUS DIGITAL CAMERA

I’ll get started on the post and rail fence that Buford will be leaning up against and fit all of that together just to make sure that everything is landing in the right place before I start painting.  More to come!

An Ear for Cattle Herding

This morning’s activities involved nursing a sore back, cleaning several Rosie “droppings” from the backyard and starting into the ears for Buford.  I didn’t enjoy the sore back part nor the backyard part ( Rosie did ) but I did enjoy the carving part.  And my back is feeling a little better.

I made a fairly quick template out of paper just to get the general shape of the ear that would eventually curl around one arm and fall just short of the six-shooter.  After transferring a front and side view of this template to a piece of basswood ( thanks, Emily, for the basswood ), I rough cut it on the bandsaw and then did some minimal shaping with some carving tools.

OLYMPUS DIGITAL CAMERA

OLYMPUS DIGITAL CAMERA

Following this step, I went back to the tried-and-true method of putting pencil lead on the arm, placing the ear in place, having the pencil lead transfer to the ear and then carving away the pencil lead.  Because the fitting was such a drastic removal of wood, I was able to eye-ball much of the material that had to be removed and resort to the pencil lead only when the final fitting was needed.  Again, I used the Typhoon carbide bit on the Foredom tool to remove the material quickly and then followed up with carving knives and chisels to do some final fitting.

OLYMPUS DIGITAL CAMERA

OLYMPUS DIGITAL CAMERA

I still have the detailing to do, and, in particular, figure out if the ear is going to need to fold around the cedar rail that this little hound will be leaning against…but, here’s the general shape.  On to the other ear…

OLYMPUS DIGITAL CAMERA

Gluing the Arms on Buford

I don’t have a lot to report on Buford’s progress other than that I’ve fitted both arms, now with gloves, and have epoxied the arms in place.  Recall that I had already done a lot of fitting of the arms by using the method of marking the mating surfaces with pencil lead and carving away the high points.  I also made sure that all of the wrinkles that were to go into the sleeves were there prior to gluing the arms in place so that I wouldn’t be trying to carve into tight spots.

OLYMPUS DIGITAL CAMERA

This week I’ll get to sawing out the ears and shaping them around the arms.  My plan is to have the one ear go over Buford’s right arm and fall inside the holster so that the six-shooter doesn’t get hidden in any way.  Should look nice.

The Gloves are On!

Here’s my progress on the clay sculpture step of creating my Hockey Player carving.

You’ll recall that this carving of the happily beaten up hockey player will be called “Two Minutes for Fighting” and will feature our hero spending that time in the penalty box.  The clay torso and penalty box boards were a result of a not-so-very-successful job at trying to carve his posture just using the two dimensional drawing that I sketched up.  This three dimensional clay sculpture is really helping me bring this little guy to life.

At this point, I’ve included both gloves and have started on some wrinkles on this arm and around his shoulder pads.  It’s kind of time consuming and I’m not sure that I’d want to do the clay work for every carving that I take on…but, in this case, the extra work is fun and useful.

That’s a coffee stir stick in his hands for now…to be replaced with a hockey stick!

OLYMPUS DIGITAL CAMERA

Post Navigation