tributesinwood

Wood Carvings by Mark Sheridan

Archive for the tag “Religious Figures”

Saturday Progress

Well, not a whole day on Saturday…but a few hours work, anyway.  The real event today was watching “Scrooge” with my son, Paul.  Now this is the “real” Scrooge starring Alistair Sims.  I’ve been watching this since I was a kid at Christmas and it’s a tradition for Paul and I to watch it as well.  Kind of scary and not very Christmas-y really…but it’s tradition!

Here’s the work that I completed today and I’m really enjoying the way that it’s shaping up.  As you can see, I’ve started to use and will continue to use sandpaper following the chisel work on this carving to provide a fine and smooth finish to the piece.

dsc_1258

Roughing-In

Here’s some initial roughing-in of the image of Mary with child.  It’s coming along pretty nicely.

Even though I knew that I would be carving it about 5/8″ deep and that the clay model was roughly that depth, it still looks surprisingly deep when it’s carved into the wood.  The recessed arch that the image rests within probably has something to do with it looking like a deeper relief carving than it actually is.

I think that the finished carving is going to look pretty sharp.

dsc_1251

Let the Carving Begin…

I picked up some very nice 1 1/8″ thick basswood and am ready to begin carving.  I was originally intending to carve into the built box, but am going in a different direction with it by carving into the individual sides and then gluing it together as a box later.

I cut out the exact size that I needed for one of the box sides and glued a copy of the drawing that I made directly onto the wood.  My plan is to cut around and into the paper copy as I produce the relief carving using a combination of chisels and Foredom tools.

When the figure and archway are carved and sanded, I’ll use my radial arm saw to cut the sides and bottom of the basswood at a 45 degree bevel.  Each side and the box bottom cut with the 45 degree bevels will make the gluing surfaces for the box construction.  This way, each glued edge will be hidden and not show any end grain.

That’s my plan…if you have a different idea, let me know.

dsc_1250

Clay Version of Michael

Here’s the start to a clay model of Archangel Michael.  I’m just about ready to start carving these clay renditions into the basswood box sides…maybe I’ll be able to get started next week.

DSC_1201.jpg

Clay Modelling

Here’s a clay model of the figure of Mary and child that I’ll eventually use as the 3D model for the relief that I’ll be carving.  I’ve found while doing my last several carvings that a quick clay model is really helpful in the carving process.  The wood carving ends up being a bit different, of course, but the clay really gives you a much better sense of how to carve than does the 2D sketch.  The relief is fairly shallow with the difference from the base to the highest point being a little over 1/2″…but, the effect is pretty nice, I believe.

dsc_1019

I built up the clay right over top of the drawing that I had produced earlier.  Once that was done, I flattened out about a 1/4″ thick piece of clay and laid the built up clay over top of that.  This gave the clay model a little bit more strength and also allowed me to carve out a bit more depth in a few spots.

As the clay that I use is water based ( not oil-based ), I need to keep it moist so that it doesn’t fully dry, shrink and crack.  I’ve placed the figure in a zip-lock plastic freezer bag with a moist paper towel covering it and will check on it now and again before I use it to begin the carving.

My plan is to model each of the four clay figures that I’ll need before putting too much attention into creation of the box carvings.

Religious Figures – Chalice Box

For some time I’ve wanted to try my hand at carving a religious figure.  As a boy , I probably spent more time studying the carved figures at our church than I did paying attention to the sermons!   I suppose that’s just being a boy and doesn’t have much to do with someday becoming a wood carver.

The figures at our neighbourhood church were painstakingly carved and sanded smooth without a hint of showing any of the knife and chisel marks.  Some were lightly stained, but a few had only hints of colour added to highlight and deepen the shadow effect in flowing robes and garments.  Although I would never have been close enough or had enough nerve to touch one of the carvings,  I know now that they were constructed of fairly soft materials like pine, but mostly basswood.  I hesitated to say that they were constructed of fairly soft wood because basswood for all of it’s “carve-ability” is actually a hardwood.

Anyways, some fifty years later, here I am fortunate enough to have been asked to design a chalice box and to carve a number of religious figures into each of its four sides.

screen-shot-2016-11-02-at-2-42-07-pmThe box, itself, was rather simple in construction and was more likely to include painted sides, as in the example, here.  Although the chalice is within the box, it actually protrudes through the top of the box and many of the boxes have a split top with hinged sides so that the chalice can be lifted easily from the box.

The box that I will make and carve will be about 12″ tall and 11″ wide to accommodate a chalice that is 13″ tall.  The top will have an opening and also be hinged as I’ve described.  The four sides will have relief carvings of a single figure per side and I plan to chip-carve some traditional designs along the edges of the box.

dsc_1011

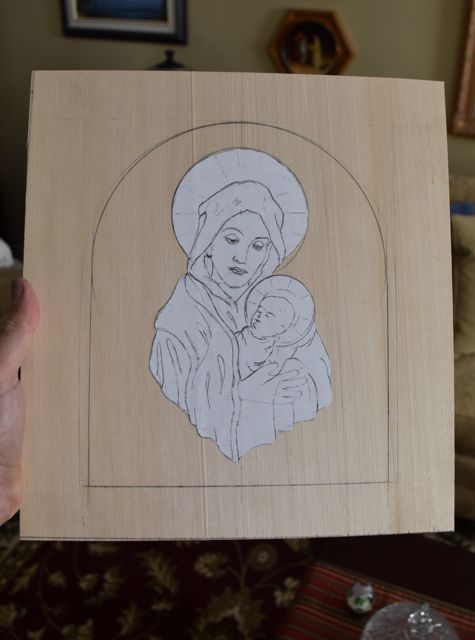
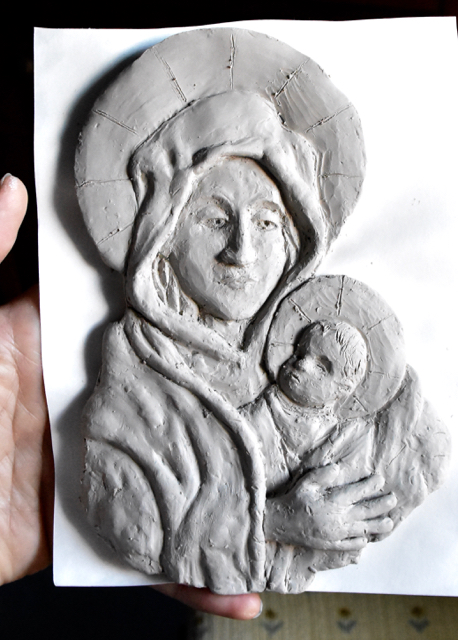
I’ve done a fairly quick sketch of one of the figures based on a variety of traditional depictions of Mary with Jesus.  I’ll use this concept sketch only to create a clay model of the relief that I’ll base my carving on.  I fully expect once I start the clay model that the depiction will change slightly.

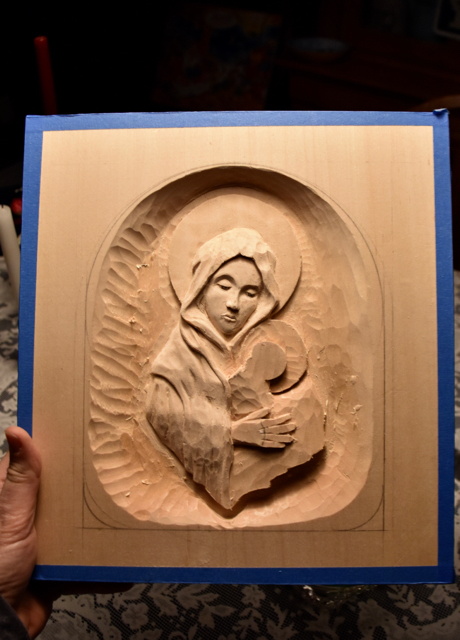
As the sides of the box are large, the figure will be quite large and I’m picturing it to be framed within a carved arch.  As the basswood will be naturally light in colour, as I’m finishing the project I may add some colour to the figures as well as a bit of darkening with brown tones to give it an older and more traditional feel.

I think that this is going to be an interesting project that will take me some time to complete and I hope you’ll enjoy it.   Your feedback and ideas are always appreciated.

Post Navigation