tributesinwood

Wood Carvings by Mark Sheridan

Painting the Wheels

You’ll remember that I actually cut out the wheel parts initially with a hole saw and then glued the pieces together and detailed them a bit on a lathe.

Today I used a wood burner to create deeper ridges for the treads and the whitewalls on the tires.  These ridges allowed me to be a little less cautious with the painting, as the thinned paint would only flow as far as the ridge and no further…so, you didn’t get too much bleeding of one paint colour into the next.

I think it’s all looking pretty good for what I’d consider as the base coat.  Once I detail the wheels in a bit more with a variety of highlight colours, I think that they’re going to look pretty good.  At least the little hounds look happy.

DSC_0329

DSC_0330

Finishing Up The Base Coats

I think I’ve got the two hounds painted about where I want them.  I used a lot of different browns in their coats…milk chocolate, asphaltum, linen…and a bit of yellow ochre to soften the browns.  The little passenger has a mottled pattern on her back as well as a larger “spot” of asphaltum with a few washes of carbon black.  This weekend, I’ll seal the acrylic on the hounds with satin urethane.  This last step really brightens up the colours even further.

You can see from these photos that I’ve taken the first few steps at painting the car.  Right now, I have a cherry red base coat that’s starting to look really nice.

As usual, just click on the photo to make it bigger.

Painting the Hounds

I’ve started painting the hounds, beginning with their helmets and goggles and then moving on to the faces and ears.

Everything other than the driver’s collar is a combination of browns and yellow.  The helmets got a base coat of asphaltum with highlights of chocolate, burnt umber and yellow ochre.  The goggles got pretty much the same treatment but with a base of chocolate.  Once they were done, both got a dry brushing of linen and then later chocolate to highlight the high spots.   I think that it turned out pretty well and the leather looks well worn.

The base coat on both dogs is linen lightened with white.  Over that base coat, the darker sections are chocolate washes alternated with a very dilute yellow ochre wash.  Around the noses I “dabbed” these washes to give them a bit of a mottled effect.

There’s still lots of painting to do but I’ve got a start on it.  The painting has actually been a nice diversion from yardwork ( but I’m not complaining about the nice weather).

DSC_0311

Blowing in the Wind

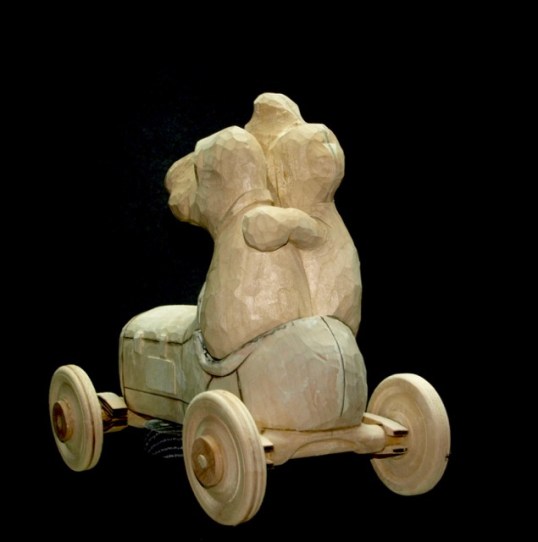
No, not Peter, Paul and Mary…just a few Basset ears.  With the ears taking shape, the car has really picked up some speed.  It sure doesn’t look like a static carving any longer.

I carved the ears much like I did the arms in my usual fashion of fitting them with the use of a small bar of sketching lead used on the two mating parts to highlight the high points.  With some gentle carving and shaping, you end up with a really tight fit that becomes stronger than the wood once the epoxy is applied.

As a note of interest, the lead that I’m using is a piece that I bought at an art store a decade ago when we went to France for a short vacation.  We brought that along with a large piece of paper and were able to make an etching of the headstone of a great uncle of mine who sadly died in Cambrai during the last few days of the first world war.  That was quite an experience.

I should also mention that I attended just a super professional carving competition and show in Belleville on Saturday.  Very well organized.  The Belleville situated “Quinte” club meets twice a week for carving and socializing and is about a 40 minute drive for me from door to door.  Guess who’ll be joining that club?  I entered “A Moving Experience” in the competition and received a 1st in Caricatures, 1st in Open and People’s Choice Award.  I met some great people and saw some great carvings…

Here are a few photos of the steps that I took in the creation of the ears.  I’m just finishing the fourth ear…then it’s on to some more of the detail on the car.

Completing Arms and Goggles

I’ve added the arms in my usual way.  Aside from the arm that is wrapped around the back of the driver and is carved directly into the wood, the other three arms were added separately so that the direction of the wood grain runs along the arm giving it the greatest strength.

You might be able to see from the photo that each arm had been placed in its rough location and then drilled through the shoulder with a 1/4″ bit followed by a wood dowel.  This helped me ensure that while I was fitting the arm to the body the arm was ending up in the exact same spot every time I removed it for shaping.  The shaping was done by shading the body with lead pencil and then letting that lead transfer to the “unleaded” arm.  The resulting marks on the unleaded arm showed where the high spots were and they were simply cut away with a chisel or knife.  Doing this several times mates the two pieces together very closely.


DSC_0211

You can also see from the photo that the eyes within the goggles are starting to emerge.  The driver is fairly wide-eyed and his friend is squinting and howling.

Niagara Wood Carving Show

I just got back from the Niagara Wood Carving Show.  I was really pleased to have won the Peoples’ Choice Award for “Two Minutes for Fighting” and 2nd Best in Show for “A Moving Experience.”

The real news ( beyond the fact that Niagara got about 4″ of snow while I was there…) is that the carvings entered in the show and those on display were exceptional.  Here are a few photos that I took of some of the carvings.  They’ll inspire you to do more carving!

Just click on the image to make it bigger.


Racing Attire

Actually, I really haven’t had much carving time in over the last few days.  But I did spend my time productively…we drove down to Ancaster and Niagara for some Easter visits and treats and had a terrific time.  Paul even got to do some Easter Egg hunting at Emily’s.

OLYMPUS DIGITAL CAMERA

Even though I didn’t make too much progress on the little Racing Hounds, I had to include this update photo of their goggles and leather helmets.  I think that they’re really going to look great once they’re painted up.  What’s going to be an interesting challenge is carving their eyes within the goggle opening!  I think that will be a lot more interesting than just painting the lenses on the goggles a dark colour.

Stay tuned!

OLYMPUS DIGITAL CAMERA


Back to Wood Carving

The clay hounds have been left behind now and I’ve moved on to their wood versions.

I didn’t take a photo of it, but what I did was hold the clay figures up to a piece of paper and outlined the side view shape onto the paper.  This takes a bit of eye-balling as you want to make sure that the lines that you draw are accurate and as close to a 90 degree angle to the paper.  With a little practice and some measurements from the clay to the paper just to check that everything is true, you end up with a side view that you can take to the bandsaw.

If you’re careful, you can do the same for the front view by holding the clay figure now up against the profile that you just sawed out on the bandsaw.  This is a bit trickier as the saw pattern left on the figure is contoured and not a flat plane.  Again, with a bit of practice it’s possible to get a nice pattern developed.  Just remember that when you take this to the bandsaw you will not have the flat plane that you originally had to rest on the bandsaw table.  What I did was to lightly glue onto the back a portion of the profile that I had cut off, so that I now would have a flat surface to cut against.

At that point, out came the Typhoon bits and the Foredom tool for some rough shaping followed by the chisels and knives.  Here’s where I am at this point.

OLYMPUS DIGITAL CAMERAOLYMPUS DIGITAL CAMERA

Clay Figures Completed

This is about as far as I’m going to need to go with the clay figures so that I’ll be able to use it as a model for the wood carving of the little racing hounds.

The driver is leaning forward pretty nicely as he cuts through the wind, while the passenger/navigator seems to be just enjoying the motion and the breeze while howling away!  The driver’s left hand will be on an external handle while his right hand will be perched up on top of the steering wheel.  Both dogs will have their ears blowing in the wind…and, I just reminded myself I wanted to have them wearing scarves…so, I’ll need to add that quickly to the clay sculptures.

Next stop is cutting the blanks out on the bandsaw.  Although their arms will be well supported, I’m pretty sure that I’m going to do their arms separately so that I can ensure that the wood grain is going in the strongest direction.

OLYMPUS DIGITAL CAMERAOLYMPUS DIGITAL CAMERAOLYMPUS DIGITAL CAMERA

Emily’s First Pyrography Project

My very talented daughter is visiting this weekend during March Break.  When Emily visits, there’s always more food, music and general activity/noise at home.  And we all love it, including Rosie.

On this visit, she decided to try her hand at pyrography so I cut a couple of basswood blanks for her.  I think that she’s found something else that will compete for her time.  Here’s her first project that she calls a test.  I think it’s a lot better than a test.

OLYMPUS DIGITAL CAMERA


Post Navigation