tributesinwood

Wood Carvings by Mark Sheridan

Ottawa Carving Show

I attended the Ottawa Carving Show this past weekend hosted by the Outaouais Carving Club.  Again, this show was well attended and approximately 180 carvings were entered in all classes.  The event attracts many competitors from Eastern Ontario and Quebec who bring along outstanding carvings.  A very friendly gathering with an opportunity to meet some really nice people.

I entered my two bark carvings along with Cpl. Duncan Sowerby.  Registration was Friday evening so I made the quick trip to Ottawa and again on Sunday afternoon to spend some time taking in the show.  The club always puts on a great prize presentation at the end of the show on Sunday and has a lot of fun with the process.  You would never guess by their light-heartedness that so much gruelling work had gone in to making the event such a success.

Image

Image

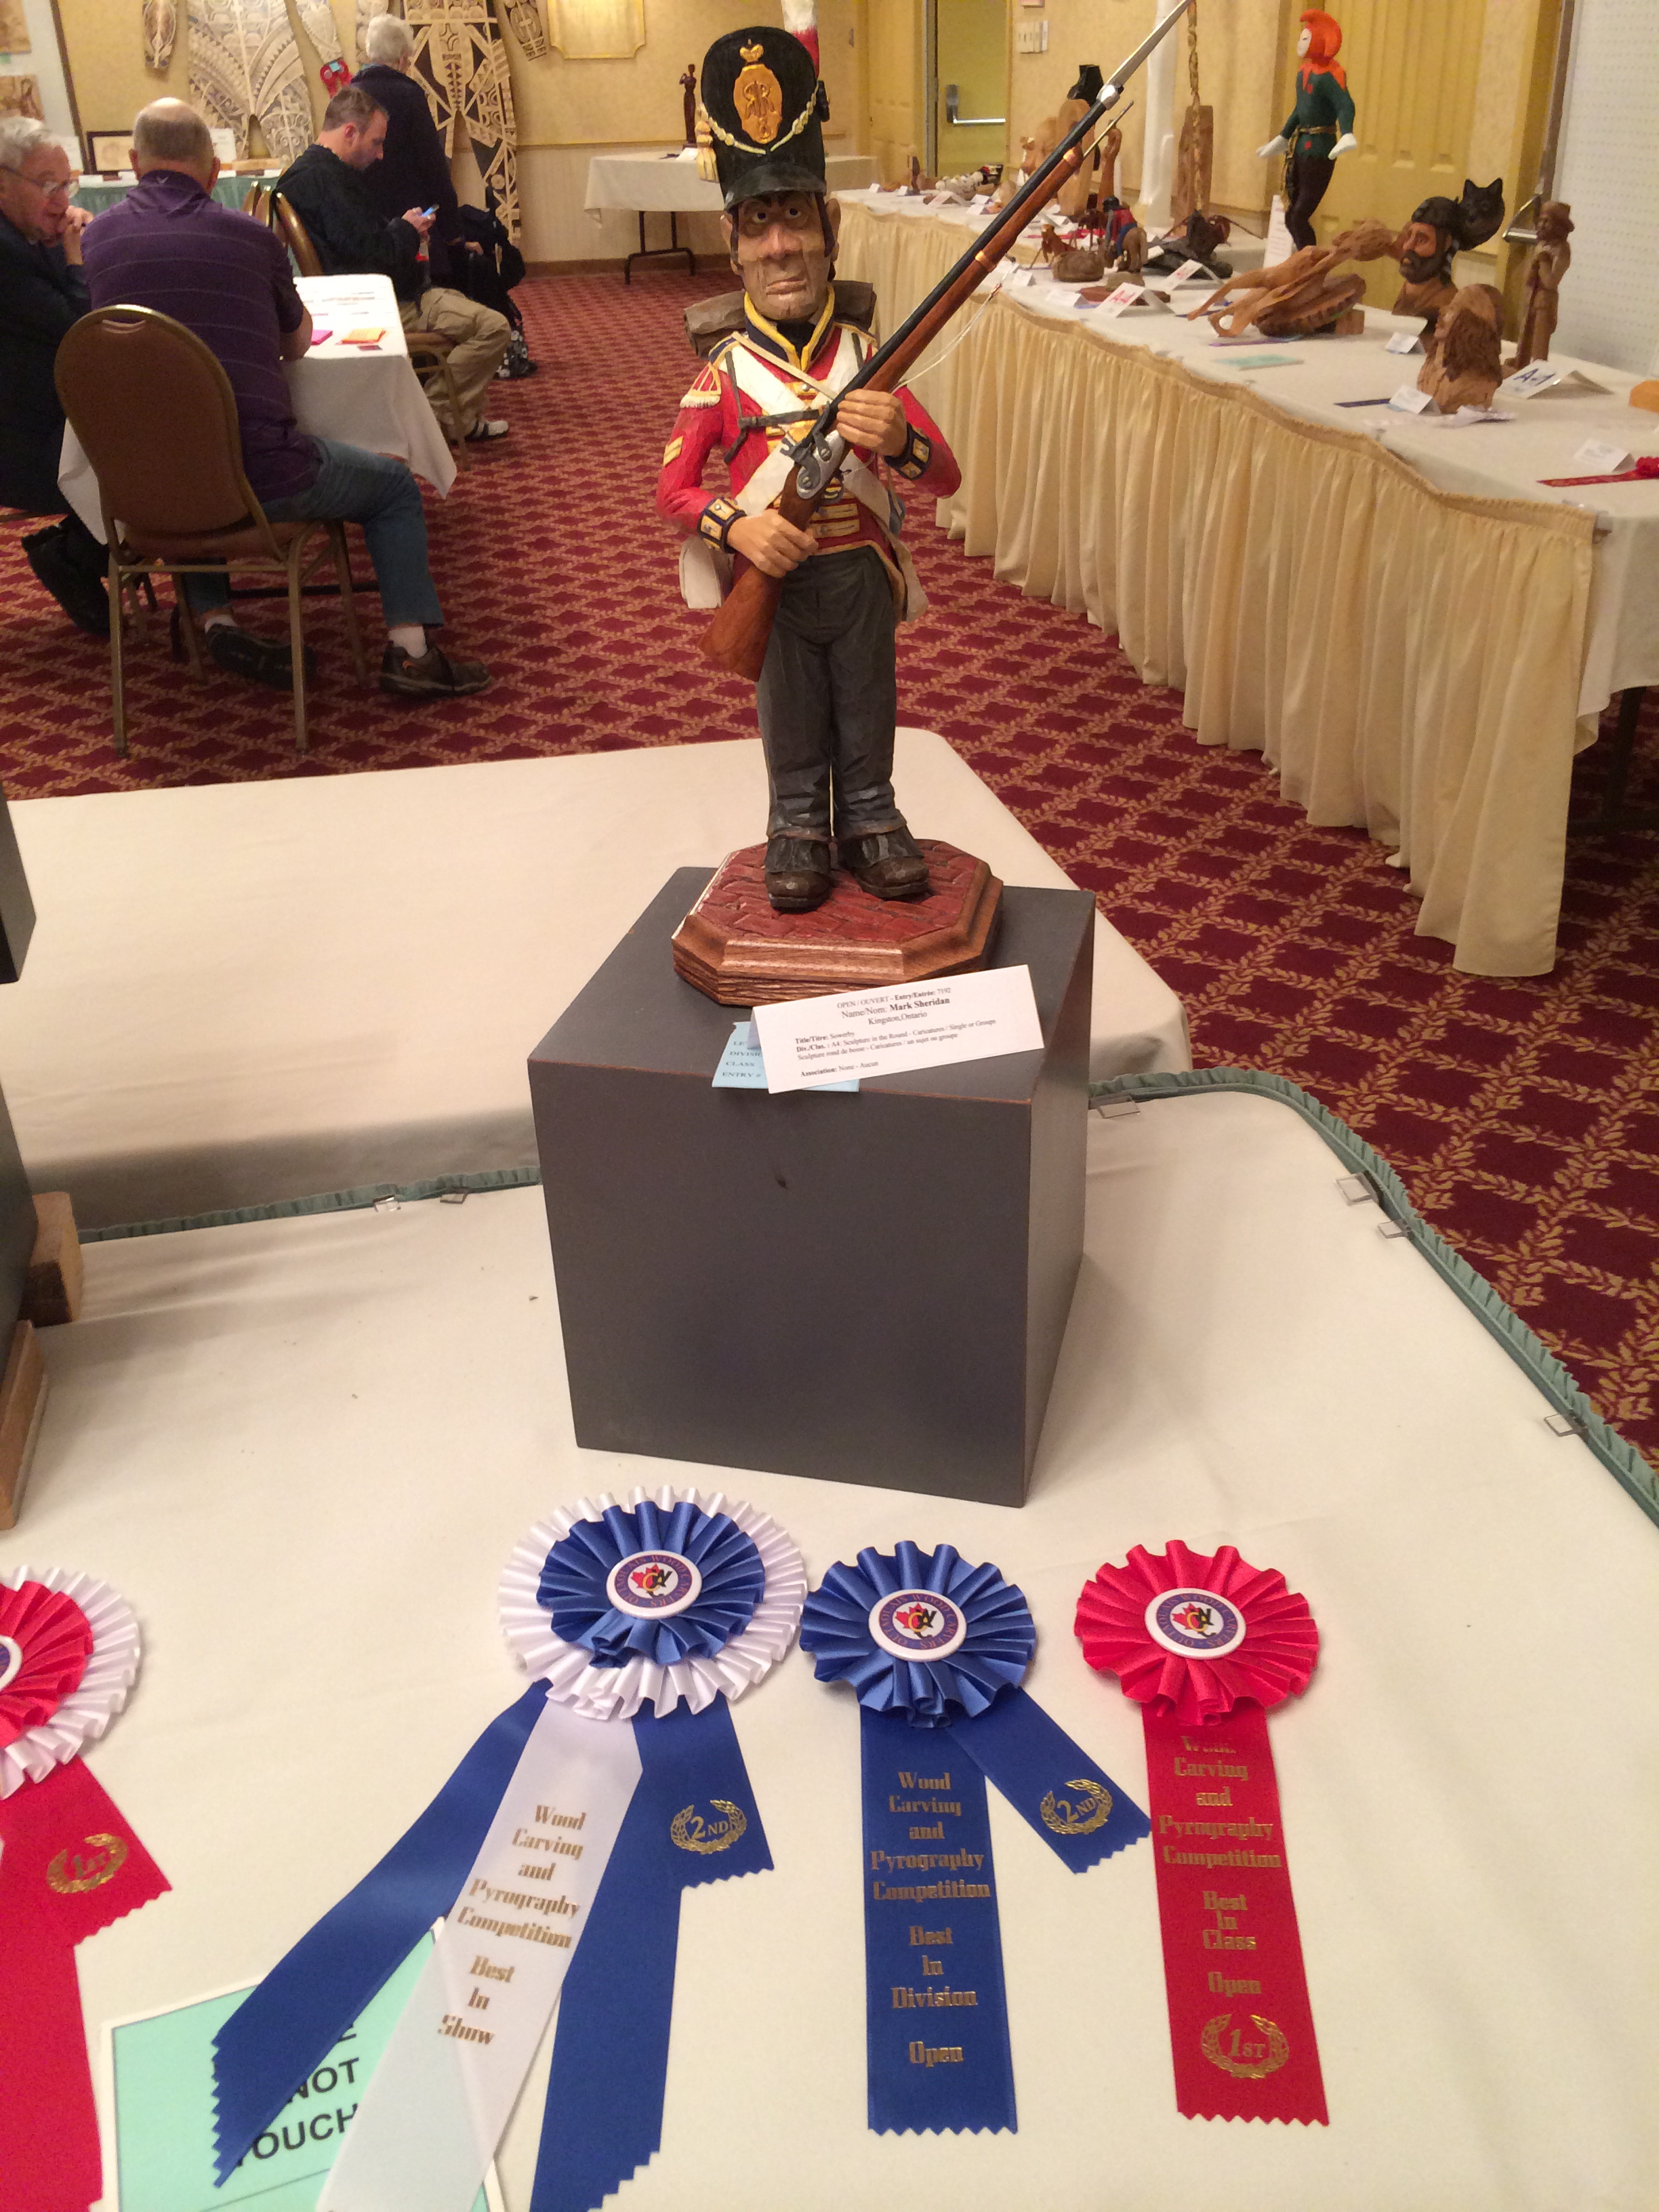
I was very happy to take away a 1st Place in Class and 3rd Best in Division for the “Castle Cottonwood” and a 2nd Place in Class for the “Cottonwood Mill”.  But what really knocked my socks off was a 1st in Class, 2nd in Division and a 2nd Best in Show for the Corporal.  He seemed to be standing a little taller…I know that I was!

IMG_0064 IMG_0066 IMG_0067

Be sure to check out the Outaouais Club’s website ( I’ve included it in the links to the right of this page ) and plan to attend this event next year.  I’ll upload all of the photos that I took at the event on the Tributesinwood Flickr Photos link soon.

Ties, Captains and Bones

I’ve painted the ties with a combination of different acrylic browns…asphaltum, burnt umber, raw umber, chocolate…with a few washes of Payne’s Grey through the centre section of the ties to give it some darkness as if years of locomotive oil and debris have landed on it.  Once I get the clear coat on it, the different shades will really come out.

I applied some white glue to the ballast sections and then sprinkled on some “crushed stone.”  Ok, the crushed stone is not quite that.  I’ve done some patio block work around the house and I had a bag of the filler that you use between the blocks to set them.  This is actually a polymer filler that looks about the same size as limestone screenings that are often used for leveling patio blocks.  Anyways, the interesting thing about the polymer is that it sets fairly hard with water.  So, once the white glue dries the first layer of “stones” in place, a misting of water sets the upper layers.  I found that I did need to add a dab of white glue to any upper larger “rocks” to keep them in place.  It’s looking pretty good so far as you can see by that smiling man in the photo.

ImageImage

By the way, Captain America and Bones collected quite a loot on Hallowe’en…

Image

Rails and Ties…and, Captain America

I worked a bit on the ties and ballast that will make up a part of the base for Ned and “Hobo”.  The wood is basswood that I picked up at the Pickering Carving Show.  I carved several ties into the basswood and chiseled out some irregular ground between the ties.  My plan is to make this ground look like a combination of gravel and dirt with just the right amount of oil and debris to make it look like it’s been well travelled.  The rails themselves will be cut to the right lengths once I get the ties completed.

Image

Image

Now, how about Captain America…well, it doesn’t have much to do with carving but it is craft related and features my #1 son, Paul.  As he decided that he would be Captain America for Hallowe’en, Peggy has been very busy sewing and creating his costume.  She did a terrific job and he’s already been the Captain at one party with several more parties to come.   Happy Hallowe’en!

Image

Image

Pickering Woodcarving Show

I enjoyed attending the Pickering, Ontario, “Magic in Wood” carving show this past weekend. The show appeared to have about 350 carvings in competition and many more on display.

I’ve included a few pictures of the carvings, both on display and in the competition, in the Tributesinwood Flickr Photo album link to the right of this page. I also took a few videos which I’ll post shortly.

I was very pleased that Cpl. Duncan Sowerby earned a 1st Place in Intermediates Caricatures and my two bark carvings, Castle Cottonwood and Cottonwood Mill, earned a 2nd and 3rd respectively in the Bark Carving category.

The owners of the bark carvings ( Mom and Emily ) will be getting their carvings back but should not expect to get the ribbons!

Image

Image

Image

“Hobo” the Basset Hound

Ned’s Basset Hound is currently under construction.  I’m looking for lots of wrinkles, squinted eyes and ears pinned back as Ned and “Hobo” rocket along the rails.  Still lots to do, but I’ve got the start to a pretty good little friend for Ned.

Image

Image

Onto the Rails

I actually pondered for some time on a good way to come up with some reasonably looking rails for Ned’s pump-car.  I had some good suggestions given to me along the lines of hobby shop rails, making some castings, etc.  As I considered these methods, each was abandoned for one reason or another.

I really didn’t want to start shaping a small piece of wood with chisels and I couldn’t get my head around holding a thin piece of wood up to a router bit safely.

At about the same time, I started thinking about approximating the shape of a rail.  I had put some moulding along our kitchen cabinets a little while ago and when I picked up some scraps that I still had laying around, I realized that if I glued them back-to-back, it started to look a bit like a rail.

Image

As it still needed some shaping, I temporarily glued the flat section ( bottom ) of the rail to a larger piece of wood that I could use to hold while routing on the router table and that would keep my fingers well away from the router bit.  After a few passes with a couple of router bits, the rail is looking pretty respectable.  I little bit of sanding and some shaping and I think that I have the start of a base.

Image

Kingston Pembroke Railway

The pump-car got a paint job started yesterday.  Originally yellow in colour, you can see that it’s been out in the weather for a while ( just like Ned ) and looks a bit worse for wear.  The weathering with browns and greys was actually a lot of fun.  I’ve started putting some nail holes in the floor boards and will add some rusted-looking nails in a while.

Still a bit more to do on the pump car but I did add a weathered looking “Kingston Pembroke Railway” logo on the sides of the pump car.  I used old “Letraset” letters ( remember those? ) which are transferred onto the wood with a bit of rubbing.  Following that, I took a sharp knife and removed some portions of a few of the letters to make it look weathered as well.

The Kingston Pembroke Railway was a line that existed in the late 1800’s up to the mid-1900’s and served a wide area around where I live.  Known as the K&P it was often referred to as the “Kick and Push” railway…which might give us a hint as to its reliability at the time.

The other fun item that I added, and which is a bit difficult to see in these photos, is a Canadian Pacific brochure from the 1930’s.  I found this on the web and reduced it down, printed it on photo paper and backed it up with a small piece of house flashing ( metal ).  Ned’s holding it in his left hand.  Across the top of the brochure it says ” Across Canada “.  A fun little extra touch.

More updates to come soon.

Image

Image

Ned Ties One On

A bit of a long-in-coming update, here, with Ned’s painting completed along with some shirt, vest and jacket buttons and a fairly worn polka-dot tie.  I’ve been pretty busy with many other things but do plan to spend some time on the painting of the rail car over the next couple of weeks.

The buttons are nail heads, and on the shirt, pin heads.  The tie is metal house flashing that I cut with a pair of heavy scissors and bent around to form a “windsor knot” and give the impression that the tie is flapping in the wind.

Hope you enjoy the updates.

Image

Image

Some Initial Painting

Here are a few shots of Ned with some paint.  I still have some highlighting to do as well as the clear urethane finish to protect ( and brighten ) the acrylics.  I’m pretty happy with the way that he’s turning out.  Peggy really likes the shoes as I have a similarly scuffed up pair downstairs.

Image

Image

Image

Ned’s Assembled Parts

The unfortunate part of carving various parts of a carving is that you get to a certain point where you start assembling the pieces and you end up…well, playing with the figure…rather than continuing on with carving.

So, given that, Ned’s been scooting around the dining room table top lately since the wheels and axles have been completed.  Actually, it’s a good thing that I didn’t make the pump mechanism actually pump with hinged arms or I’d never get this carving completed.

Image

Since my last update, the wheels and axles are pretty much complete, although I do want to carve up some nuts and bolts to glue to the wheels.  I’ve also included some wedge shaped blocks that fit above and beneath the axles.  I thought that it was important to include some blocks beneath the axles as you will be able to see under the rail car to some extent once it’s up on the rails and ties that I’ll be carving at some point.  Also, you’ll notice the lifting beams that ran beneath these pump cars so that a couple of strong workers could lift the unit on and off the rails.

Hope you’re enjoying the updates.

Post Navigation