tributesinwood

Wood Carvings by Mark Sheridan

Archive for the tag “wood caricatures”

Good Boy

Our little dog is eager to get his fill of “Good Boy Dog Chow.”

I actually came across a vintage brand of dog chow called “Good Boy” and combined that name with the old Purina checkered border on their packages.  I liked the way that it turned out as both the checkers and the label were painted to look stretched by the little dog which helps the whole image of the heavy sack getting pulled away from the moving load.

OLYMPUS DIGITAL CAMERA


Another Braided Rug

This is my second braided rug, the first one being included with “The Country Hound.”

I made it along the same lines…I first used a parting tool ( v-shaped ) and a knife to make channels for the line of braids and followed that up with a wood burning tool to give each row a lot of definition.  I then burned the actual braids into the lines by making individual “y’s” that looked like a herring bone design when it was finished.

The painting used three different shades of the same colour in each section.  So, as an example, the blue section consisted of a pale blue, a medium blue and a dark blue repeated over and over ( …and over and over ).  It is truly mindless work but the final result looks nice.

I finished it off with a light dusting of beige and a spray of matte finish.  I would normally use a satin urethane and then wipe away the excess, however, there are so many crevices left from the wood burning tip that it would be impossible to wipe away all of the urethane and you’d be left with a lot of very shiny areas.

I also painted the “porcelain” on the kitchen sink and made sure that I added ample water stains with some yellow-ochre.  The porcelain colour is basically white with washes of “linen.”  I then brushed several coats of white glue ( it’s actually a bit yellow in the bottle) over the whole thing to give the porcelain some depth.  It seemed to turn out pretty well.


Lightly Toasted

I finished up the mattress, lamp and the toaster today although I still want to add electrical cords to the lamp and toaster later on once everything is in place.

I’m not sure if I mentioned earlier that I decided to change up the floor lamp and have it sticking through the rolled up mattress.  So I ended up drilling out within the fold of the mattress and cutting the lamp in about equal halves to insert into either end.

The lamp shade got a coat of automotive primer followed by several coats of acrylic “linen” with some dabs of yellow ochre to give it an aged and a bit stained look.  The lamp stand and legs were first covered with brown “asphaltum” and then dry brushed pretty liberally with a copper colour called “worn penny.”  I think that it duplicated that aged brass look that I was after pretty closely.

The toaster got covered with metal tape often used in HVAC ( furnaces and ducts ) work.  This is an adhesive backed tape that once on the wood can be smoothed out around gentle curves by rubbing on it with a smooth surface like the back of a spoon.  With a bit of grey-black on the parts that would have been the plastic of the time – bakelite- it turned out pretty well.


Everything is Better with Music

Although Mervin doesn’t have a whole lot of spare time, if he could take a break at least he has a borrowed guitar to play.

I first painted the guitar case in a lightened black ( added a bit of grey ) and then highlighted some of the scars in the case with even lighter grey.  I added some raw sienna and yellow ochre to dirty things up a bit before dry brushing with beige.  Everything got the usual satin polyurethane finish for sealing.

The little bumper stickers show that whoever’s moving has attended at least one jamboree and square dance!

OLYMPUS DIGITAL CAMERA

Crate’s Ready for Packing

I painted the crate with a sand coloured acrylic followed by some browns ( burnt umber and asphaltum ) at the edges of the boards along with some grey to make the boards look weathered.  I then added several washes of light beige ( linen ) and yellow to give the impression of weathered grain.  After I lettered the sign, I “scrubbed” in some yellow ochre and raw sienna to dirty things up.

I picked up the lettering style from a web search for “1930’s signs” and I think it turned out pretty well.  I kept the lettering painting pretty thin ( almost like a wash but a bit heavier ) so that it would be a bit translucent and look like it had worn away.  Finally, I finished up with a few streaks of yellow and the sand colour in spots to make it look like the lettering had completely worn through in those areas.

Everything got a light coat of satin polyurethane that was applied and then mostly removed with a paper towel.  This method of the final coat is something that Lynn Doughty “taught” me and it produces a nice dull but protective finish.

Mervin’s business slogan just seems to fit the situation….!

OLYMPUS DIGITAL CAMERA

Some Paint Added

Below are a few items that I’ve painted so far.  I’ve stained the furniture much the same way as you would stain full size furniture and then have used a lot of browns and yellow ochre to give the furniture an aged and used look.  Everything is followed by a light dry brushing of an ivory/beige colour and a final coat of satin polyurethane.

Ready to Start Painting

I still have a few things to tidy up on the carving portion of this project, but I’m itching to start painting so I thought that I’d put the knives away for a while and pull out the paint brushes next.  Here’s what I’ve accomplished recently…

The lamp stand now has a lampshade made of brass.  I used a .010″ thickness of brass sheet and soldered the one edge to create the open ended cone for the shade.  Brass sometimes isn’t the easiest thing to solder, but I find that if I really burnish the surface up with sandpaper and then use a torch and solder ( rather than a soldering gun ), I can get a pretty good bond.

P1243669.jpg

I also added a bit more interest to the birdcage that I carved by opening up the bottom portion a bit and inserting some copper wire to resemble the cage.  I also soldered a small washer over a short piece of copper wire and with a bit of bending and hammering ended up with a pretty reasonable looking hook.  With a few wrinkles carved into the wood, it’s starting to look like a cloth draped over the cage.

OLYMPUS DIGITAL CAMERA

So, prior to some dabbing of paint, this is what it’s looking like.  I’ve added an old-time vacuum cleaner and the little bird that escaped the cage prior to packing.  You won’t be able to tell from this photo, but the cat’s eyes are now less evil thanks to Peggy’s prompting…

OLYMPUS DIGITAL CAMERA

OLYMPUS DIGITAL CAMERA


Who Thought of a Cat?

Well, all of the fine women in my life suggested that a cat was needed so I added one peeking out from beneath some clothes tucked away in the dresser drawer.

Now, I’m not a cat person.  It’s not that I don’t like cats.   I’ve been very nice to cats that we’ve had or that family members have had.  It’s just that I prefer to own a dog.  Really prefer.

In fact, Peggy tells me that by just looking at this cat she can tell that I’m not a cat person. She says the cat looks evil.  I think, then, that I got it about right…

OLYMPUS DIGITAL CAMERA


Leave the Chow

This little dog is now pulling away on the sack of dog chow determined that it stays behind.

I’ve dowelled the sack to the crate and also dowelled about an 1 1/2″ into the dog’s mouth and into the sack.  Once I’ve painted this part up and epoxied it in place, it should be fairly strong and act as an anchor point for the back end of this carving.

I suppose that any wood carving can be broken, but I’ve done my best here to have a fairly strong base that should stand up to reasonable handling.

OLYMPUS DIGITAL CAMERA


Final Detailing

Up to this point I’ve been placing the individual pieces in place temporarily with a glue gun just so that I could get the general shape and location of items figured out.  Now, I’m taking the next step of detailing each piece to it’s final shape before painting.

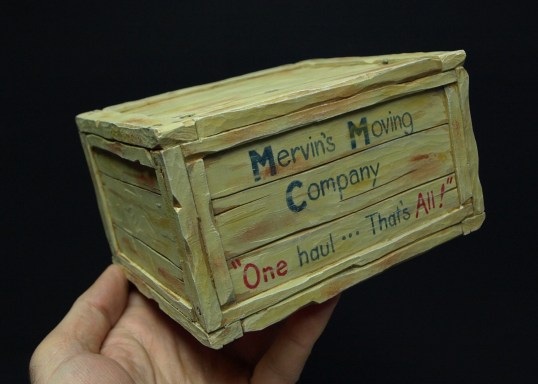
Working from the “centre” of the pile ( which happens to be the crate ), I’ve started by adding a few wood cracks and various knicks into the crate with a knife and chisel.  I’ve also included a few nail heads here and there where you’d imagine the crate is held together.  To make the nail heads, I took a piece of copper tubing ( about an 1/8″ diameter ) and sharpened the circumference of one end with a fine file.  I then fastened it to the end of a soldering gun with some fine copper wire.  With the soldering iron heating up the tubing, I was able to pretty quickly burn the nail heads into the wood.

The back of the crate was drilled out for a 1/4″ dowel as was the back of Mervin.  I did the same thing to locate the mattress against the crate, which you can see in the photo below. Once everything is painted, these dowel pins will be epoxied in place and will give the carving a lot of strength.

OLYMPUS DIGITAL CAMERA

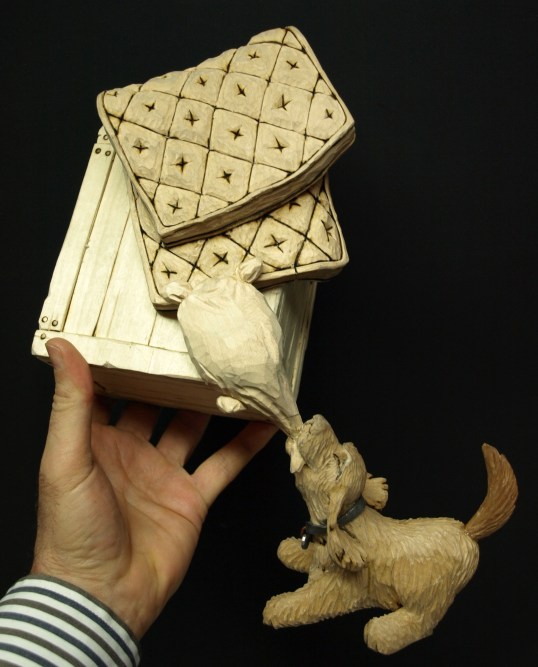
To get the detail into the mattress, I used a knife to cut fairly deep diamonds with a four pointed centre depression.  Then with a shallow chisel, I smoothed out the contour from the outline of the diamonds to the centre depression.  I think it turned out pretty well.  In fact, I’m going to have to rearrange some of the other items to make sure that you can see the mattress once everything is piled on!

OLYMPUS DIGITAL CAMERA


Post Navigation