tributesinwood
Wood Carvings by Mark Sheridan

Archive for the category “Uncategorized”

My Wonderful Daughter
Emily sent me a couple of photos of her fun night out with friends. You’ve probably heard of “paint night” activities…where you join a group for a night of painting a particular scene led by a local artist.
Well, Emily went to such a get together last night and came up with this acrylic masterpiece! She had just a great time and tells me that this group has a Facebook page at paintniteHamilton if you’re interested in seeing other nights that they’ve sponsored.


Just Prior to Final Sanding
Here’s what Michael looks like prior to some final sanding. I added my version of the feathers on the underside of the wings with some chisel work followed up by ruby cutters on a Foredom tool. Ruby cutters are fine stones that provide some cutting along with a satin finish to the wood. I used these tear-drop shaped cutters so that I wouldn’t have to cut each in by hand and likely leave some knife and chisel marks.
I’m still working a bit on Michael’s face, as well. I’m looking for a not too kindly but not too frightening expression!
I haven’t really been doing too much carving over the Christmas holiday. Instead, I’ve been enjoying Emily’s company during her visit home. Tomorrow, she’ll be heading back which will send me back into the workshop to finish some fine sanding. Following that, I’ll set this panel aside and begin the third panel of the chalice box with the image of Jesus holding a chalice and loaf.

More Detail
Here’s another quick update on how this project is going. A little bit more detailing left and some final sanding and I’ll be on to Archangel Michael as another panel on my chalice box project. I should mention that all of the blue masking tape is just to protect the wood from dings while I do the carving.
The carving has been very enjoyable and I’m really only using a few chisels for the work. The only “special” chisel that I’ve used is a bent style ( much like a spoon ) to be able to scoop out along the archway on the top and bottom where access is limited. A nice project and certainly being done at the right time of year!

Today’s Progress
I have to admit that I spent more time cleaning leaves out of the yard than I did planning my carving…but, here’s the progress that I’ve made on the one image.


I still have a bit more to go before I’ll be satisfied with the model for the carving. It’s interesting how your brain works when it comes to artwork. I find that as I’m working on something like this, “my brain” gets used to how things are looking and sort of accepts it. It’s not until I take a photo of the carving, or in this case, the clay, that I start to see what else needs to be done before it looks right to me. Another trick that I’ve used to similarly change my view of something is to hold the carving ( or clay ) up in a mirror to look at it. The reverse image almost immediately points the things out to you that just aren’t right or are out of proportion.
So, a bit more that I want to do on this figure before putting it aside. It’s all fun…
Second Figure of Jesus
The chalice box will have a depiction of Jesus holding a chalice in one hand and a small loaf of bread in the other hand. There are actually quite a number of ancient pieces of artwork of Jesus in this particular pose and I used a number of combined sources to come up with my own depiction. Again, the relief is about 5/8″ deep which produces enough of a shadow effect to give you a sense of 3D but it’s not dee p enough to allow you to get the perfect perspective from all angles that you’d get out of looking at a true “in the round” carving. So, it’s a bit of a trade-off.
I built up the clay model bit by bit and then, once it was dried somewhat, I used some sharp sculpting tools to shave away pieces until I was happy with the contours. I still have quite a bit of work to do on the hands yet as I want a good clay model before I attempt them in wood.
This clay work is actually well timed as it’s easy on the wrists and arms and I’m just in the midst of recuperating from some bothersome tendonitis (tennis elbow ). If you ever think about cutting up and ripping out all the carpets in your house on your own to prepare for hardwood floors…don’t.
Clay Modelling
Here’s a clay model of the figure of Mary and child that I’ll eventually use as the 3D model for the relief that I’ll be carving. I’ve found while doing my last several carvings that a quick clay model is really helpful in the carving process. The wood carving ends up being a bit different, of course, but the clay really gives you a much better sense of how to carve than does the 2D sketch. The relief is fairly shallow with the difference from the base to the highest point being a little over 1/2″…but, the effect is pretty nice, I believe.
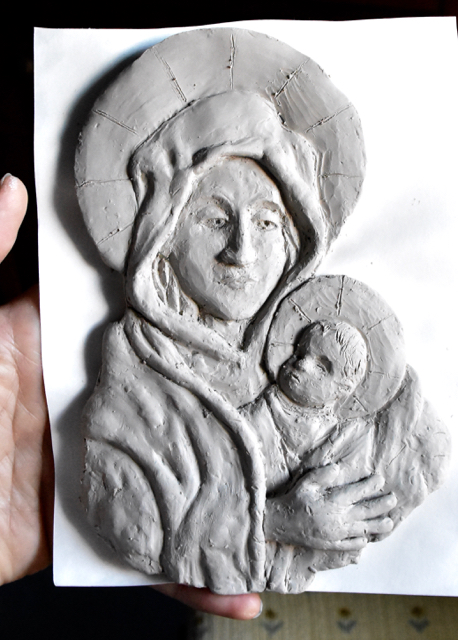
I built up the clay right over top of the drawing that I had produced earlier. Once that was done, I flattened out about a 1/4″ thick piece of clay and laid the built up clay over top of that. This gave the clay model a little bit more strength and also allowed me to carve out a bit more depth in a few spots.
As the clay that I use is water based ( not oil-based ), I need to keep it moist so that it doesn’t fully dry, shrink and crack. I’ve placed the figure in a zip-lock plastic freezer bag with a moist paper towel covering it and will check on it now and again before I use it to begin the carving.
My plan is to model each of the four clay figures that I’ll need before putting too much attention into creation of the box carvings.
Learn by Doing
The “Learn by Doing” crowd at the recent Magic in Wood Show asked me if I would provide them with a few close-ups of the little hound-in-the-gift-bag carving that they started at the show. Here are a few additional photos, below, for this group and any others that might want to try this project. Of course, you can look back in these posts to find a few more photos of the little dog.
Click on the image to make it bigger…


A Busy Summer
Well, this has been a busy and productive summer and it looks like the fall will be at least as busy. Right now I have most of the carpets removed from the first floor of our home and will be getting the sub-floors ready for installing some hardwood in a few weeks. Following that, I have a fence that I really need to fix up a bit before winter…and that’ll be a bit of a big project as well. I do have the Magic in Wood Show and Competition coming up in mid-October to look forward to, but I don’t think that I’ll get much major carving in prior to that…other than the roughing-out of the little Bassets that I’ll use for leading the Learn by Doing portion of the show.
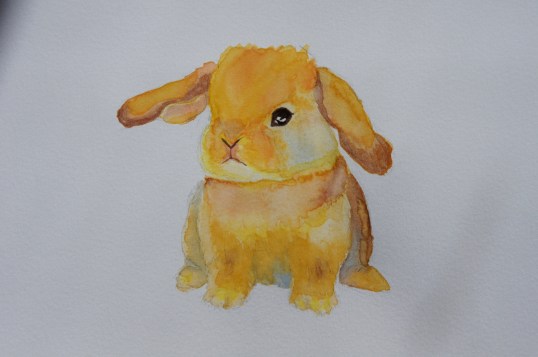
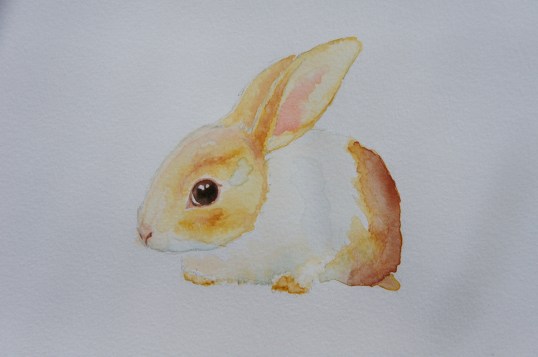
Although I haven’t moved too far along on my artistic duties this summer, my talented daughter, Emily, sure has. She decided to try her hand at water colours and has struck another great talent. Take a look at the paintings she’s produced. Quite a gal.


Six Bassets and a Sheltie
Rosie and I have been in the shop this week. In October, I’ll be leading a Learning by Doing session at the Magic in Wood Competition and Show in Pickering. I’ll be helping people create the little Basset-in-a-gift-bag that you saw in an earlier post. I’m not sure how many people ( if any ) will sign up for the session at this point, but I now have five versions of the little guy cut out on the bandsaw. I’m planning to rough them out a bit with a Foredom tool just so that people have a head start on the carving. I only have two or three hours with the group so I think the rough out will be appreciated.

I haven’t been too active lately with my carving, other than this preparation work. I’m hoping that the fall period will open up some more time for carving. I definitely have lots of ideas and plans…
Top Posts & Pages
