tributesinwood

Wood Carvings by Mark Sheridan

Archive for the tag “Dog Carving”

A Moving Experience

All done and tied down with tea-soaked twine!  Mervin’s off to the Canadian Woodcarving Championship Show in Hamilton this weekend…

I’ll get some more photos on Flickr next week.  Just click on the photo, below, and you’ll get a larger view.

Load ‘Em Up

Well, Mervin finally has some colour and some of the load is now glued in place.  It’s looking pretty good, all in all.  You learn something new with each carving and although there are a few things that I would now do differently, I’m really pleased with the way this carving is turning out.

I picked up a nice piece of maple for a base and carved in some cobblestone and painted it using a reddish-brown and highlighted with burnt umber and yellow ochre.  In between the cobblestones is a sand coloured acrylic paint with a wash over it of the same colour as the bricks.

Notice in behind the carving there was a bit of a dead space that just didn’t look right, so I added a little sewer opening.  I like the way it fits in with the carving and makes it look like Mervin has just stepped off of the curb and is on his way down the road.

By the way, the maple was very, very hard.  I think I’ll return to a softer hardwood on my next carving.

OLYMPUS DIGITAL CAMERA


Assembling the Parts

I still have the Mervin character to paint, but I thought I’d spend some time in assembling his moving load.

Here’s a quick shot of some of the assembled parts.

The mattress ended up looking really nice.  It’s actually a shame to cover it with other items!  I used brass nails with nicely rounded heads and trimmed them back and then glued them in drilled holes wherever a mattress “button” should appear.  Later, I painted the brass heads and gave them a light coat of polyurethane to seal them.

This weekend, I’ll do some final prep on Mervin and get the painting started on him.

OLYMPUS DIGITAL CAMERA


Good Boy

Our little dog is eager to get his fill of “Good Boy Dog Chow.”

I actually came across a vintage brand of dog chow called “Good Boy” and combined that name with the old Purina checkered border on their packages.  I liked the way that it turned out as both the checkers and the label were painted to look stretched by the little dog which helps the whole image of the heavy sack getting pulled away from the moving load.

OLYMPUS DIGITAL CAMERA


Leave the Chow

This little dog is now pulling away on the sack of dog chow determined that it stays behind.

I’ve dowelled the sack to the crate and also dowelled about an 1 1/2″ into the dog’s mouth and into the sack.  Once I’ve painted this part up and epoxied it in place, it should be fairly strong and act as an anchor point for the back end of this carving.

I suppose that any wood carving can be broken, but I’ve done my best here to have a fairly strong base that should stand up to reasonable handling.

OLYMPUS DIGITAL CAMERA


The Shaggy Dog

Well, with the help of a small gouge, our little dog became the little shaggy dog.  Paul calls him Snoopy and I’m not sure why…

With the rough contouring I did earlier, the small gouge accentuated the hills and valleys in his coat and made the whole thing come to life, I think.  I added a metal ( lead ) collar and tag as well.  The tag is attached to the collar with some copper wire.  If you use lead, remember, it’s safe as long as you don’t ingest it…so, wash your hands after handling it.  It’ll all eventually be painted and sealed.

OLYMPUS DIGITAL CAMERA


I also started a covered birdcage and little bird that somehow got out just in time for the big move.  This thing is getting tall and I’m not sure where I’m going to put it once it’s done!

OLYMPUS DIGITAL CAMERA


Back to Carving

Now that the clay work is done, I can get started on the carved version of the dog.

I made a quick pencil outline on a piece of paper based on the top, front and side view of the clay sculpture and then transferred that to a piece of basswood.  When it came off of the bandsaw, it looked like this…it looks huge only because it’s closer to the camera.

OLYMPUS DIGITAL CAMERA

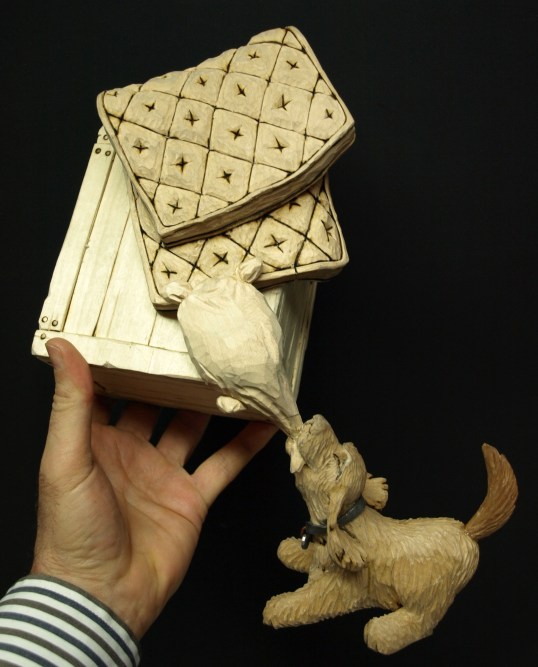
Once again, I used a combination of a Foredom tool with a Typhoon bit and later, a Proxxon  motorized carver to do the roughing in of the shape.  It’s still pretty chunky compared to the clay version, but that’ll give me a bit of  room for detailing.  All the detailing will now be done with knives and chisels.  I’m going to try to skinny down this little dog so he looks hungry enough to want to steal that sack of dog chow.

OLYMPUS DIGITAL CAMERA

I had also done some preliminary work on the dog chow sack that this little pup will be trying to pull off of Mervin’s load.  I actually googled “Purina” dog chow and got a whole slew of different dog chows from a variety of brands dating back to production in the mid 1800’s in the U.K….Spiller’s, Molassine, Vims and several more.  I’ll choose one to put it’s 1930’s era logo and slogan on the sack.  One slogan is simply “better than the others”…I wonder who came up with that marketing breakthrough?

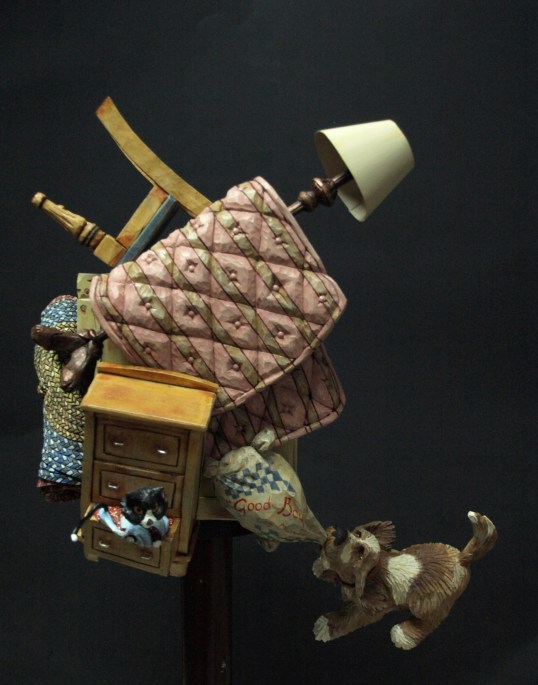
So, here’s what it’s going to roughly look like when the dog and sack is complete and in place.  Again, a benefit of adding the dog is to give me another base point for the carving.

OLYMPUS DIGITAL CAMERA


Speaking of hungry and troublesome dogs,  Rosie is enjoying our first big ( and late for us ) snowfall.

OLYMPUS DIGITAL CAMERA


A Troublesome Friend

I just needed to add a dog somehow and decided that a mutt of some kind could possibly add to Mervin’s troubles.

I’m starting with clay again just to get the right pose down before I start into the wood carving.  This little dog will be tugging away at a sack of dog chow on Mervin’s load.

The addition of the dog is two-fold, really.  The  idea of it trying to keep the chow will help tell the story of moving, but it will also provide a third support for the carving…Mervin’s two feet and the dog.  I may even drill a long hole and install a rod or screw from the base of the carving up through the dog’s mouth and into the sack to give greater strength to the overall carving.

Here’s the start to the clay sculpture.  There could be a bit of Spaniel, Lab and Basset in this little guy.  You artists and dog lovers chime in…does the pose look right?

OLYMPUS DIGITAL CAMERA

OLYMPUS DIGITAL CAMERA


The Beach Basset Completed

Here’s the completed carving of the Beach Basset.  Enjoy!  I’ll get some more photos on he Flickr Site shortly.

OLYMPUS DIGITAL CAMERA

OLYMPUS DIGITAL CAMERA

A Little Reading Material

Well, here’s something new for me.

You’ll recall from an earlier post that I fashioned a newspaper out of a light sheet of brass, with some soldering and “newspaper white” painting included.

Now comes time for the printed sections.  I knew that the printing couldn’t be readable given the size of the paper (!) and that I only needed to provide some chicken scratch for the articles, but, I wasn’t completely sure how I was going to do it.  I eventually decided on using a mechanical pencil with an HB lead ( read: small, soft and dark ), followed with a light mist coating of a matte finish urethane to prevent things from smudging.

I’ve completed the front of the paper and even included a couple of advertisements and a “photo” of a doghouse to go along with one of the articles.  I’m pretty pleased with the Daily News so far!

OLYMPUS DIGITAL CAMERA

Post Navigation