tributesinwood

Wood Carvings by Mark Sheridan

Archive for the tag “Dog Carving”

And the Snow Keeps Coming…

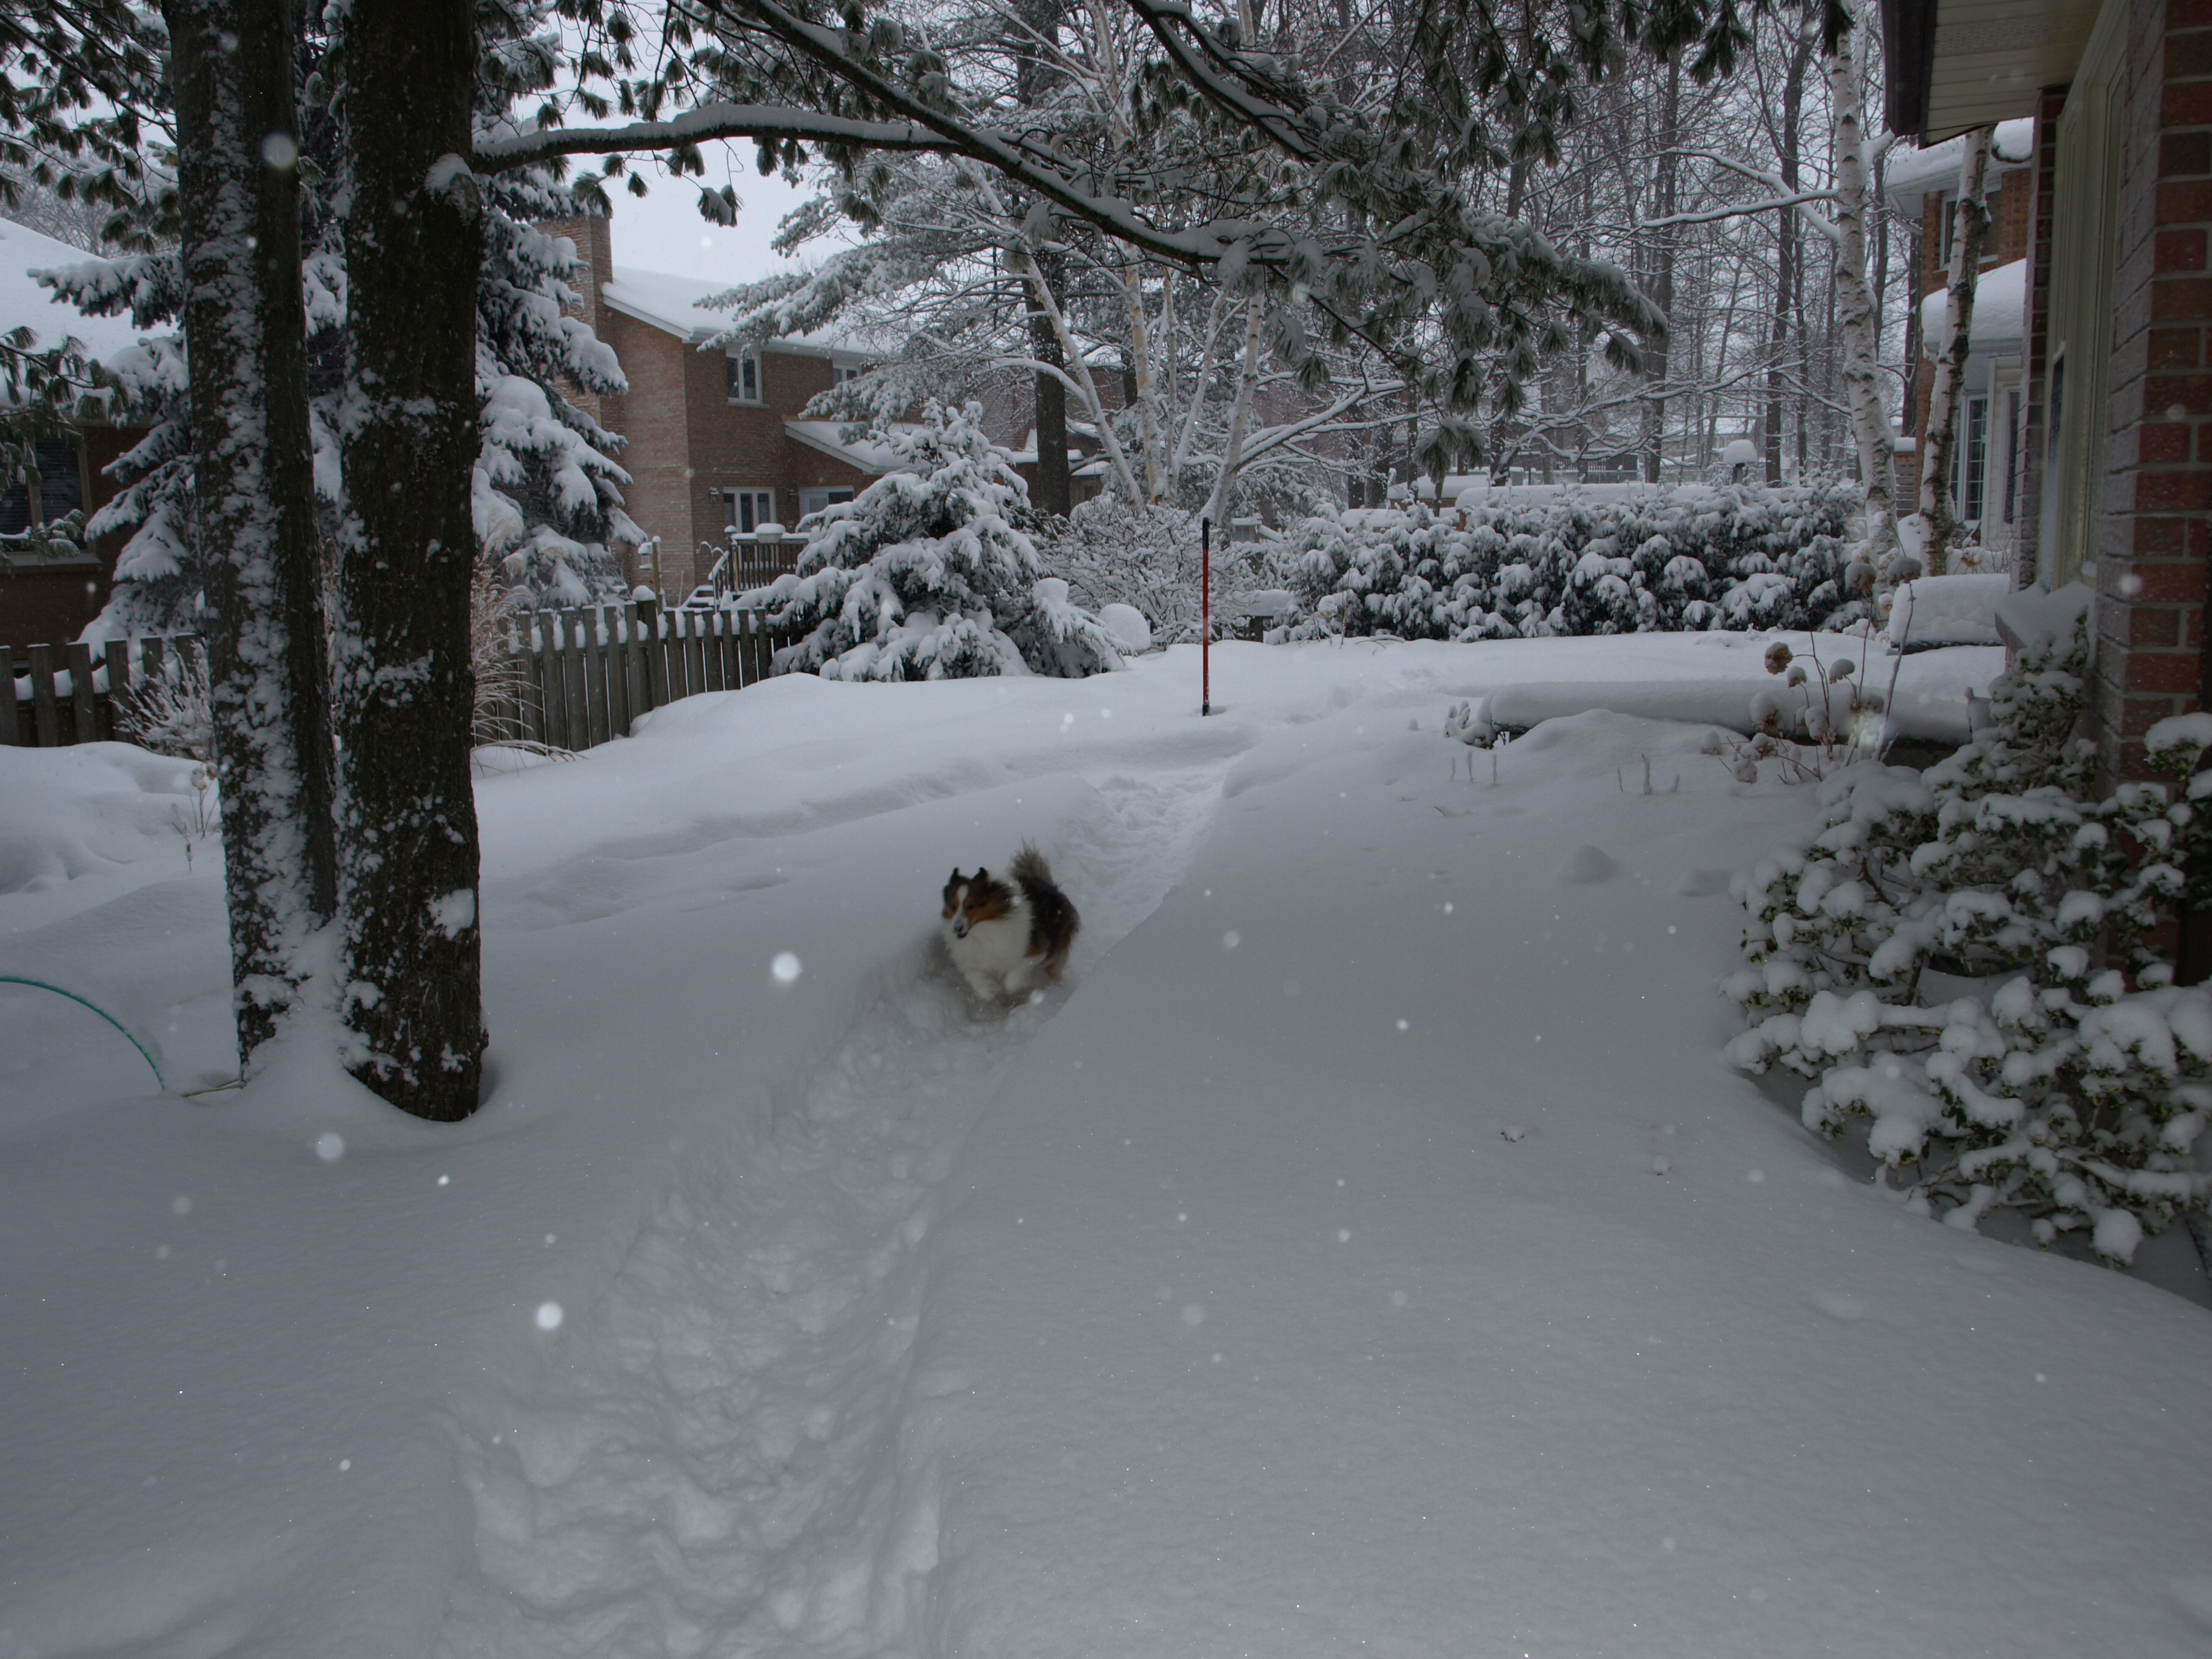
Well, this is definitely February in Ontario.  Rosie enjoys it, though, and I have a good reason to stay in and carve.  I actually had to cut a little path in the snow so that Rosie could get outside without tunnelling!

OLYMPUS DIGITAL CAMERA

OLYMPUS DIGITAL CAMERA

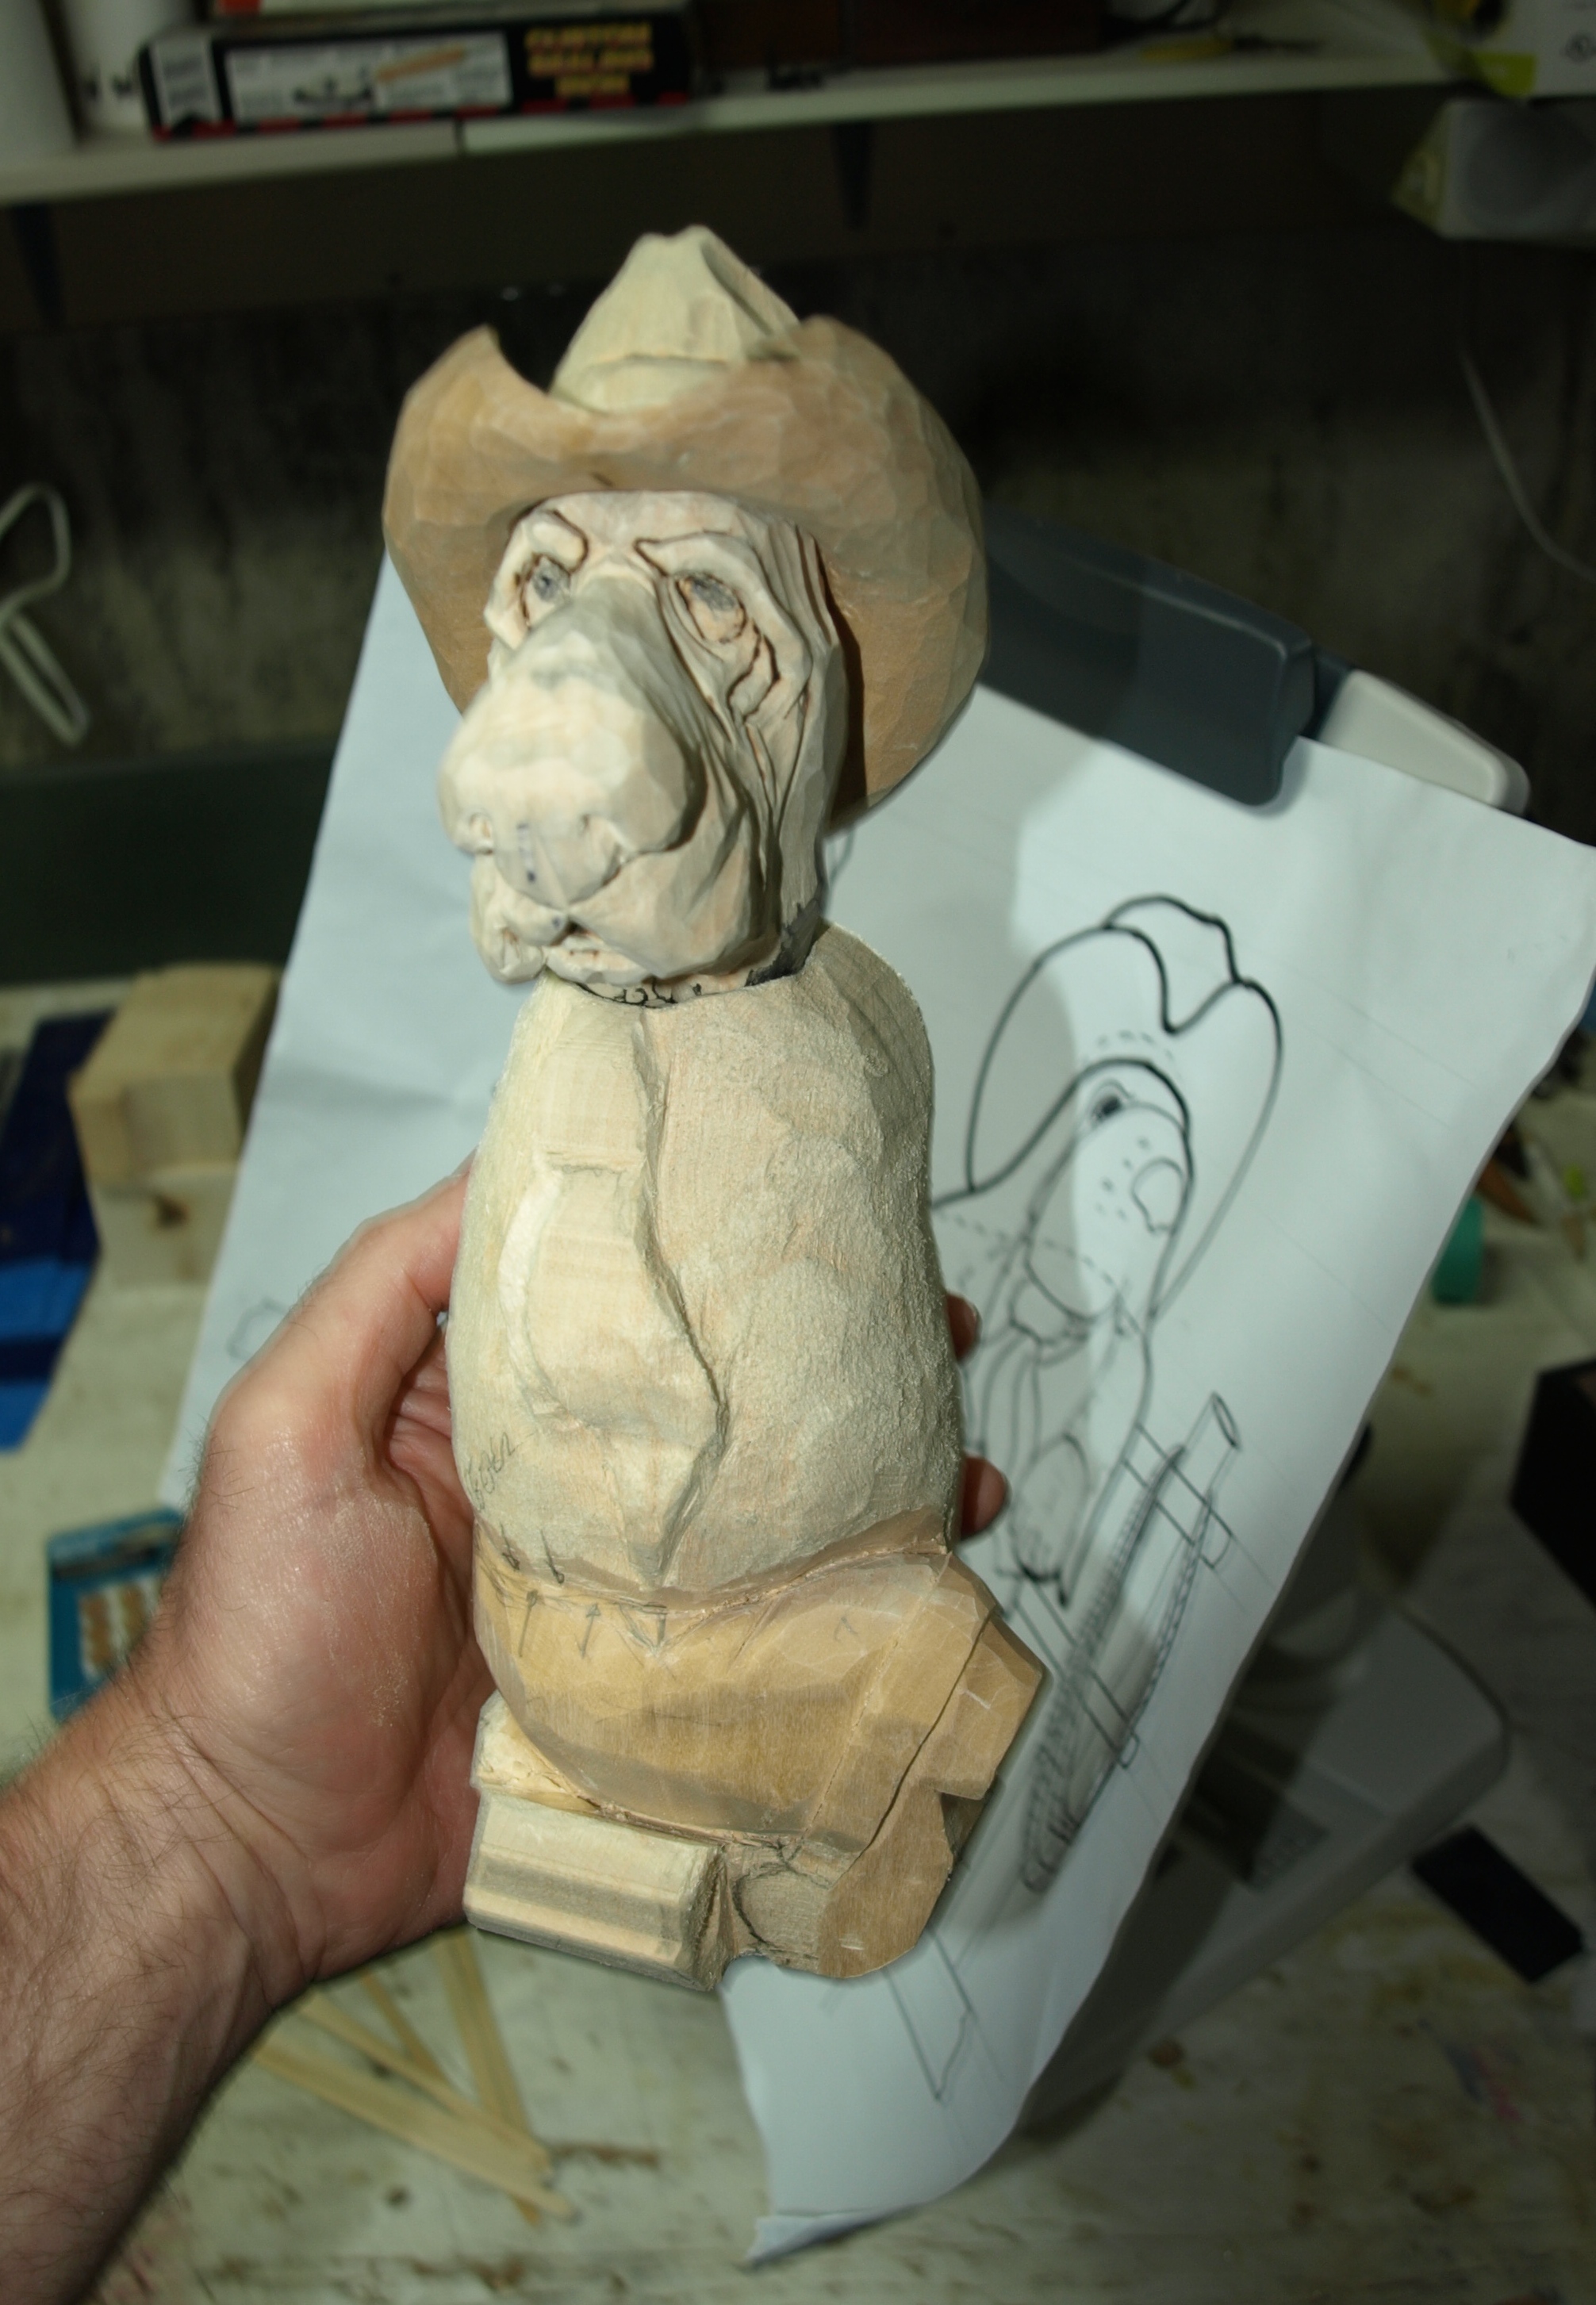
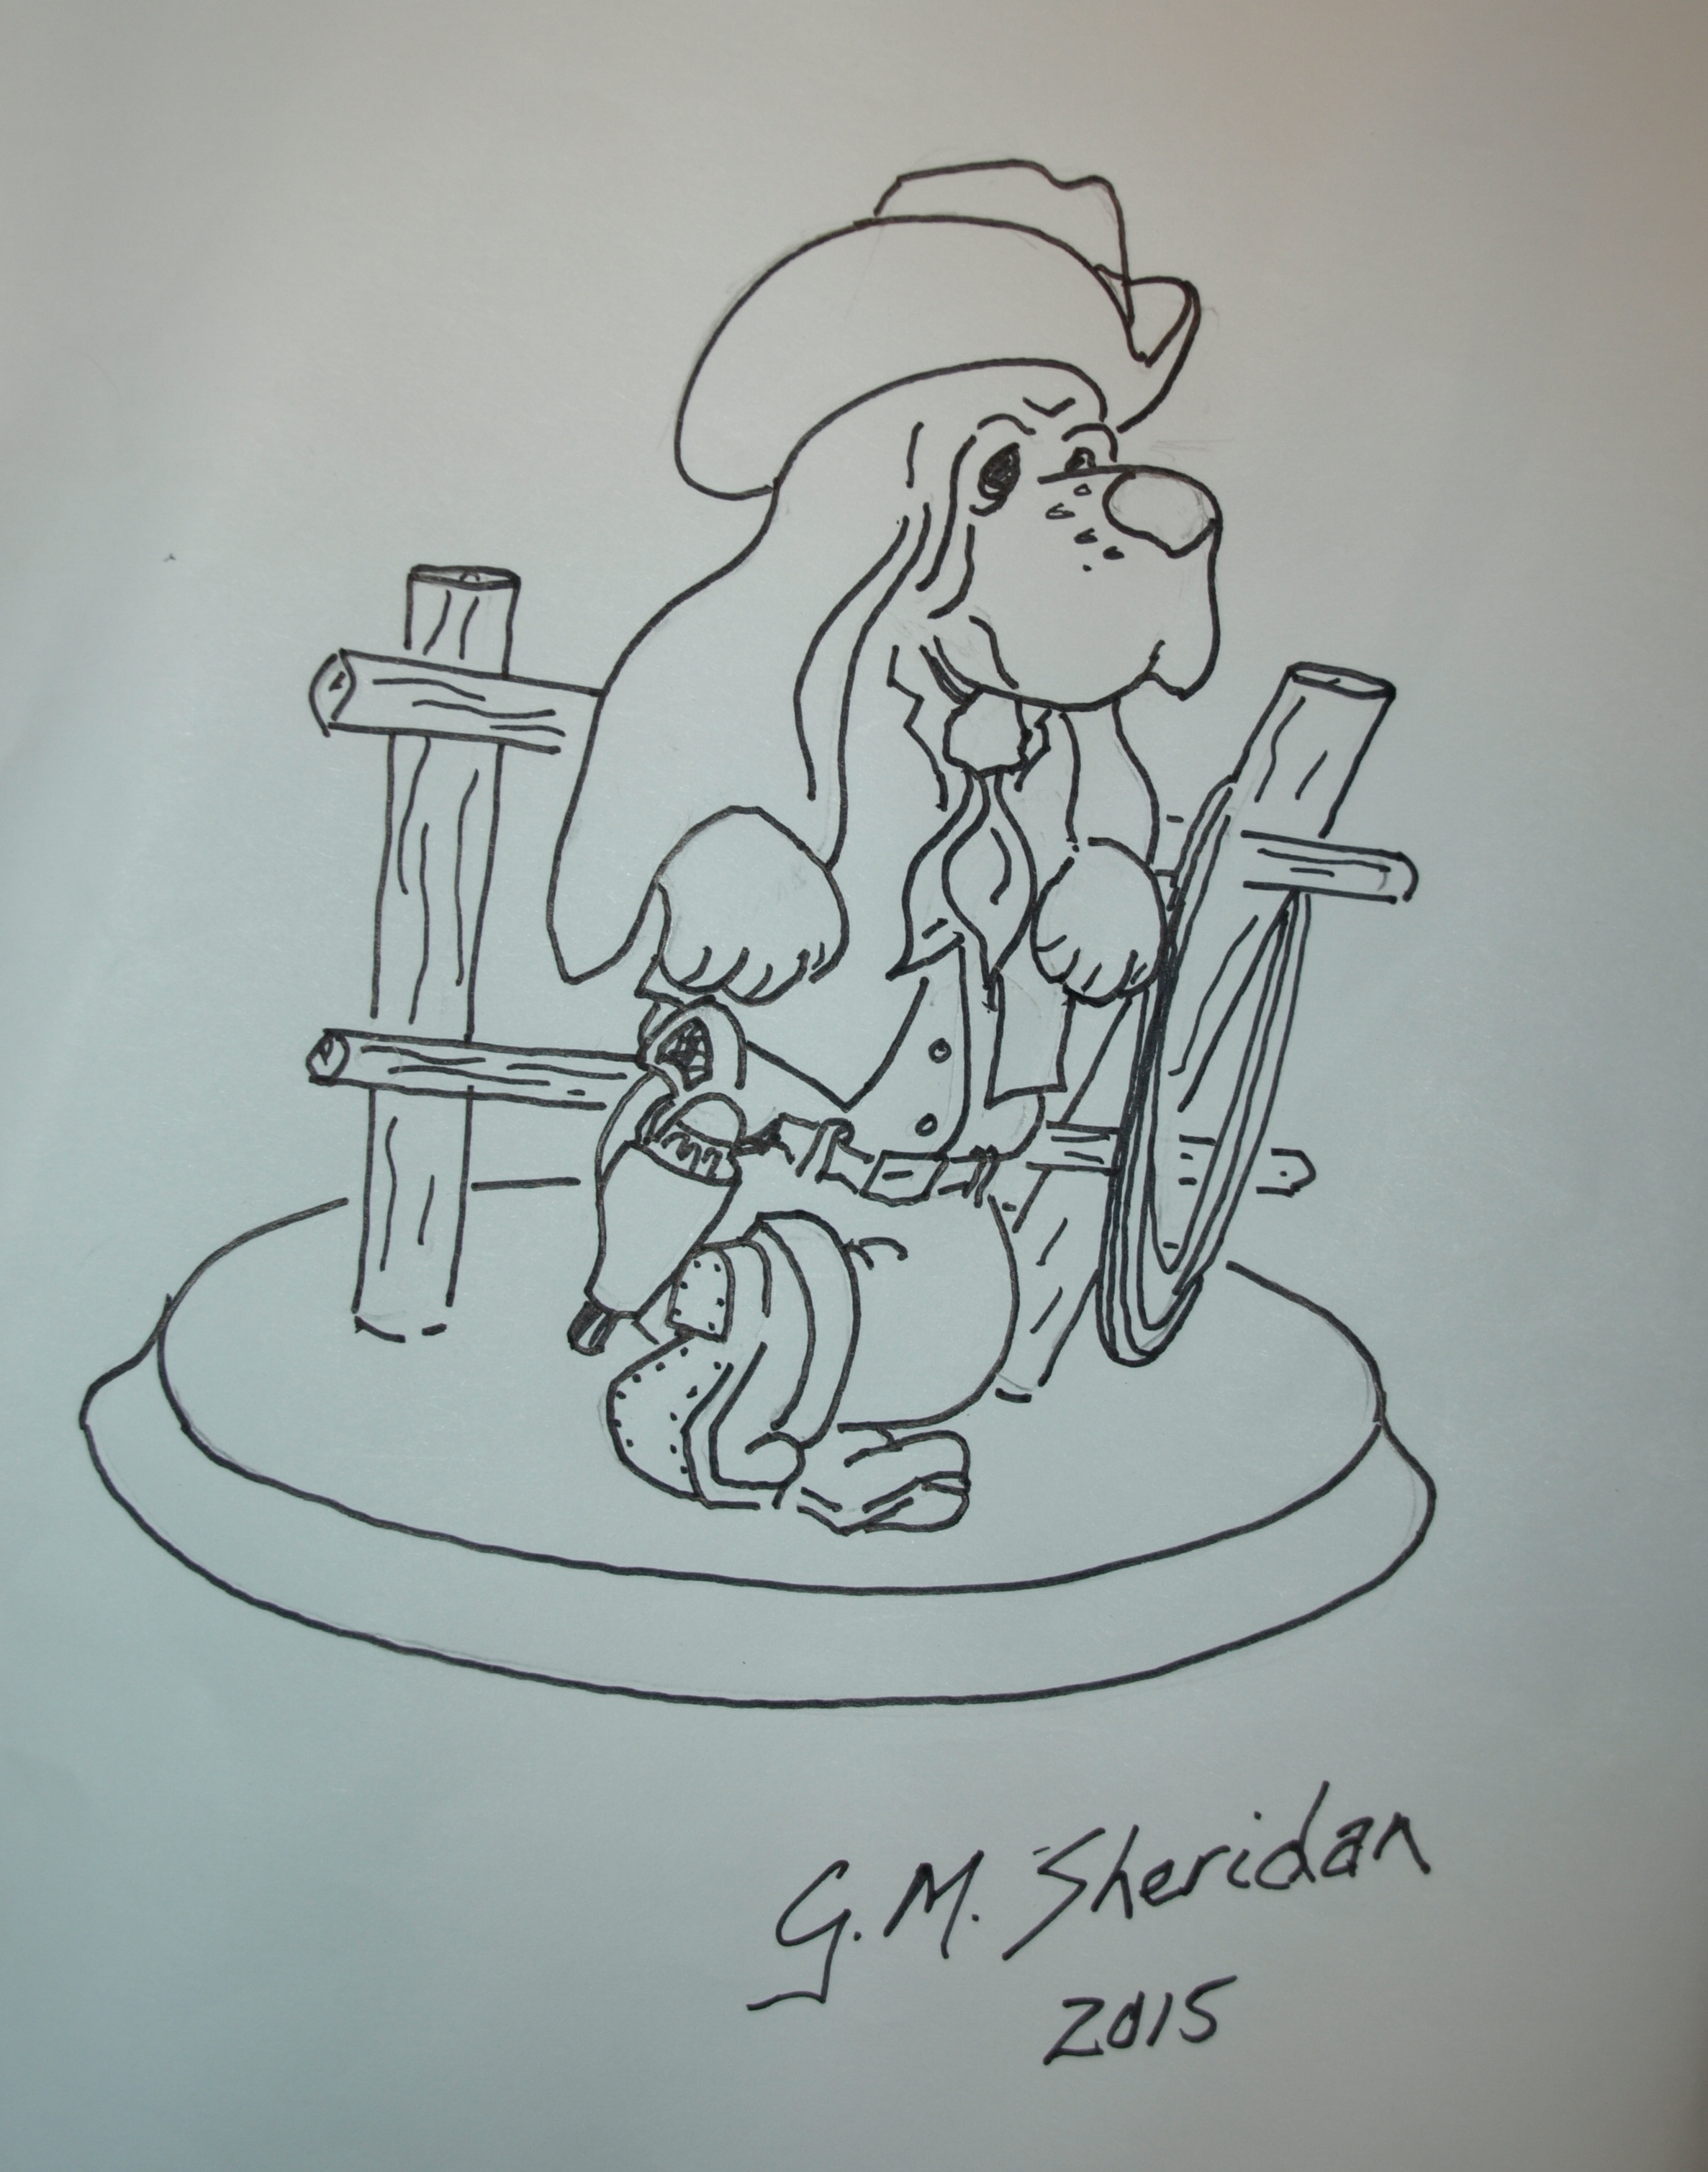
Our little Wrangler is coming along with some additional roughing in of what will become some nice detail…his boots, the start of a gun belt and additional belt for his pants, his vest, shirt and neckerchief.  He has that slightly leaning back posture that I’ll accentuate by slimming down the carving here and there.

I think I’ll rough in those arms now before going any further with the body so that I can get a good feel for how he’ll look leaning against that fence post.

Oh, and we’ve decided that we’re calling this Wrangler, Buford.  Not sure why.

OLYMPUS DIGITAL CAMERA

Back to the Snow

Well, we enjoyed a bit of sun this past week at DisneyWorld and saw all the characters, rode many of the rides, sat on the grass and soaked up some sun…then, returned to lots of cold and snow.  Oh well, it was nice while it lasted.

OLYMPUS DIGITAL CAMERA

Although I haven’t had a chance to return to carving since we’ve been home, I’ll include a little picture of how my cowboy hound is coming along.  I’ve roughed in the body and done a bit of detailing on the legs just to get a sense for the stance of this little guy.  Later this week I’d like to rough in a couple of arms and then start some detailing on the body.  I’m starting to picture this weathered ranch-hand taking a break from the work of the day.

OLYMPUS DIGITAL CAMERA

A Pretty Serious Wrangler

I’m having some fun with this little hound.  He’s turning out to be a pretty serious looking wrangler…someone’s who has seen his share of cow thieves.

With one eyebrow raised higher than the other in a suspicious gesture, eyes rolled off to one side looking for banditos and a thinner, more weather worn, face than I’ve carved for Bassets…he’s clearly a working, and hard working, dawg.

Oh…did I mention the droopy smoke hanging out of his mouth?  This carving is going to make a nice scene.

OLYMPUS DIGITAL CAMERA

The Cowboy Hat

Now that the head is at least roughed in for our little cowboy hound, it’s time to start thinking about a hat.  The hat is made in two pieces along the same lines as described by Lynn Doughty on his website OutWestWoodcarving.  Basically, the side view of the brim was outlined on a piece of basswood with the grain of the wood running from the front to the back of the brim.  After cutting out this profile, an elongated oval was cut ( looking from the top of the hat ) so that I ended up with the cut-out shown in the second photo, below.
OLYMPUS DIGITAL CAMERA

OLYMPUS DIGITAL CAMERA


Following that, I took a little bit off of the top of the hound’s head to make a flat area to sit the hat upon.  Using the method of applying some pencil lead to the top of the head and slowly chiseling away the impression of the lead that’s left on the hat, I ended up with a depression on the bottom of the hat brim that made a nice tight fit on the head.  This might seem a bit unnecessary to you, but you’ll find that having this depression makes the hat sit nicely on the head in a way that leaves you with the impression that the hat is fully covering the head and not just sitting on top of it.

OLYMPUS DIGITAL CAMERA


The crown of the hat was pretty simply made…just a quick cut out of an almost rectangle on the bandsaw and then some knife carving to get the rounded shape from the top view.  I say, rounded, but it actually is round with a bit of a point at the front.  That just seemed to look about right to me.  Then, I just used the same method of applying pencil lead to the brim and let it rub off onto the bottom of the crown so that all of the high points were highlighted by the lead markings.  A few ( actually, quite a few ) swipes with a shallow gouge removed those lead marks and ended up with the crown sitting nicely on the brim.  I should also mention that I added a hat band using a carving knife and a quick pass with a burning tool.

Hope you like things so far.


OLYMPUS DIGITAL CAMERA


OLYMPUS DIGITAL CAMERA

Roughing in the Head

The Wrangler Hound is starting to take some shape.  The general outline of his head was marked out on a piece of basswood and cut away on the bandsaw.  I intentionally cut the outline a little bit larger than I expect the carving to be when it’s completely so that I have room to cut in some deep wrinkles and folds that these little Basset Hound carvings end up having.

OLYMPUS DIGITAL CAMERA

I started off using a Typhoon bit and the Foredom tool to move some wood away quickly and do some general shaping.  I’ve mentioned before that Typhoon bits are very aggressive carbide tipped bits.  If you decide to use this method of blocking in your carving, you need to wear the appropriate protective gear…safety glasses, gloves, leather apron and either leather or very heavy sleeves.  Of course, you can use your regular knife to accomplish the same thing.

The roughed-in surface after the shaping with the Foredom tool and a bit of refining with a carving knife is looking like this.  Next step will be to cut a flat section along the top of the head and add in a weathered, droopy, cowboy hat.

OLYMPUS DIGITAL CAMERA


OLYMPUS DIGITAL CAMERA


My Project List

I wonder if everyone has a project list full of ideas?  I love having a project list…always have.  As a kid, I used to look forward to the Fall just because I knew that I’d be down the basement working on a project…usually a model airplane.

One of the newer additions to my list, one that I introduced a little while ago, was my notion of a hockey-player sitting in the penalty box following a bit of a scuffle.  I’ve pretty much completed the head and helmet, but ran into a little trouble with the body…I just can’t seem to get the right orientation of the shoulders and arms…or, at least, something that is going to make me happy with the final carving.  So, I’m going to try something that I’ve not tried before and that’s using modelling clay to create a three dimensional body figure that I can use as a model for the carving.

Carving wood is a bit unforgiving…once you’ve carved away too much, well, you’ve carved away too much.  Many carvers first develop a clay model where, of course, you can add or take away clay to your heart’s delight, and, once your satisfied, turn your creation into a wood carving.  I’m going to give it a try with my first ever block of clay!

Don’t laugh if this doesn’t turn out.

Another project that I’ve started involves a…wait for it…Basset Hound!  Not sure what I’ll call this carving yet but am feeling like this particular little hound may end up with a touch of attitude.  Especially, with that six-shooter hanging in his holster.

Here’s a quick sketch of what I have in mind.  Stay tuned.

OLYMPUS DIGITAL CAMERA

Photo-Op for a Country Hound

Our little Country Hound is finished and has now sat patiently for his photo-op.

I’m pretty pleased with the way that this little carving  has turned out.  Thanks to Lynne for her ideas on this carving as I would not have come up with this composition on my own.  It was fun to carve and complete.

I’ll put some additional photos on the Flickr site ( link at the side of this page ) a little bit later today.

OLYMPUS DIGITAL CAMERA

OLYMPUS DIGITAL CAMERA

OLYMPUS DIGITAL CAMERAOLYMPUS DIGITAL CAMERA

Some Rug Braiding

I’ve done some rug braiding tonight and the rug is now ready for paint!

The planked floor and the shaped base beneath it also got some stain and urethane earlier this week, so the base is coming to completion.  I’ve typically painted the wood grain lines on the plank floor with acrylic paints, however, in this case, the planks are running parallel to the grain in the oak base and, given that the grain is very fine, an oak finish looked just right to make a true-to-scale rendition of a floor.

OLYMPUS DIGITAL CAMERA


After doing some sanding, the edge of the base got a darker stain than the planked floor just to make the perimeter stand out.  I also included some small nails at a few of the plank joints in the floor just to add some more interest.

My next step will be to use some acrylic paints to provide a multi-colour rug pattern within the “braided” lines that I’ve already burned in with a wood burner.  I’m planning to use diluted “washes” of a number of colours so that the rug ends up not looking too bright…I’d prefer something that looks well used.

The Base Takes Shape

Well, I decided on a circular base as I mentioned in the last post…so, this morning I did the routering and spent a bit of time carving an oval “braided” rug and a few hardwood slats into the top of the base.  I’m just in the process of using a wood burning tool to show the braiding in the rug cord.  I think that once it’s finished and painted it’s going to look pretty good.

OLYMPUS DIGITAL CAMERA

OLYMPUS DIGITAL CAMERA

In non-carving news, Rosie and I got a bit of snow-frisbee in today.  We also learned a new trick…snow angels…kinda like a normal “roll-over” trick but done in the snow!

OLYMPUS DIGITAL CAMERA

Starting the Base

The Country Hound carving is now finished, has been glued together and has received a light coat of urethane to protect the acrylics.  I like the way this carving is turning out.

The base has been cut from a piece of oak and I’m just getting a sense of how I’d like it to look.  I’m picturing that rocking chair sitting on a wood floor with a throw rug.  I’m going to play around with that for a little while and see what turns up.

For now, here’s how it’s looking.

OLYMPUS DIGITAL CAMERA

OLYMPUS DIGITAL CAMERA

Post Navigation