You know, I’ve never carved a Santa. I always think about carving one just before Christmas and by the time I get around to things, Christmas is over and I’m on to something new.
This year is different…maybe. At least I’ve started on a Santa.
So, here’s how I’m coming along with it. Started with just a quick sketch directly on the basswood and then went from there. I threw it out twice before finishing it! I’ll do a bit more wood burning to clean up a couple of spots and then on to painting.
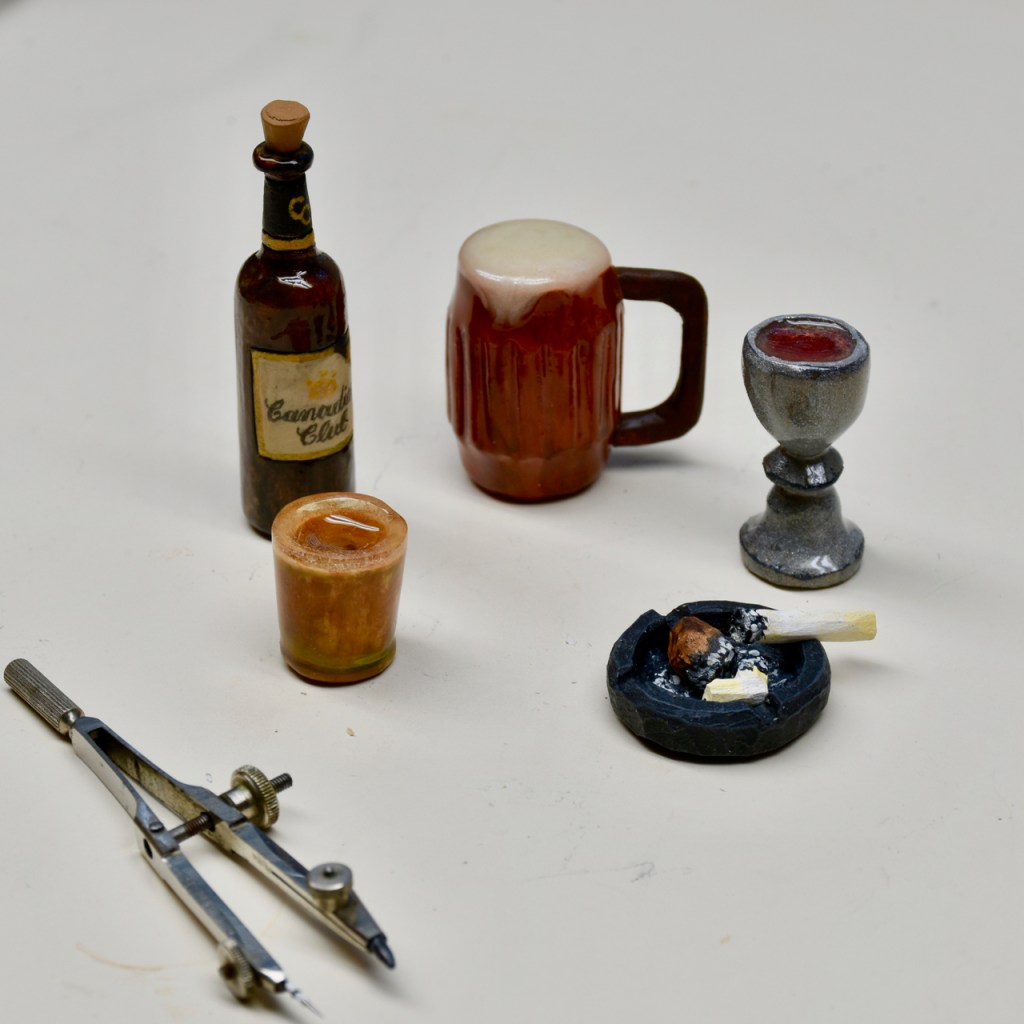
The “Props” were actually a lot of fun to make and they turned out ok.
The Vicar’s wine goblet was just carved and sanded and then painted with silver acrylic paint. I mixed a few drops of reddish-brown into a little pool of clear epoxy and dropped it into the cup. The outside of the goblet got a coat of clear epoxy to give it an ultra shiny appearance.
The shot glass was carved and then I built up just about a 1/16th of an inch of epoxy around what would be the rim. I sanded the epoxy as flat as I could and then painted the wood and again covered everything in epoxy. I’m not over-the-moon about it…but it’s ok.
The beer mug was also carved with the handle being added separately. I hollowed out the rim area and after painting the wood, I added some flour to the epoxy and “frothed” it up by stirring it for a while. When I came back to check it, a little drip had formed over the edge of the “mug” and I thought that looked pretty good.
I think that the ashtray is my favourite piece. Just carved and painted it followed by a satin urethane finish.
So, here’s how it all came together. I should mention that I went with the very long caption on the carving so I ended up painting the caption on a base that I made. To get a bit of a template for the script, I printed it out on a Powerpoint program ( in reverse ) and then rubbed the ink-jet printed paper onto the base. It came out pretty light but I just wanted it as an indication of how to space the script…I followed up with a small brush and black paint.
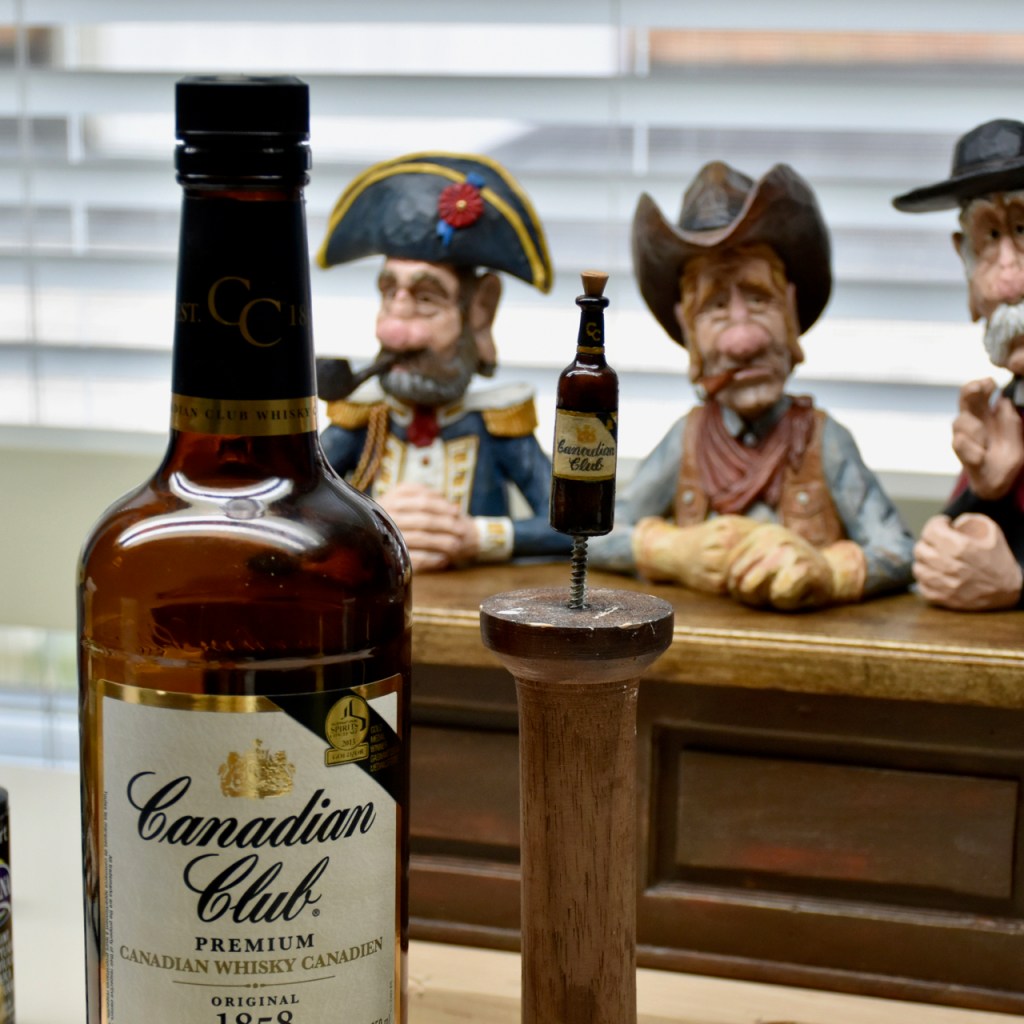
Well, first you start by putting a bottle on your work table. Then, without touching the bottle, you carve the shape of the bottle and then sand it. After you sand it and, again, without touching the bottle, you use some asphaltum, burnt umber and black to get the right shade of the bottle. Then ( don’t touch the bottle ), you use a light beige to create the label and outline it in gold. And then, with a soft HB pencil, you draw in the label script. Apply a bit of satin urethane on the painted label and paint the rest of the bottle with 30 minute epoxy to give it a nice gloss.
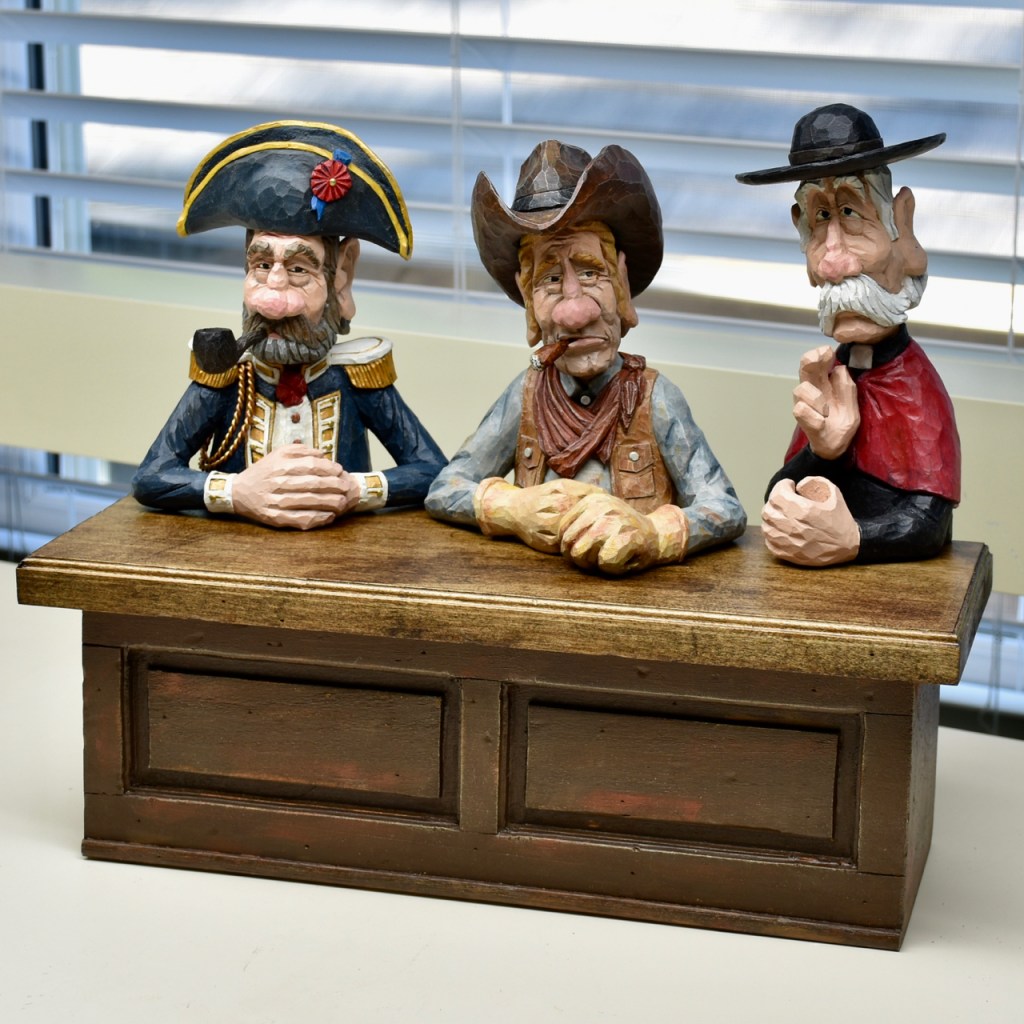
The Vicar followed the same steps as I took in making the Admiral and the Cowboy. I gave him a little cape to bring some colour into the figure and then it was on to building the bar.
The “box” of the bar is just a solid piece of basswood. I used a dremel tool to router some inlays into the front of the bar. The top is a separate piece of hardwood and, again, I used the dremel tool to make a bit of a decorative edge.
I painted the bottom with some house latex paint that I had laying around and then added some highlights with asphaltum, burnt sienna and raw sienna. I then dusted it up a bit with some “desert sand” dry-brushing. The top of the bar got a walnut stain.
After beating it up gently with a small hammer to give everything a well-used-bar look, I put a coat of satin urethane over everything.
I still want to add some details ( like drinks for the poor fellows ), but I’m really pleased with the way it’s looking.
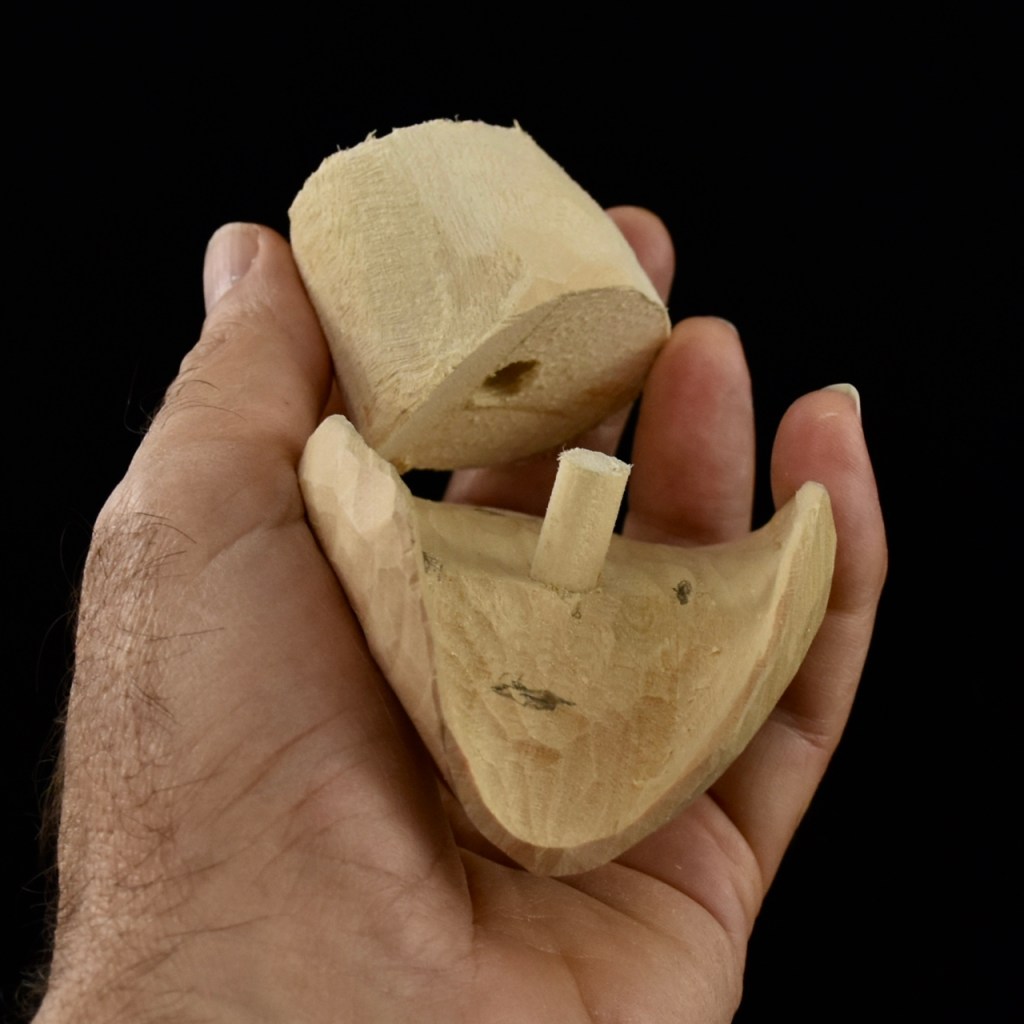
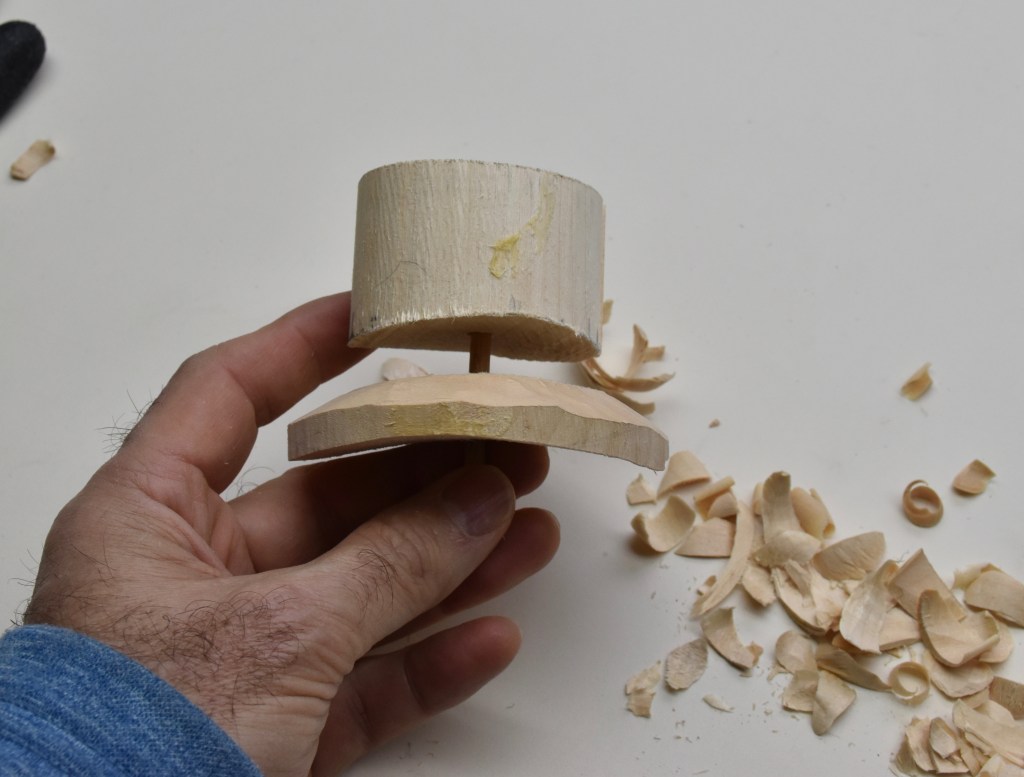
Again, I started with a quick clay model and then used it to make a very simple line diagram on the front and side of a block of basswood that I brought to the bandsaw to do its magic. After some roughing out with a Foredom tool equipped with a very aggressive Typhoon bit ( and, again, be careful using these ), this is what the rough-out looked like. I had already carved the head for this piece, so I just drilled an oversized hole for its placement.
The hat was created in the usual manner with the crown and brim separate so that the grain matched the strongest direction. The head is cut away to accept the brim of the hat.
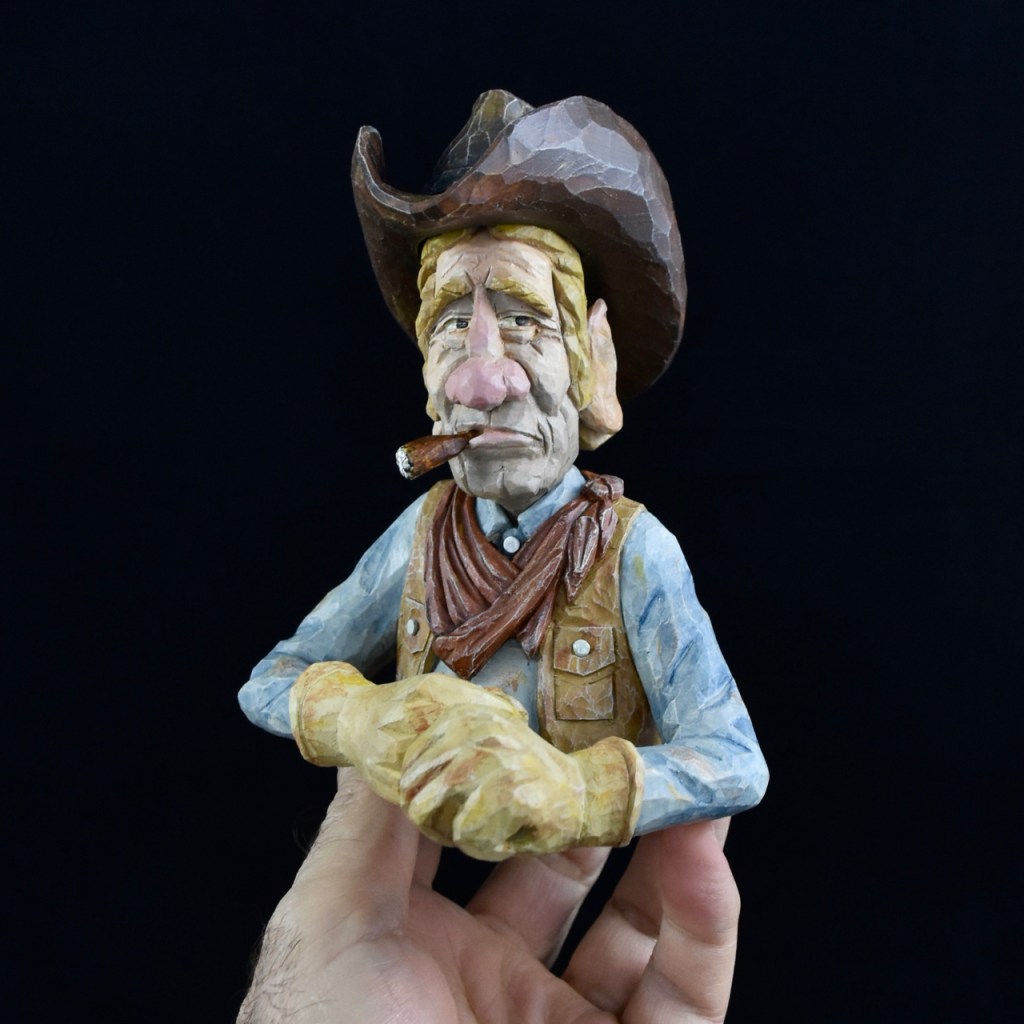
Then, with knives and a few small gouges, I started adding detail. The neckerchief, gloves and vest were a must for this ranch-hand. I used a dilute coat of urethane over the entire carving to seal things up and to harden any “fuzzy” sections that I later sanded lightly away.
Yellow ochre, chocolate brown, asphaltum ( why is it so hard to get that colour at stores right now? ), midnight blue ( light washes ) and dabs of yellow ochre and raw sienna here and there gave the little guy a nice set of working clothes. The final finish was with some dry-brushing to highlight the high points of the carving followed by a satin urethane finish. I really like Lynn Doughty’s methods and, in particular, his application of the urethane…so, check out one of his tutorials on Outwestwoodcarving to get a step-by-step “how-to” on this method.
I’m moving slowly along on my game show idea featuring a British Admiral, a Sherlock Holmes type Investigator and a Cowboy. I did get one point wrong on my last post, though…the original 60’s and 70’s gameshow wasn’t called “What’s My Line” ( that was another show that I used to watch )…the one that I’ll be mimicking was called “To Tell The Truth.”
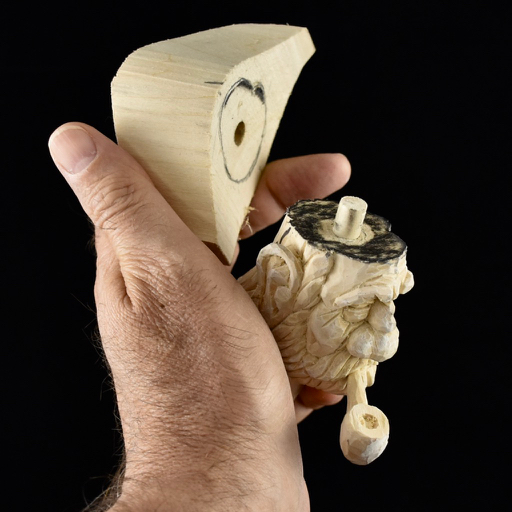
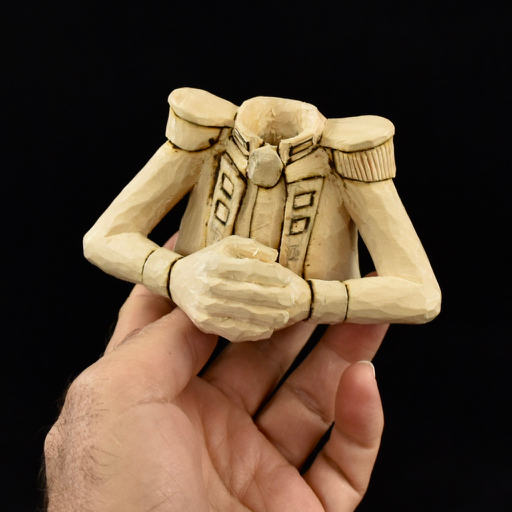
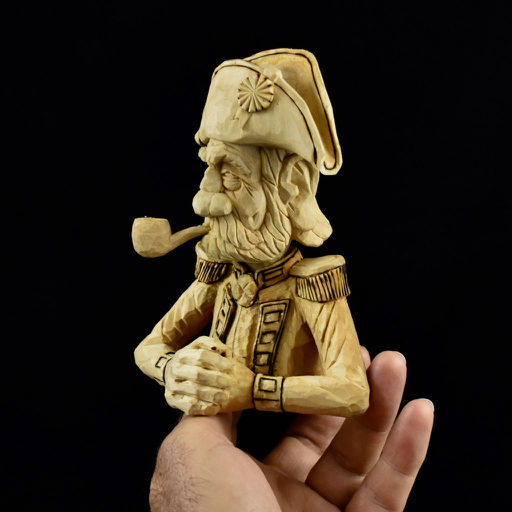
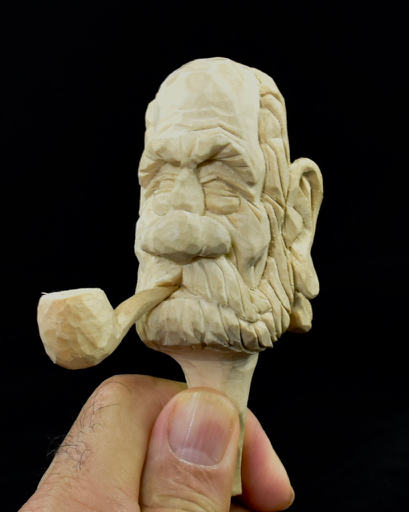
So, you’ll recall that I started off with the three heads that I carved, one of which looked like a Naval Officer…thus, Lord Horatio Weatherbee of the British Admiralty! I got things started with some clay to get a bit of an idea of what I was after as well as to set up a paper pattern to cut out the basswood blank.
From there, a combination of a Foredom “Typhoon” bit followed with a knife and gouge resulted in the basic hat and body. By the way, I found out in the process that the hat is called a “bicorne”…didn’t know that. I used the usual method of transferring lead pencil markings from the head to the hat to seat the hat very precisely on the head. Check out one of Lynn Doughty’s great videos on Outwestwoodcarving if you need a bit more of an explanation on this method. You can see that I also used a burning tool to clean things up as I went.
The final piece prior to painting looked like this.
For final touches, I added some copper wire which I twisted together into a braid by chucking the wire into a battery operated hand drill and operating it at a low speed. Brass decorative finishing nails and some acrylic paints with a satin urethane finished it off.
This is probably the first time that I’ve just started carving heads not knowing what the project would end up looking like. Now that the heads are fairly complete, though, I’m starting to get some ideas.
Do you remember the old game show called “What’s My Line?” They’d introduce someone, say an airline pilot, and then contestants would try to guess who was actually the airline pilot amongst three people…the actual pilot and two imposters.
I was thinking about carving a bust for each of these heads…a Cowboy, a Sherlock-Holmes style Investigator and a Naval Officer of old. The busts would be situated on and behind a panel top with the words “What’s My Line” carved into the front. It would look like the original game show.
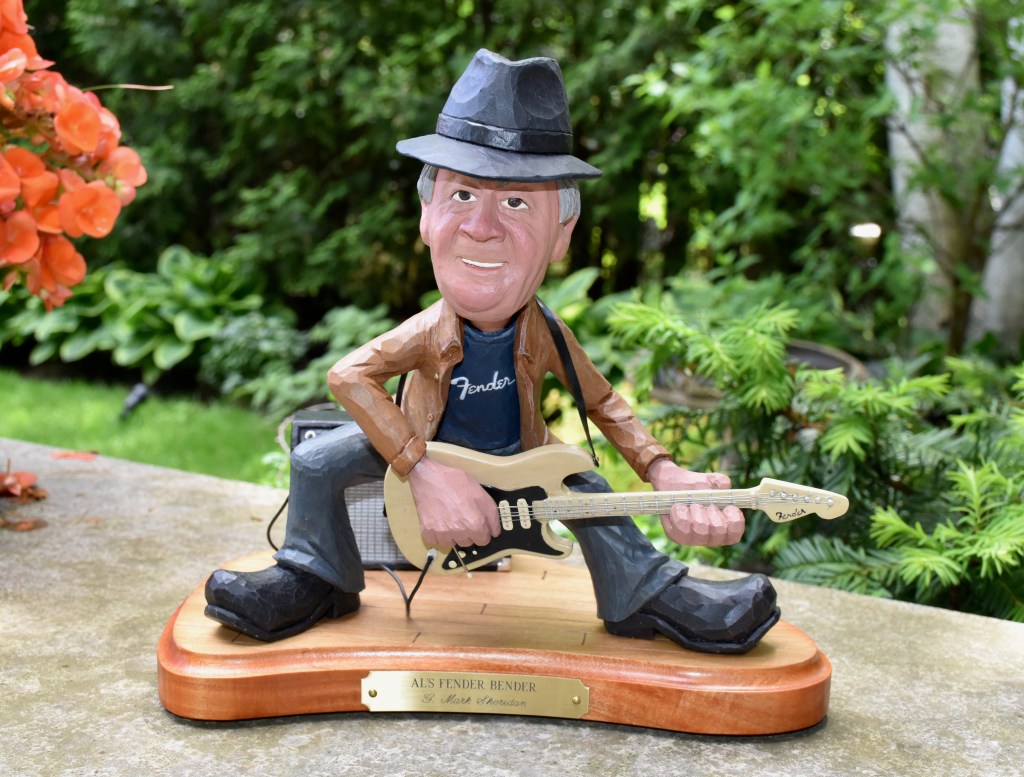
Well I had fun doing this carving as it was a bit of a departure from my other caricature carvings in that it was meant to resemble a specific person.
My friend, Pat, asked me to do a caricature of her husband, Al, ( also a friend!) doing what he enjoys…rocking on with his Fender guitar and amp. As it was a birthday surprise that he only received this past Friday and as he and Pat tend to follow what I’m doing on this blog, I had to wait to publicize things…so, here it is!
I started with a few photos that Pat sent me and downloaded a few additional photos of the Fender Stratocaster and amplifier that Al owns. Once again, I did the figure in clay and then used the clay figure as a model for the carving. The clay work was particularly helpful when modelling the face…I think that I would have gone through a lot of failed attempts if I had tried to do the initial resemblance in wood!
I actually started with the guitar and amp. The guitar is made from oak and I cut out the blank and added details based on a print-out that I made from a local music shop website…the nice part of doing this is that I was able to make the exact size that I wanted by reducing the print size to what I wanted and then just cut it out on the bandsaw. After some carving, some acrylic paint to simulate the wood grain and several coats of gloss urethane…pins, nails, metal tape and fine wire went into making up all of the details. The amp was made from basswood and includes some screws and metal tape. The amp screen was produced with a v-tool and several coats of alternating white and silver acrylic paint.
I did my typical carving of the head and hat separately using calipers that you see in the photo for measuring from the clay and then started into the body.
Once again, I kept the arms separate so that the grain direction of the wood was aligned as best as possible along the length of the arms. I had considered an additional joint at the one elbow but felt that the grain direction was pretty good and that glueing and pinning the “strumming” arm to the guitar would give it ample strength…plus, Al’s pretty careful with things!
The base is maple with a few lines that simulate floor planking. A few buttons ( decorative nails ) were added to what became a leather jacket and the Fender logos were painted on the guitar, amp and t-shirt.
I really enjoyed this project but the most enjoyment, by far, came from the smile on Al’s face!
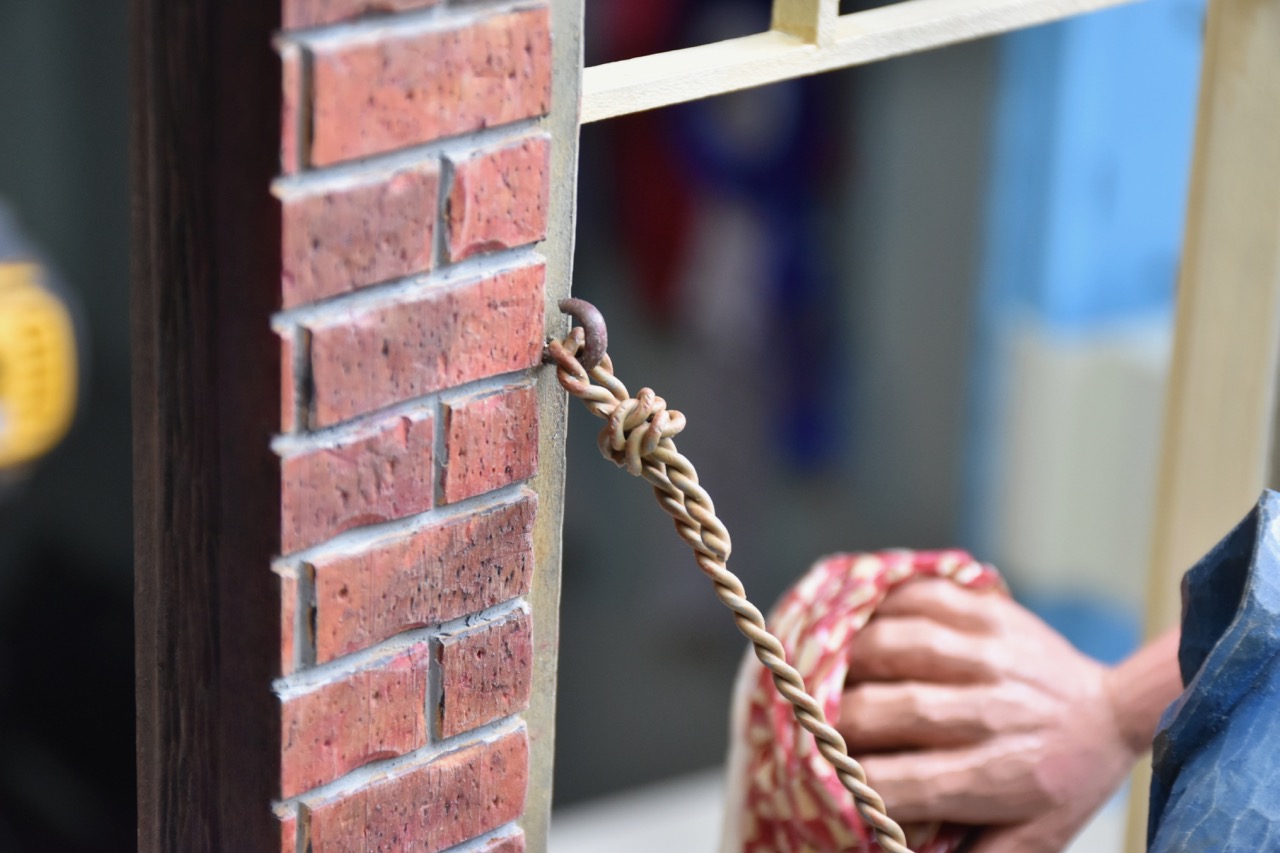
Wendell needed a rope seat to lean back against as he’s washing the windows, so I grabbed some household electrical copper wire to fashion the ropes.
I chucked up just two strands of copper wire into my battery operated electric drill and with the other ends of the wire wrapped around a nail that I drove into my work table, I slowly wound the wires into a rope. To make the knots that I needed, I just took an inch or so length of this wound wire and curled it into something that looked like a knot. These curled pieces were later just slipped over the “rope” and crimped and glued in place.
The hooks that were glued in place on the window sills are cotter pins that were cut in half.
Everything got a light sanding, a coat of primer, some acrylic paint and finished with satin urethane. I’m happy with the way that they turned out.
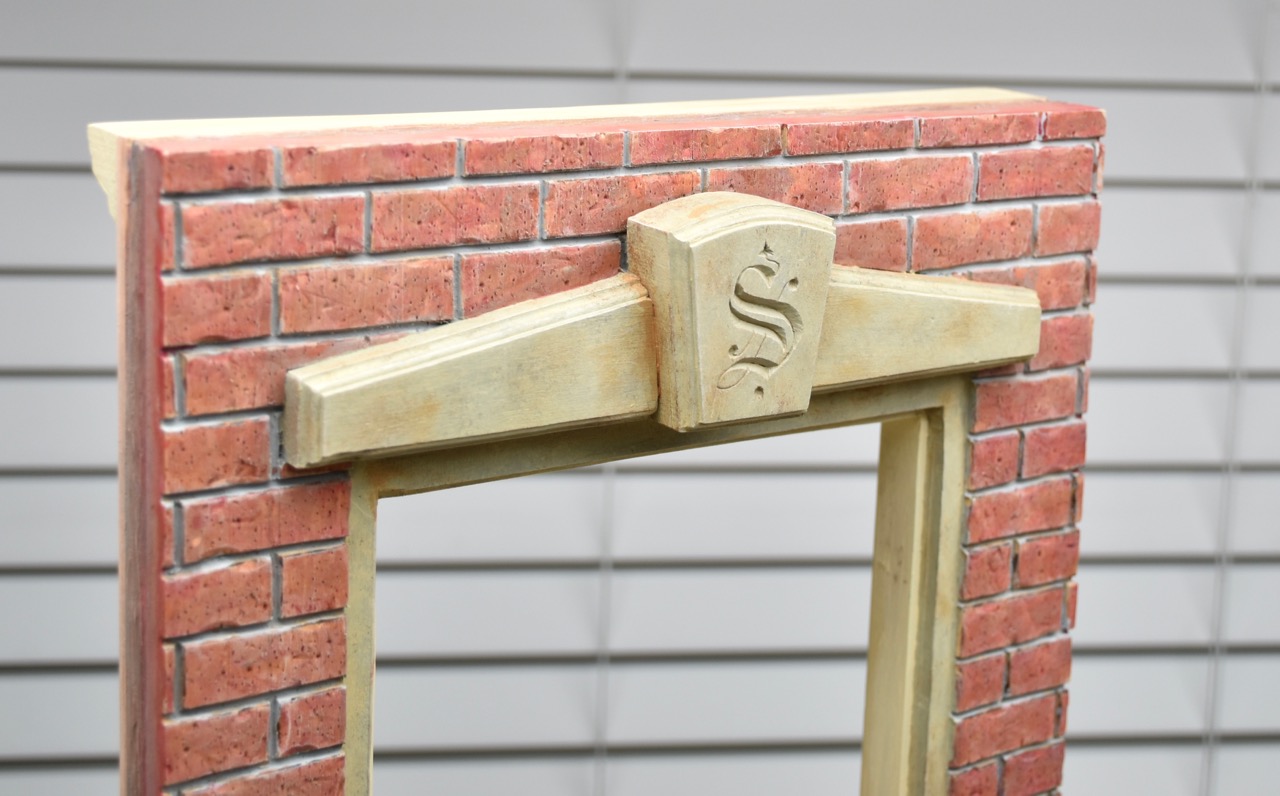
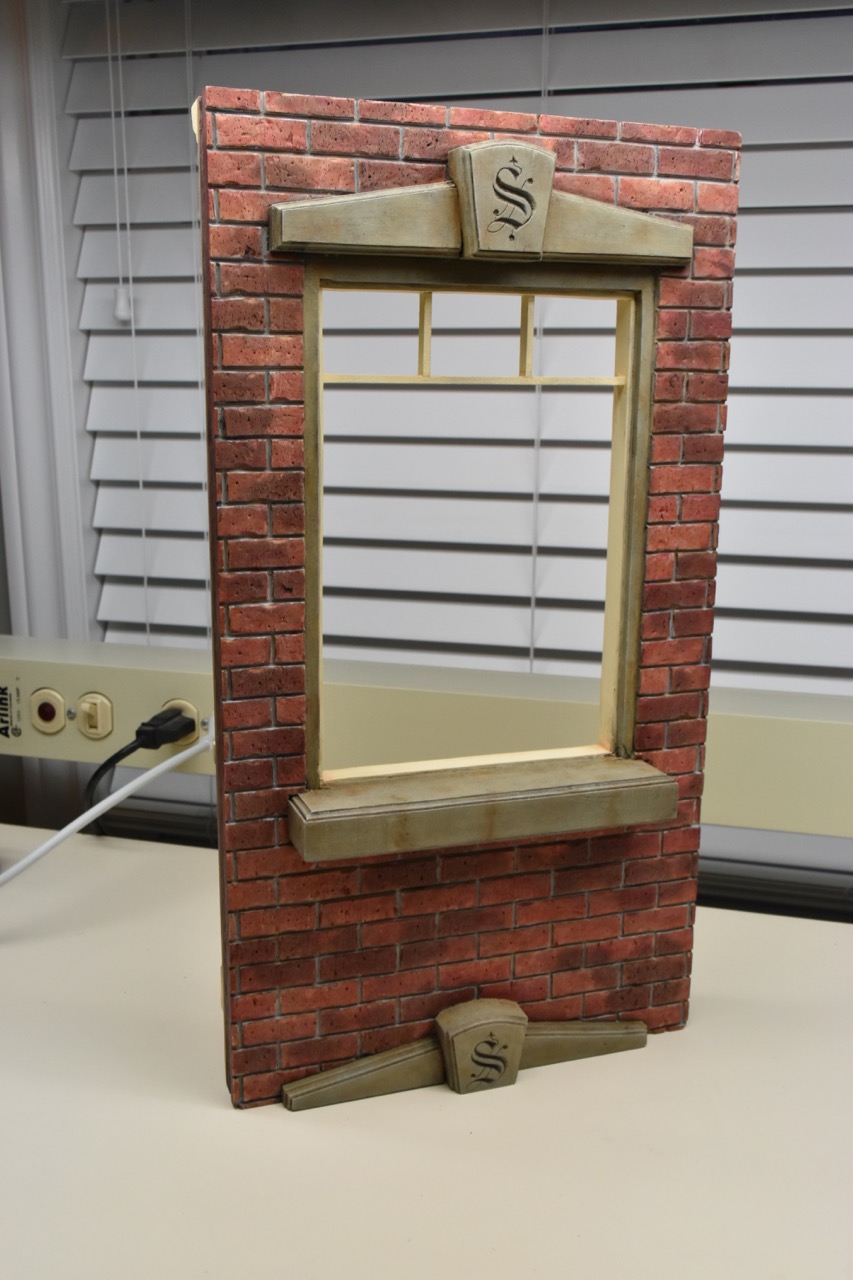
You can look back at an earlier posting of when I created the brickwork and the stonework for this carving…just look under “Themes” for “Missed A Spot” and scroll back to see the original wood version of what follows.
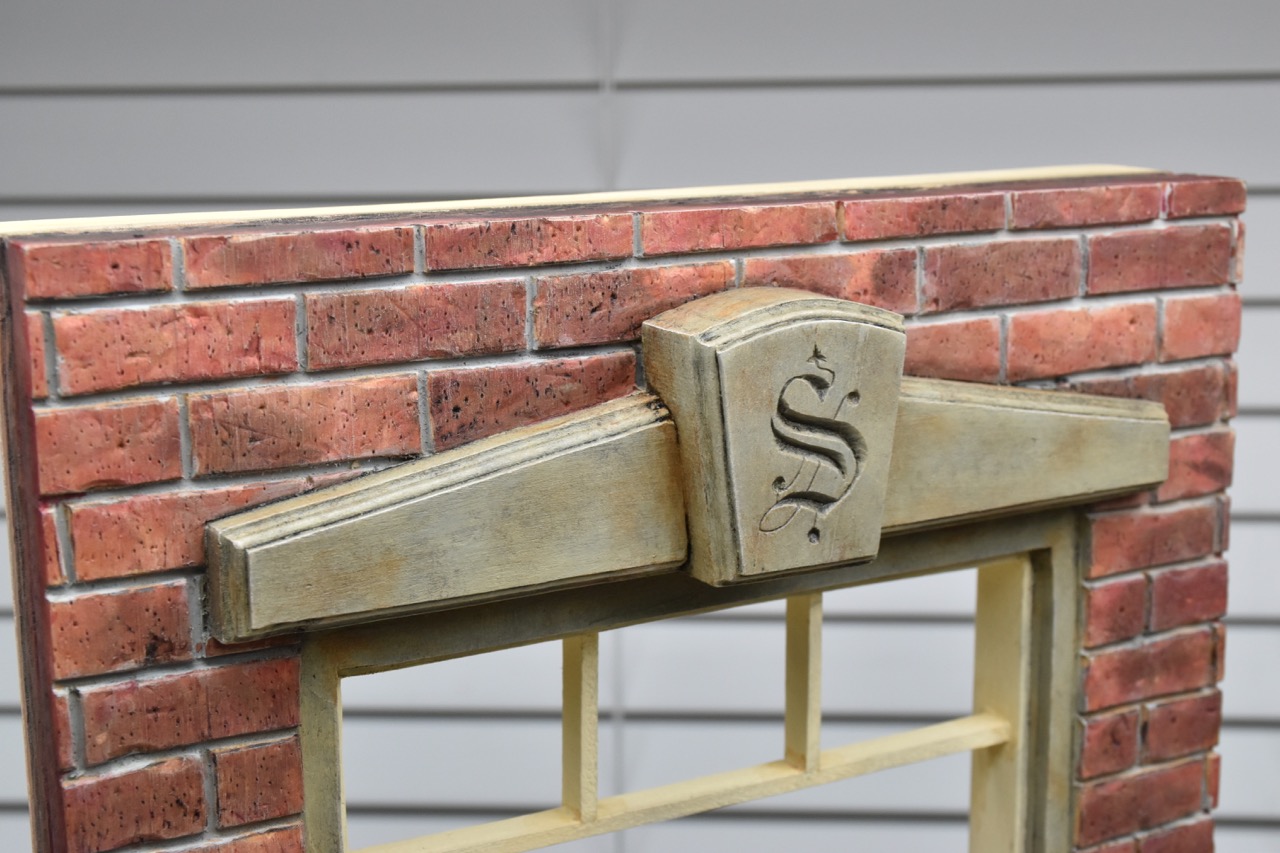
The painting was fun. I started with the stonework by initially carving in a stylized “S” onto the two keystones. I found a nice font on the web, flipped the image vertically and then printed it off on an ink-jet printer. With the letter now printed backwards, it was a simple matter to rub the back surface and leave a faint image directly on the wood. A sharp knife and a bit of wood burning then created the image into the wood. I suppose we could argue that the “S” is like the Sheraton chain, but I’m going with Sheridan.
The stone ledges and headers were initially painted a light grey and then were covered with multiple “washes” of a sand coloured beige, yellow ochre and light grey. I then finished them up with some age related “stains” of yellow ochre, burnt sienna and asphaltum in the corners and “dripping” down the edges.
The mortar between the bricks was painted first with a light grey. I then dabbed more than brushed on a brown/red combination followed by some grey and yellow ochre. The dabbing was effective in giving the bricks a mottled look…I was careful to dab the colours randomly.
Now the kicker: I remembered using an antiquing stain back ( way back ) when Peggy and I dabbled in ceramic painting. I’m not sure how to describe this but I’m sure that it still can be purchased at ceramic shops or hobby shops. It’s black, looks similar to a wood gel-type stain and has a slight solvent smell. With a bit on the end of an artists brush, I dabbed an area of several bricks with this black stain and then wiped it off with a paper towel. I used the same stain on the stonework, but in that case I painted the complete stone and then wiped off the stain.
Here are some pictures that show the “before” with just the acrylic paints and the “after” with the stain applied. I’m pretty pleased with how it turned out and I’m looking forward to seeing how it looks with the urethane finish coat.